


If you’ve been using Metamask for your cryptocurrency transactions, you might have noticed that it only supports a limited number of tokens by default. However, the good news is that you can easily add your favorite tokens to Metamask so that you can seamlessly manage and exchange them within the wallet.
Adding tokens to Metamask allows you to have a more comprehensive view of your crypto portfolio in one place. It also enables you to interact with various decentralized applications (dApps) that utilize these tokens, without the need to switch between different wallets.
In this step-by-step guide, we will walk you through the process of adding tokens to Metamask. Whether you want to add popular tokens like Ethereum or Bitcoin, or even more niche tokens, this guide will provide you with all the necessary information you need to get started.
Step 1: Open Metamask and Access the Wallet
To begin, make sure you have Metamask installed in your preferred web browser. Open Metamask and enter your password to access your wallet. If you haven’t installed Metamask yet, you can easily find it as a browser extension for most popular web browsers.
Step 2: Click on the “Add Token” Button
Once you’re inside your Metamask wallet, locate the “Add Token” button, usually found at the bottom of your token list. It may also be under the “Assets” or “Tokens” section, depending on the version of Metamask you are using. Click on this button to proceed.
Step 3: Select the Token Network
A dialog box will appear after clicking the “Add Token” button. Here, you will need to select the token network that the token belongs to. Most tokens are either on the Ethereum network or on Ethereum-compatible networks. Choose the appropriate network from the drop-down menu.
Step 4: Enter Token Details
In this step, you will need to input the specific token details to add it to Metamask. These details usually include the token contract address, token symbol, and decimal precision. Don’t worry if you’re not familiar with these terms; they can be easily obtained from reliable sources such as the token’s official website or popular cryptocurrency tracking platforms. Fill in the required fields and click on the “Next” button to proceed.
Step 5: Confirm Token Addition
After entering the token details, Metamask will verify the information and display a confirmation screen. Double-check the token details to ensure accuracy. If everything is correct, click on “Add Tokens” to finalize the process.
Once you’ve followed these steps, the token should now be successfully added to your Metamask wallet. You can now view and manage your added tokens alongside your existing tokens. Keep in mind that adding a token to Metamask doesn’t mean you own the token, but it allows you to interact with it within the wallet and access dApps that are built on top of the respective token network.
With the ability to add tokens to Metamask, you can create a personalized and comprehensive wallet experience that suits your needs. Enjoy the convenience of managing and exchanging your favorite tokens within one secure interface!
What is Metamask?
Metamask is a web extension wallet that allows users to interact with the Ethereum blockchain. It serves as a gateway between users and decentralized applications (dApps) on the Ethereum network. With Metamask, users can securely store, send, and receive Ether (the native cryptocurrency of Ethereum) and other tokens.
Metamask functions as a bridge between traditional web browsers and blockchain technology. It injects the necessary Ethereum web3 API into web pages, enabling users to seamlessly interact with dApps without having to rely on a separate wallet or browser extension.
Metamask provides users with a unique Ethereum wallet address, which they can use to manage their Ethereum-based assets. In addition to storing and transferring Ether, Metamask also supports the integration of custom tokens, allowing users to add and manage various ERC-20 and ERC-721 tokens.
Overall, Metamask offers a user-friendly and intuitive interface that simplifies the process of interacting with the Ethereum network. It is a widely used wallet among Ethereum enthusiasts and developers, making it an essential tool for anyone looking to participate in the Ethereum ecosystem.
Why would you want to add tokens to Metamask?
Metamask is a popular Ethereum wallet that allows users to store, manage, and interact with tokens on the Ethereum blockchain. By adding tokens to Metamask, you unlock a range of possibilities:
- Diversify your portfolio: Adding tokens to Metamask allows you to hold a variety of different cryptocurrencies in one place. This can help you diversify your investments and take advantage of different market opportunities.
- Access to new tokens: Many new projects and cryptocurrencies launch as tokens on the Ethereum network. By adding tokens to Metamask, you can stay up-to-date with the latest projects and participate in their token sales or airdrops.
- Interact with decentralized applications: Metamask is not just a wallet but also a web3 browser extension. Many decentralized applications (DApps) require users to have specific tokens to interact with their platforms. By adding tokens to Metamask, you ensure that you have the necessary tokens to fully utilize these DApps.
- Send and receive tokens: Adding tokens to Metamask allows you to easily send and receive tokens from other Metamask users or external wallets. This can streamline your token transactions and make it more convenient to manage your token holdings.
- Track token balances: By adding tokens to Metamask, you can easily monitor the balance of each token in your wallet. This gives you a comprehensive view of your token portfolio and allows you to track the value of your holdings in real-time.
Overall, adding tokens to Metamask expands the functionality and versatility of the wallet, allowing you to engage with the Ethereum ecosystem in a more comprehensive way.
Benefits of adding custom tokens to your Metamask wallet
Adding custom tokens to your Metamask wallet offers several advantages:
- Diversification: By adding custom tokens, you can expand your investment portfolio and diversify your holdings beyond just popular cryptocurrencies like Bitcoin and Ethereum. This allows you to take advantage of the potential growth in other tokens and maximize your investment opportunities.
- Access to exclusive projects: Many innovative blockchain projects issue their tokens, which can only be accessed by adding them to your wallet. By adding custom tokens, you can participate in token sales, initial coin offerings (ICOs), and decentralized finance (DeFi) projects that may have high potential for returns.
- Easy tracking and management: Adding tokens to your Metamask wallet makes it easier to track your holdings and manage your investments. You can view your token balances, transaction history, and overall portfolio performance all in one place.
- Seamless transactions: Once you add custom tokens, you can seamlessly transact with them directly through the Metamask wallet interface. This eliminates the need to use separate wallets or exchanges, simplifying the process and saving time.
- Increased liquidity: Adding custom tokens can potentially increase liquidity as you can easily buy or sell them directly from your Metamask wallet. This allows you to quickly capitalize on trading opportunities and manage your assets more efficiently.
- Staying updated with the market: By adding custom tokens, you stay informed about the latest projects and trends in the blockchain space. This gives you a competitive edge as an investor and helps you stay ahead of the curve in this fast-evolving industry.
Overall, adding custom tokens to your Metamask wallet opens up a world of possibilities for diversifying your investments, accessing exclusive projects, and managing your assets more efficiently. It’s a simple step that can have significant benefits for your cryptocurrency journey.
Step-by-Step Guide to adding tokens to Metamask
Metamask is a popular wallet for storing and managing cryptocurrencies, and it allows you to add custom tokens to keep track of your holdings. This step-by-step guide will show you how to add tokens to Metamask so that you can easily monitor and transact with them.
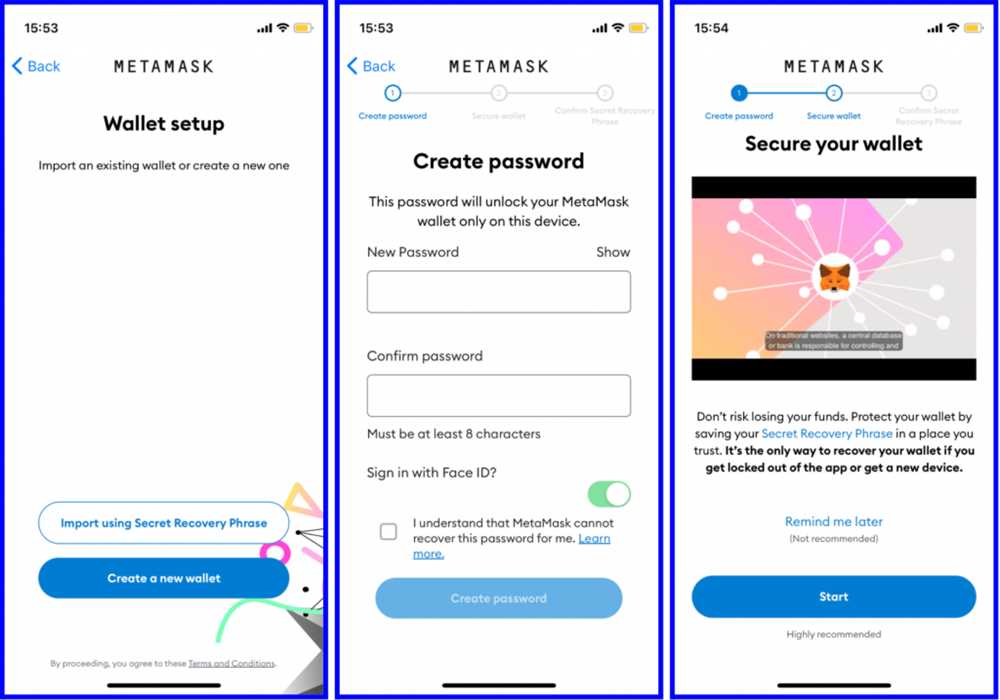
Step 1: Install Metamask
If you haven’t already, download and install the Metamask extension for your browser. Once installed, create a new wallet or import an existing one by following the on-screen instructions.
Step 2: Access the Metamask wallet
Click on the Metamask extension icon in your browser toolbar to open the wallet. Enter your password or complete any authentication process to unlock your wallet.
Step 3: Add a custom token
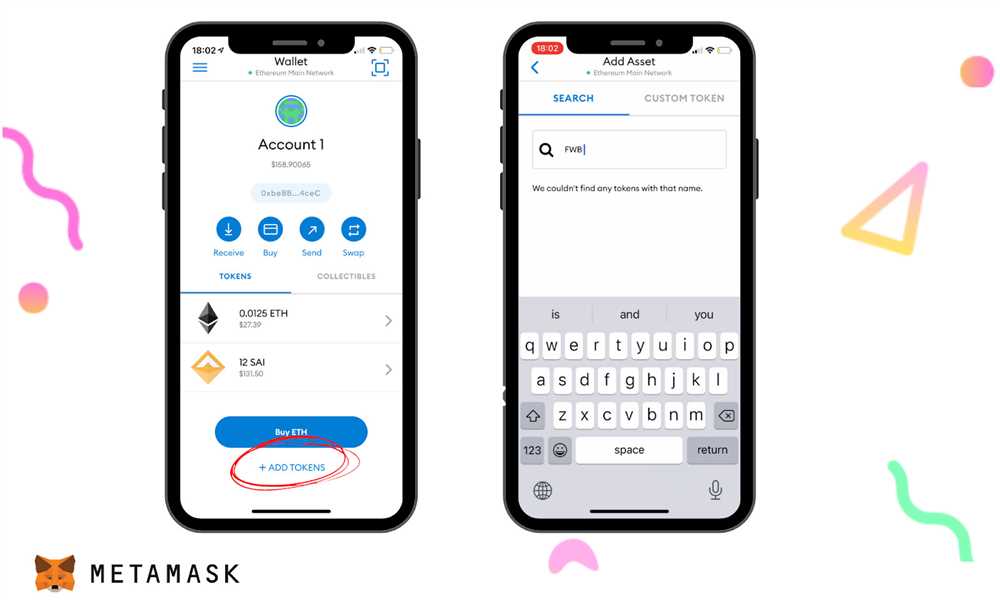
- Once you’re inside the Metamask wallet, click on the “Assets” tab at the top of the screen.
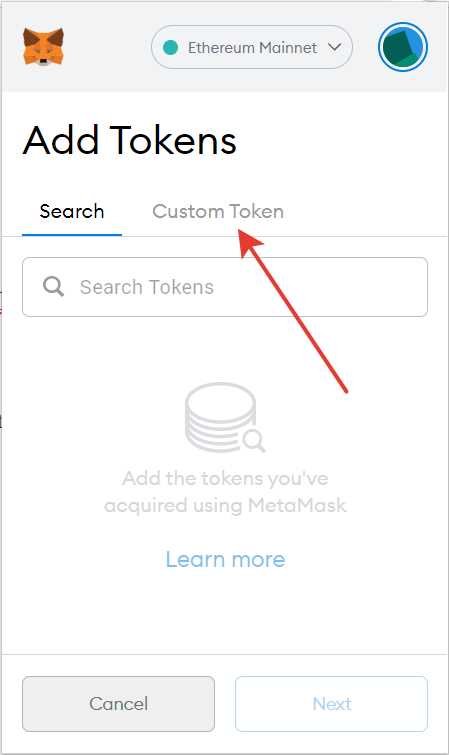
- Under the “Assets” tab, click on “Add Token”.
- You’ll be presented with two options: “Custom Token” and “Search Token”. If the token you want to add is not listed on popular exchanges like Uniswap or Binance, select “Custom Token”. Otherwise, select “Search Token” and enter the token’s symbol or contract address.
- If you selected “Custom Token”, enter the token’s contract address, symbol, and precision (number of decimal places) in the respective fields. Make sure to double-check the accuracy of the information.
- Click on the “Next” button.
- Review the token details and click on the “Add Tokens” button to confirm.
That’s it! You have successfully added a custom token to your Metamask wallet. You can now view and interact with the token by going back to the “Assets” tab.
Note: Adding a custom token to Metamask does not mean that you own the token. It simply allows you to monitor and transact with the token using Metamask as the interface. Make sure to exercise caution and do your own research before engaging in any token transactions.
A Comprehensive Walkthrough for Adding Tokens in Metamask

If you want to expand your token portfolio and trade a variety of cryptocurrencies, you’ll need to add tokens to your Metamask wallet. This comprehensive step-by-step guide will walk you through the process.
Step 1: Open Metamask
Make sure you have Metamask installed and open it in your browser. If you don’t have Metamask, install it from the official website and set up a new wallet.
Step 2: Access the Token Menu
In the Metamask interface, click on the account icon on the top right corner of the screen. From the dropdown menu, select “Add Token”. This will take you to the “Add Tokens” screen.
Step 3: Choose the Token Network
The “Add Tokens” screen will display two options: “Search” and “Custom Token”. If the token you want to add is from a popular network like Ethereum, Binance Smart Chain, or Polygon, select “Search”. If the token is on a different network, select “Custom Token”.
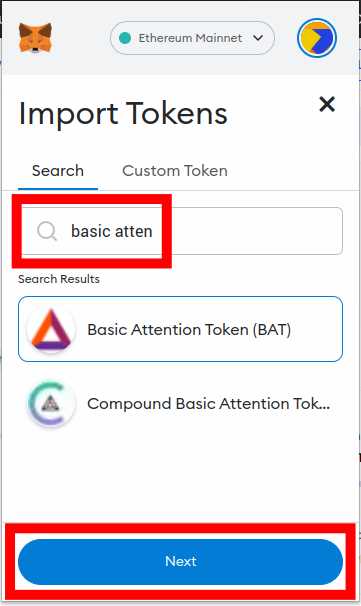
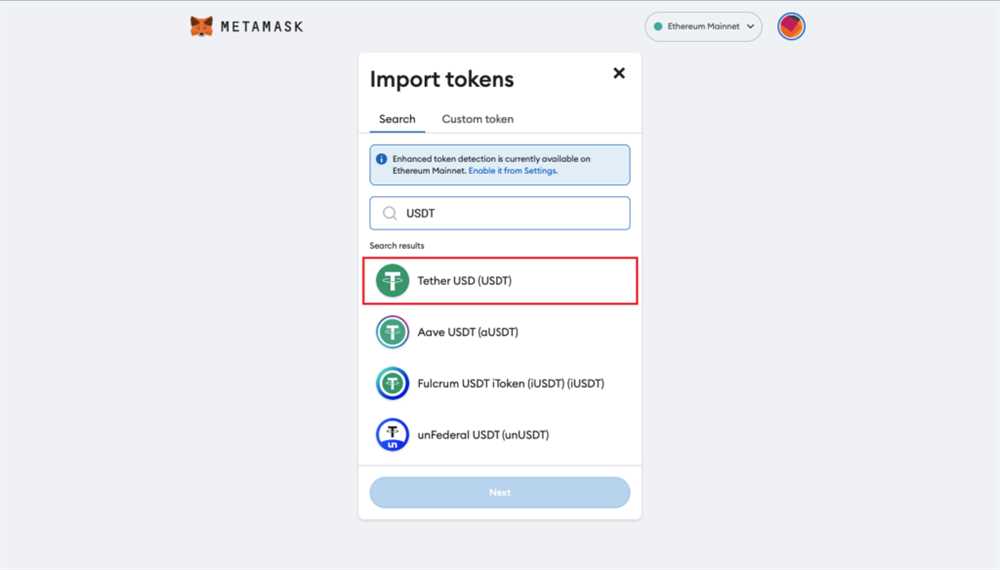
Step 4: Search for the Token
If you selected “Search”, simply type the token name or symbol in the search bar and click “Next”. Metamask will display a list of matching tokens. Select the correct token, review the details, and click “Add Tokens”.
Step 5: Add Custom Token Details
If you selected “Custom Token”, you’ll need to provide the token contract address, symbol, and decimals. You can usually find this information on the token’s website or in relevant forums. Verify the details, click “Next”, and then “Add Tokens”.
Step 6: Confirm the Token Addition
Metamask will display a confirmation dialog with the token details. Review the information, including the token balance, and click “Add”. Metamask will now add the token to your wallet.
Step 7: View and Manage Your Added Tokens
Once the token has been added, you can view it in your Metamask wallet by clicking on the account icon and selecting “Assets”. You can also manage your tokens by going to the “Assets” tab and clicking “Manage Assets”. From there, you can hide or rearrange your tokens for easier access.
Congratulations! You have successfully added a new token to your Metamask wallet. Now you can trade, send, and receive the added token using Metamask’s built-in functionalities.
Troubleshooting common issues when adding tokens to Metamask
Adding tokens to Metamask can sometimes encounter certain issues. Here are some common problems users may face and steps to troubleshoot them:
1. Token Contract Address Error: If you receive an error message stating that the token contract address is invalid, double-check the address you entered. Make sure it is accurate and matches the token you are trying to add. You can verify the token contract address on a blockchain explorer like Etherscan to ensure its correctness.
2. Insufficient Balance: If you see a zero balance for the added token, it could be due to insufficient funds in your wallet or the token has not been transferred to your address yet. Ensure you have enough balance in your wallet and that the token transfer has been successfully completed. You may need to wait for a few minutes or refresh your wallet to see the updated balance.
3. Incorrect Decimals: Tokens with decimal places require correct decimal configuration in Metamask. If you notice unexpected decimals or 0 balance, it may be due to incorrect decimal settings. Go to Metamask Settings, click on the added token, and ensure the decimal value matches the token’s specifications. Update the decimal value if necessary.
4. Network Compatibility: Some tokens may be specific to certain networks, such as Ethereum or Binance Smart Chain. Make sure you have selected the correct network in your Metamask wallet before adding the token. If you add a token meant for a different network, it may not appear or function correctly in Metamask.
5. Token Verification: Not all tokens are automatically recognized by Metamask. If you cannot find your token after adding it, it may need to be manually verified by Metamask or added as a custom token. Check the token’s official website or contact the token’s project team for information on how to verify or add the token to Metamask.
By following these troubleshooting steps, you can address common issues when adding tokens to Metamask and ensure a smooth experience using your added tokens within the wallet.
Frequently Asked Questions:
What is the “contract address” of a token?
The contract address of a token is a unique identifier that is assigned to a specific token on the blockchain. It is like the token’s fingerprint and allows the token to be recognized and interacted with on the blockchain network. When adding a token to Metamask, you need to provide the contract address to identify the token you want to add.
Can I add any type of token to Metamask?
Yes, you can add any ERC20 token to Metamask by following the steps mentioned in the guide. ERC20 is a common standard for creating tokens on the Ethereum blockchain, and most tokens are ERC20 compliant. However, it is important to note that not all tokens are ERC20 tokens, and some tokens may have different standards or may not be supported by Metamask.
+ There are no comments
Add yours