


MetaMask is a popular browser extension that allows users to interact with Ethereum-based decentralized applications (dApps) and manage their Ethereum wallet. If you own Ethereum and want to convert it into cash, MetaMask can help simplify the process. In this step-by-step guide, we will walk you through the process of converting your Ethereum to cash using MetaMask.
Step 1: Install MetaMask
The first step is to install the MetaMask extension in your browser. You can find it in the Chrome Web Store or Firefox Add-ons. Once installed, create a new wallet or import an existing one using your seed phrase or private key. Make sure you keep your wallet information secure.
Step 2: Connect MetaMask to a DEX
After installing MetaMask, open it and click on the network dropdown menu to select the Ethereum Mainnet. Next, go to a decentralized exchange (DEX) such as Uniswap, SushiSwap, or 1inch and connect your MetaMask wallet to the DEX by clicking on the connect wallet button. Follow the on-screen instructions to complete the connection.
Step 3: Swap Ethereum for a stablecoin
Once connected to a DEX, locate the trading interface and select Ethereum as the token you want to swap. Choose a stablecoin such as USDT, USDC, or DAI as the token you want to receive in exchange. Enter the amount of Ethereum you want to convert and confirm the transaction.
Step 4: Transfer stablecoin to an exchange
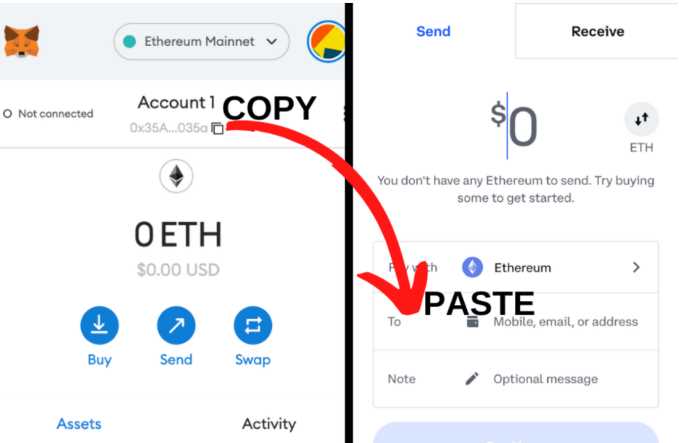
After the swap is complete, you will receive the stablecoin in your MetaMask wallet. To convert the stablecoin to cash, you need to transfer it to a cryptocurrency exchange that supports cash withdrawals. Find a reliable exchange and create an account if you haven’t already. Then, send the stablecoin from your MetaMask wallet to the exchange wallet by copying the deposit address.
Step 5: Convert stablecoin to cash
Once the stablecoin is in your exchange wallet, navigate to the trading section and look for the trading pair that matches your stablecoin (e.g., USDT/USD, USDC/USD). Place a sell order for your stablecoin and choose the option to receive cash. Follow the prompts to complete the transaction.
Step 6: Withdraw cash to your bank account
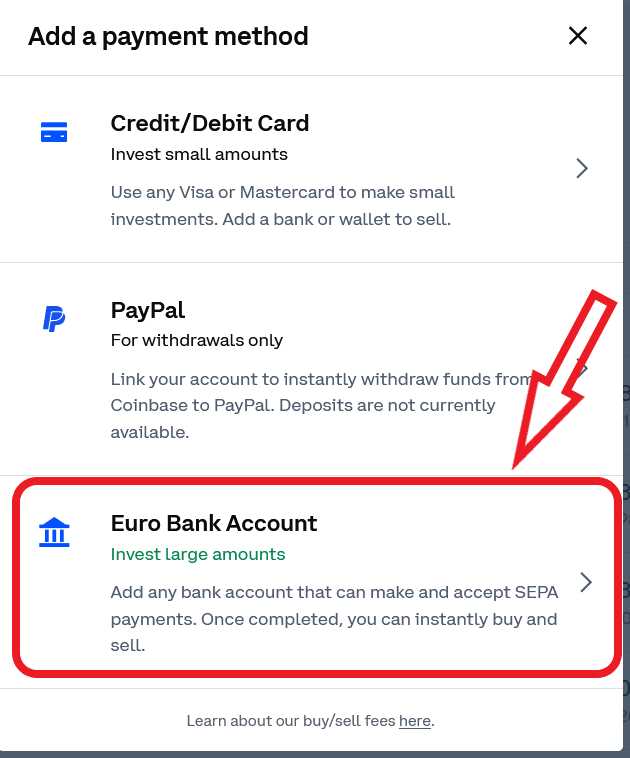
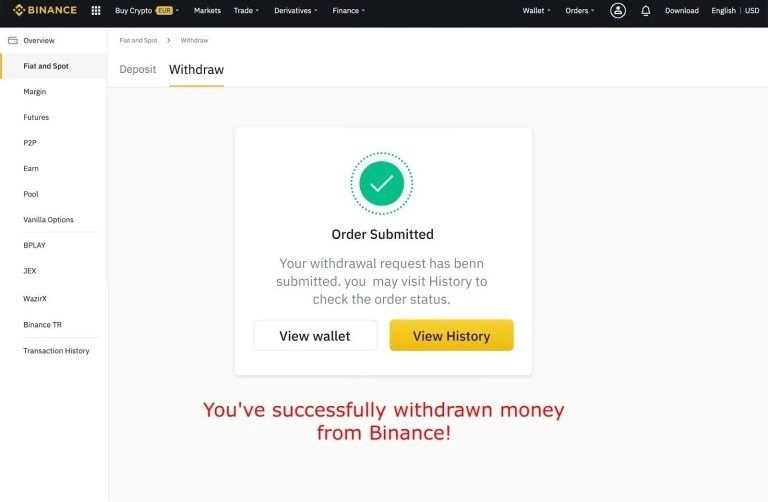
Once you sell your stablecoin for cash, the funds will be available in your exchange account. To withdraw the cash to your bank account, go to the withdrawal or cash-out section of the exchange platform and follow the instructions to initiate a withdrawal to your linked bank account. Depending on the exchange, it may take some time for the cash to be credited to your account.
By following these six simple steps, you can convert your Ethereum to cash using MetaMask. Remember to double-check all transaction details and use reputable platforms for exchanges and withdrawals. Happy converting!
Setting up Metamask
To convert Ethereum to cash using Metamask, you first need to set up and configure Metamask on your device. Follow these step-by-step instructions to get started:
Step 1: Install Metamask
Visit the Metamask website (https://metamask.io/) and download the extension for your preferred browser (Chrome, Firefox, or Brave). Once downloaded, follow the installation instructions specific to your browser.
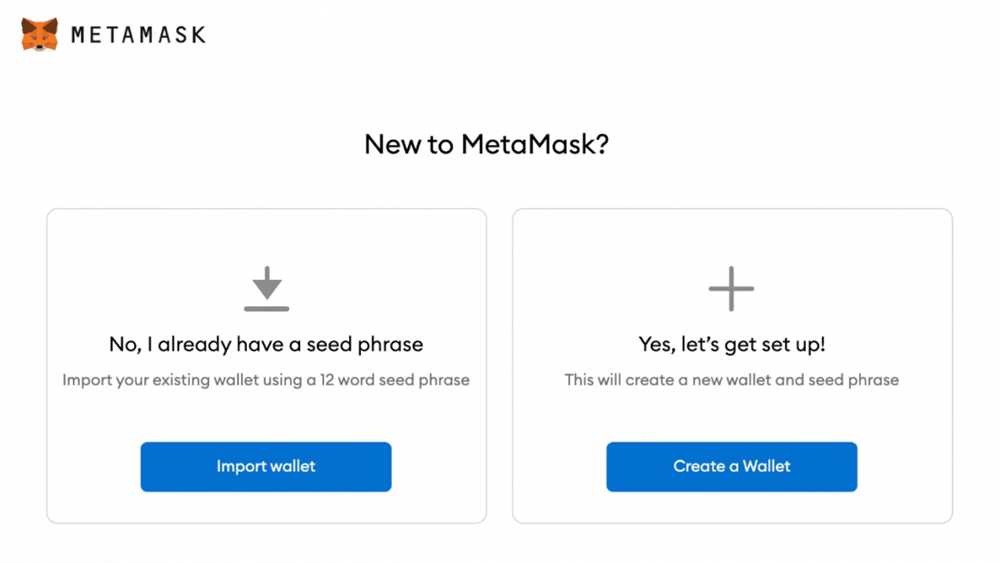
Step 2: Create a new Metamask wallet
After installing Metamask, click on the extension icon in your browser toolbar and select “Create a Wallet”. Follow the prompts to set up a new wallet, including creating a strong password and agreeing to the terms of use.
Step 3: Backup your wallet
Once your wallet is created, Metamask will display a secret backup phrase. This phrase is crucial for recovering your wallet if you ever lose access to your device. Write down the backup phrase and store it in a safe place away from your computer.
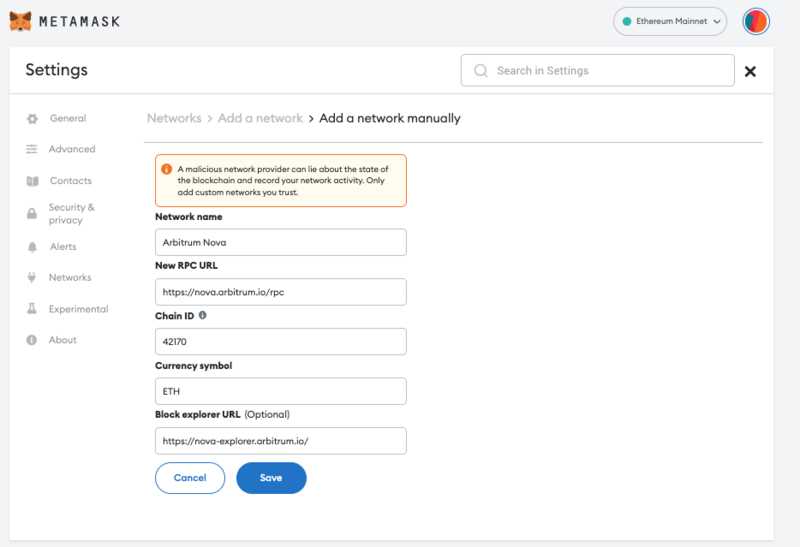
Step 4: Connect Metamask to the Ethereum network
After creating and backing up your wallet, you need to connect Metamask to the Ethereum network. Click on the extension icon and select “Main Ethereum Network” from the dropdown menu. If you are planning to convert Ethereum to cash on a different network, such as Binance Smart Chain, select the appropriate network instead.
Step 5: Import or purchase Ethereum
To convert Ethereum to cash, you will need some Ethereum in your Metamask wallet. You can either import existing Ethereum from an external wallet or exchange, or you can purchase Ethereum directly within Metamask using a supported payment method.
Once you have completed these steps, you are ready to proceed with converting your Ethereum to cash using Metamask. Be sure to follow the specific instructions for the cash-out method you have chosen.
Connecting your Ethereum wallet
In order to convert your Ethereum to cash using Metamask, you first need to connect your Ethereum wallet to the Metamask browser extension. Follow these steps to get started:
Step 1: Install the Metamask extension
Open your preferred browser and go to the official Metamask website. Click on the download button to install the extension. Once installed, you should see the Metamask icon in your browser toolbar.
Step 2: Create or import a wallet
Click on the Metamask icon in your browser toolbar and select “Create a Wallet” if you don’t have one already. Follow the prompts to set up a new wallet by creating a password and agreeing to the terms of service. Alternatively, you can choose the “Import Wallet” option if you already have an existing Ethereum wallet.
Step 3: Connect your wallet to the Metamask extension
To connect your wallet, click on the Metamask icon in your browser toolbar and enter your wallet credentials. Once logged in, you will see your wallet balance and transaction history.
Step 4: Connect to the desired network
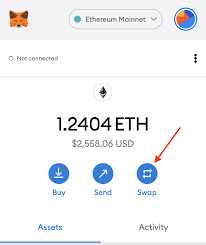
Metamask allows you to connect to different Ethereum networks. In order to cash out your Ethereum, make sure you are connected to the Ethereum Mainnet. To switch networks, click on the dropdown menu and select “Main Ethereum Network”.
Step 5: Check for sufficient funds
Before converting your Ethereum to cash, double-check that you have sufficient funds in your wallet. You can view your wallet balance in the Metamask extension.
Step 6: Proceed with the conversion

Now that your wallet is connected and you have verified funds, you can proceed with converting your Ethereum to cash using the desired platform or service. Follow the specific instructions provided by the platform you have chosen to carry out the conversion.
| Troubleshooting Tip: | If you encounter any issues connecting your Ethereum wallet to Metamask, make sure you have the latest version of the extension installed and that you are using a supported browser. You may also want to check the Metamask official documentation for additional troubleshooting steps. |
|---|
Converting Ethereum to cash
Converting Ethereum to cash can be done through various methods, and one popular option is using Metamask. Metamask is a cryptocurrency wallet and browser extension that allows users to interact with decentralized applications (dApps) on the Ethereum network.
If you have Ethereum stored in your Metamask wallet and want to convert it to cash, follow these step-by-step instructions:
Step 1: Verify your identity
Before converting Ethereum to cash, it’s important to ensure that you have completed any necessary identity verification processes. This might include providing personal information or completing KYC (Know Your Customer) procedures, depending on the platform or exchange you plan to use to convert your Ethereum.
Step 2: Choose a platform or exchange
Next, you’ll need to select a platform or exchange that supports converting Ethereum to cash. There are several options available, such as popular exchanges like Coinbase, Binance, or Kraken. Research different platforms to find one that suits your needs in terms of fees, security, and supported withdrawal methods.
Step 3: Connect your Metamask wallet
Once you have chosen an exchange or platform, you’ll need to connect your Metamask wallet to it. This typically involves logging into your Metamask account, authorizing the connection, and providing any required permissions. Be sure to follow the specific instructions provided by the platform or exchange you have chosen.
Step 4: Initiate the conversion
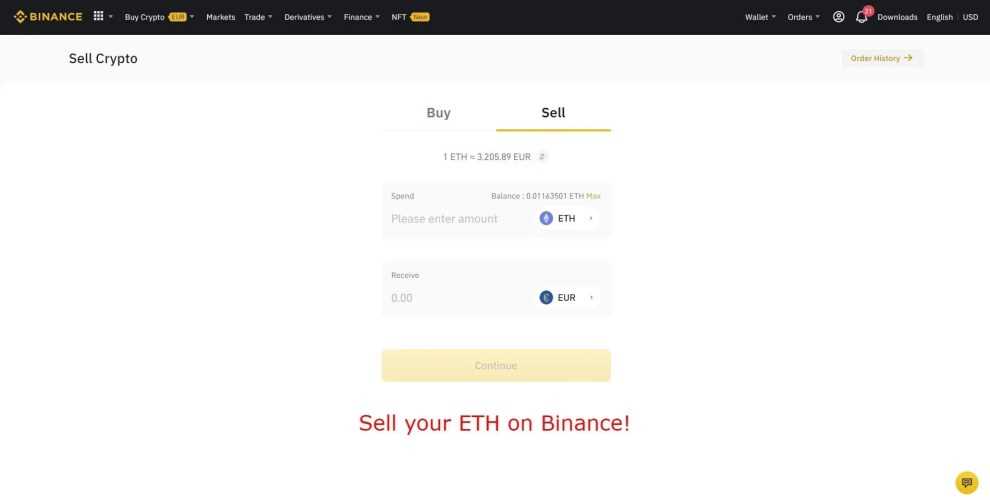
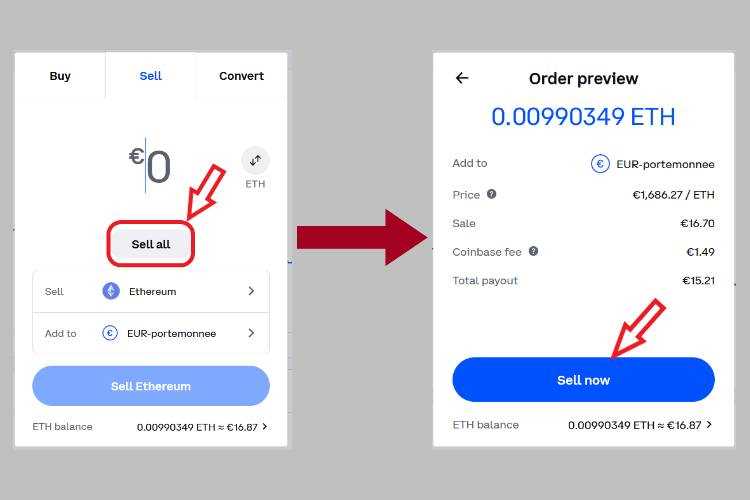
After your Metamask wallet is connected to the platform or exchange, you can navigate to the section where you can initiate the conversion of Ethereum to cash. This section may be called “Withdraw,” “Sell,” or something similar, depending on the platform. Follow the provided instructions to proceed with the conversion.
Step 5: Specify the amount and confirm
In this step, you will need to specify the amount of Ethereum you wish to convert to cash. Enter the desired amount, confirm the transaction details, and ensure you are aware of any fees or conversion rates. Double-check all the information before proceeding to avoid any mistakes.
Step 6: Complete the withdrawal
Once you have confirmed the transaction details, you can proceed to complete the withdrawal. This typically involves clicking a “Submit” or “Confirm” button, depending on the platform. The conversion process may take some time, so be patient and monitor your transaction status if the platform provides such functionality.
Remember to securely store your cash, whether it be in a bank account or using a secure digital wallet. Additionally, be mindful of any tax obligations that may arise from converting Ethereum to cash.
Following these steps should help you successfully convert your Ethereum to cash using Metamask or other platforms/exchanges. Always perform your own due diligence and research to ensure the platform or exchange you choose is reputable and trustworthy.
Withdrawing cash from Metamask
Once you have successfully converted your Ethereum to cash using Metamask, you can now withdraw it. Here is a step-by-step guide on how to do it:
1. Open the Metamask extension on your browser and make sure you are logged in to your account.
2. Click on the “Assets” tab to view your wallet balance.
3. Locate the cash asset you received after the conversion process. It might be labeled as the local currency or the name of the stablecoin you converted to.
4. Click on the three dots (…) next to the cash asset and select the option “Send”.
5. A new window will open, asking you to fill in the recipient’s address and the amount you want to withdraw.
6. Enter the recipient’s wallet address in the “To” field. Make sure to double-check the address to avoid any mistakes.
7. Fill in the amount you wish to withdraw in the “Amount” field. You can select a specific amount or click on “Max” to send the entire balance.
8. Review the transaction details and ensure everything is correct.
9. Click on the “Next” button to proceed to the confirmation page.
10. Check the transaction details once again and click on the “Confirm” button to complete the withdrawal process.
11. Wait for the transaction to be confirmed on the Ethereum network. This may take a few minutes or longer depending on the network congestion.
12. Once the transaction is confirmed, the cash will be transferred to the recipient’s wallet address.
Remember to keep your recipient’s wallet address private and securely store it to avoid any unauthorized access to your funds.
Frequently Asked Questions:
What is Metamask?
Metamask is a cryptocurrency wallet and browser extension that allows users to interact with the Ethereum blockchain.
Are there any fees involved in converting Ethereum to cash with Metamask?
Yes, there are usually fees involved when converting Ethereum to cash with Metamask. These fees can vary depending on the exchange you use and the current network congestion of the Ethereum blockchain. You may have to pay a transaction fee to send your Ethereum from Metamask to the exchange, and there are also typically fees involved when selling Ethereum for cash on the exchange.
Is it safe to convert Ethereum to cash with Metamask?
Converting Ethereum to cash with Metamask can be safe if you follow certain precautions. Make sure to use a reputable cryptocurrency exchange that has a good track record of security. Additionally, double-check the deposit address you enter in your Metamask wallet to avoid sending your Ethereum to the wrong address. It’s also a good idea to enable two-factor authentication and use strong, unique passwords for your exchange and Metamask accounts. By taking these steps, you can minimize the risks associated with converting Ethereum to cash.
+ There are no comments
Add yours