


Web3js is a powerful JavaScript library that allows developers to interact with the Ethereum blockchain. With the growing popularity of decentralized applications (dApps), Web3js has become an essential tool for building and interacting with these applications. One of the most popular tools for interacting with Ethereum-based dApps is Metamask, a browser extension that enables users to manage their Ethereum accounts and securely interact with dApps.
In this comprehensive guide, we will delve into the world of Web3js and explore how to harness its power to unlock the full potential of Metamask. Whether you are a beginner wanting to dip your toes into the exciting world of decentralized applications, or an experienced developer looking to leverage the capabilities of Web3js, this guide will provide you with all the necessary knowledge and tools.
Throughout this guide, we will cover the fundamentals of Web3js, including how to set up Metamask, create and manage Ethereum accounts, interact with smart contracts, and handle transaction signing. We will also explore more advanced topics such as handling events, integrating with other libraries and frameworks, and building your own dApp using Web3js and Metamask.
By the end of this guide, you will have a solid understanding of how to use Web3js and Metamask to build decentralized applications, interact with the Ethereum blockchain, and leverage the power of the decentralized web. So let’s dive in and unlock the true potential of Web3js and Metamask!
Understanding the Basics of Web3js
Web3.js is a JavaScript library that allows you to interact with the Ethereum blockchain. It provides a way to connect to an Ethereum node, send transactions, and retrieve data from the blockchain.
Connecting to the Ethereum Network

To start using Web3.js, you need to connect to the Ethereum network. This can be done by specifying the provider, which is a communication layer between your application and the Ethereum network. The most common provider used is MetaMask, a browser extension that injects the Web3.js library into web pages. Once connected to the Ethereum network, you can access accounts, send transactions, and interact with smart contracts.
Interacting with Smart Contracts

Web3.js provides a set of functions to interact with smart contracts deployed on the Ethereum network. You can call functions defined in a smart contract, send transactions to modify the state of the contract, and listen for events emitted by the contract. To interact with a smart contract, you need to know its address and its ABI (Application Binary Interface), which describes the functions and events defined in the contract.
Here is an example of how to interact with a smart contract using Web3.js:
- Instantiate the contract: Use the ABI and address to create an instance of the contract object.
- Set the default account: Specify the account to use for sending transactions.
- Call contract functions: Use the contract object to call functions defined in the smart contract.
- Send transactions: Use the contract object to send transactions that modify the state of the contract.
- Listen for events: Use the contract object to listen for events emitted by the smart contract.
By following these steps, you can easily interact with smart contracts using Web3.js.
Retrieving Blockchain Data
In addition to interacting with smart contracts, Web3.js also provides functions to retrieve data from the blockchain. You can get the balance of an account, retrieve transaction details, and fetch data from specific blocks. This allows you to build applications that can display real-time data from the Ethereum blockchain.
Here is an example of how to retrieve data from the blockchain using Web3.js:
- Create an instance of the web3 object: Instantiate the Web3.js object using the provider.
- Get the balance of an account: Use the web3 object to retrieve the balance of an account.
- Retrieve transaction details: Use the web3 object to fetch details of a specific transaction.
- Fetch data from a block: Use the web3 object to retrieve data from a specific block.
With these functions, you can fetch and display data from the Ethereum blockchain in your application.
Overall, Web3.js is a powerful library that allows you to interact with the Ethereum blockchain. Whether you want to send transactions, interact with smart contracts, or retrieve blockchain data, Web3.js provides the necessary tools and functions to unlock the full potential of Web3 development.
Setting Up and Configuring Metamask

Metamask is a popular cryptocurrency wallet that allows you to interact with decentralized applications (dApps) on the Ethereum blockchain. Before you can start using Metamask, you need to set it up and configure it on your device.
Here are the steps to set up and configure Metamask:
- Install Metamask: Visit the Metamask website and download the extension for your preferred web browser (Chrome, Firefox, Brave, etc.). Once the extension is installed, you will see the Metamask icon in your browser’s toolbar.
- Create a New Wallet: Click on the Metamask icon and follow the instructions to create a new wallet. Make sure to use a strong and unique password when creating your wallet, as it will protect your funds.
- Backup Your Seed Phrase: After creating a wallet, Metamask will provide you with a seed phrase. This phrase is essential for recovering your wallet in case you forget your password or lose access to your device. Write down the seed phrase and store it in a safe place offline.
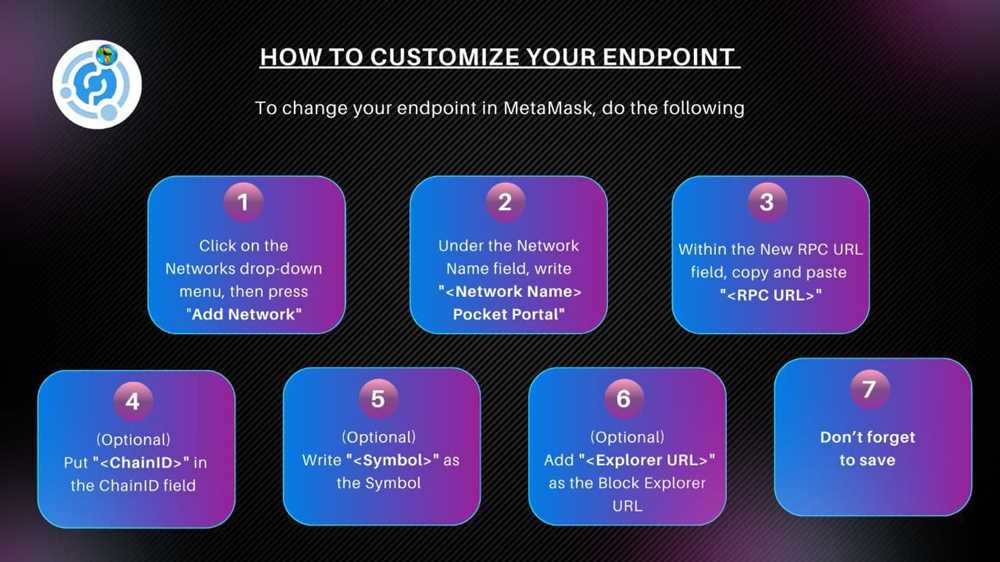
- Connect to the Ethereum Mainnet: By default, Metamask is connected to the Ethereum Mainnet. If you want to interact with test networks or custom networks, you can switch to them by clicking on the network dropdown menu and selecting the desired network.
- Add Accounts: Metamask allows you to create multiple accounts within a single wallet. To add a new account, click on the account icon in the top right corner of the Metamask extension and click on “Add Account.”
- Import Accounts: If you already have an Ethereum account, you can import it into Metamask by clicking on the account icon and selecting “Import Account.” Follow the instructions to import your account using your private key or JSON file.
- Customize Settings: Metamask offers various settings that you can customize according to your preferences. You can access the settings by clicking on the account icon and selecting “Settings.” From here, you can manage your security and privacy settings, enable/disable specific features, and set the preferred gas prices.
Once you have set up and configured Metamask, you are ready to start using it to interact with decentralized applications, send and receive cryptocurrency, and participate in blockchain-based transactions.
Using Metamask for Secure Transactions and Interactions
Metamask is an essential tool for interacting with decentralized applications (dApps) on the Ethereum blockchain. It not only provides a secure way to manage your cryptocurrencies but also ensures the privacy of your transactions and interactions.
When you use Metamask, your private keys are encrypted and stored locally on your device, giving you full control over your funds. This means that you don’t have to worry about your private keys being held by a third party, significantly reducing the risk of theft or hacking.
In addition to securing your funds, Metamask also protects your privacy during transactions. When you initiate a transaction, Metamask will prompt you to review and confirm the details before it is broadcasted to the network. This ensures that you are in full control of your actions and can prevent any unauthorized or accidental transactions.
Metamask also provides a layer of security for interacting with dApps. When you visit a dApp website, Metamask will display a pop-up notification asking for permission to connect. This prevents websites from accessing your funds or interacting with your wallet without your consent.
Furthermore, Metamask allows you to set transaction fees manually, giving you the flexibility to prioritize speed or cost-effectiveness. You can adjust the gas price and limit according to your preference, ensuring that your transactions are processed efficiently.
Overall, using Metamask for secure transactions and interactions is crucial in the Web3 ecosystem. It offers a user-friendly interface, cryptographic security, and privacy features that make it a trusted and reliable choice for Ethereum users.
Exploring Advanced Features and Integrations with Web3js

Web3js is a powerful JavaScript library that allows developers to interact with the Ethereum blockchain. While the basic functionalities of Web3js are well-known, there are many advanced features and integrations that can greatly enhance the capabilities of your decentralized applications (dApps).
One such advanced feature is the ability to listen for events emitted by smart contracts. With Web3js, you can easily subscribe to specific events and be notified whenever they occur. This can be useful for monitoring contract state changes, tracking user interactions, and triggering actions in response to specific events.
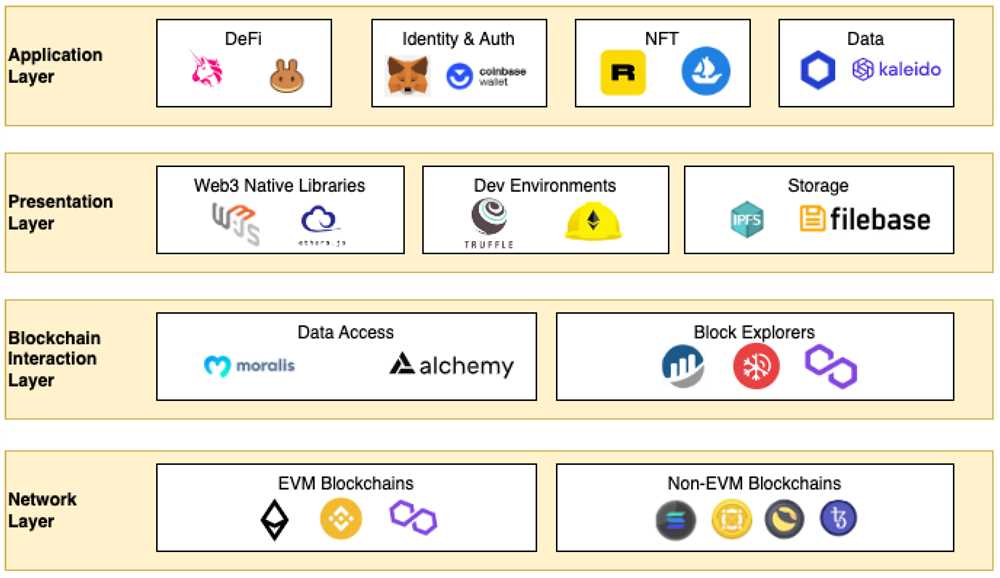
Another powerful feature of Web3js is its integration with IPFS (InterPlanetary File System). IPFS is a distributed file system that allows for decentralized storage and retrieval of files. By combining Web3js with IPFS, developers can create dApps that store and retrieve data in a decentralized manner, removing the need for a centralized server.
Furthermore, Web3js can be integrated with popular JavaScript frameworks and libraries such as React and Angular. This allows developers to leverage the power of Web3js within familiar development environments, making it easier to build and deploy dApps. Additionally, Web3js can be used in conjunction with other Web3 libraries, such as Web3.py, to create cross-platform applications that span multiple programming languages.
Web3js also provides support for decentralized identity systems such as uPort and SelfKey. These systems allow users to control their own identities and personal data, ensuring privacy and security in a decentralized environment. By integrating Web3js with decentralized identity systems, developers can build dApps that provide users with a seamless and secure experience.
In conclusion, Web3js offers a wide range of advanced features and integrations that can greatly enhance the capabilities of your dApps. Whether it’s listening for events, integrating with IPFS, or leveraging popular frameworks and libraries, Web3js provides developers with the tools they need to unlock the full power of the Ethereum blockchain.
Frequently Asked Questions:
What is web3.js?
Web3.js is a JavaScript library that allows developers to interact with the Ethereum blockchain. It provides a simple interface for connecting to an Ethereum node, sending transactions, and retrieving data from the blockchain.
How can I use Metamask with web3.js?
To use Metamask with web3.js, you’ll first need to install the Metamask browser extension. Once installed, you can connect web3.js to Metamask by using the `ethereum` object provided by Metamask. This object will allow you to interact with the user’s Ethereum account and sign transactions.

+ There are no comments
Add yours