


If you’re new to the world of cryptocurrencies, you might be wondering how to transfer tokens from Metamask, one of the most popular cryptocurrency wallets out there. Well, you’re in luck! In this step-by-step guide, we’ll walk you through the process of transferring tokens from your Metamask wallet to another wallet or exchange.
Before we begin, it’s important to note that Metamask supports Ethereum and Ethereum-based tokens, so make sure you have some of these tokens in your wallet. If you don’t have any, you’ll need to acquire them through a cryptocurrency exchange or any other means of obtaining Ethereum tokens.
Now that you have some tokens in your Metamask wallet, let’s get started with the transfer process. Here’s what you need to do:
- First, open your Metamask extension in your browser or launch the Metamask app on your mobile device.
- Unlock your wallet by entering your password or using biometric authentication.
- Once your wallet is unlocked, you’ll see your account balance and the list of tokens you hold.
- Select the token you want to transfer from the list of tokens.
- Click on the “Send” or “Transfer” button, depending on the interface of your Metamask version.
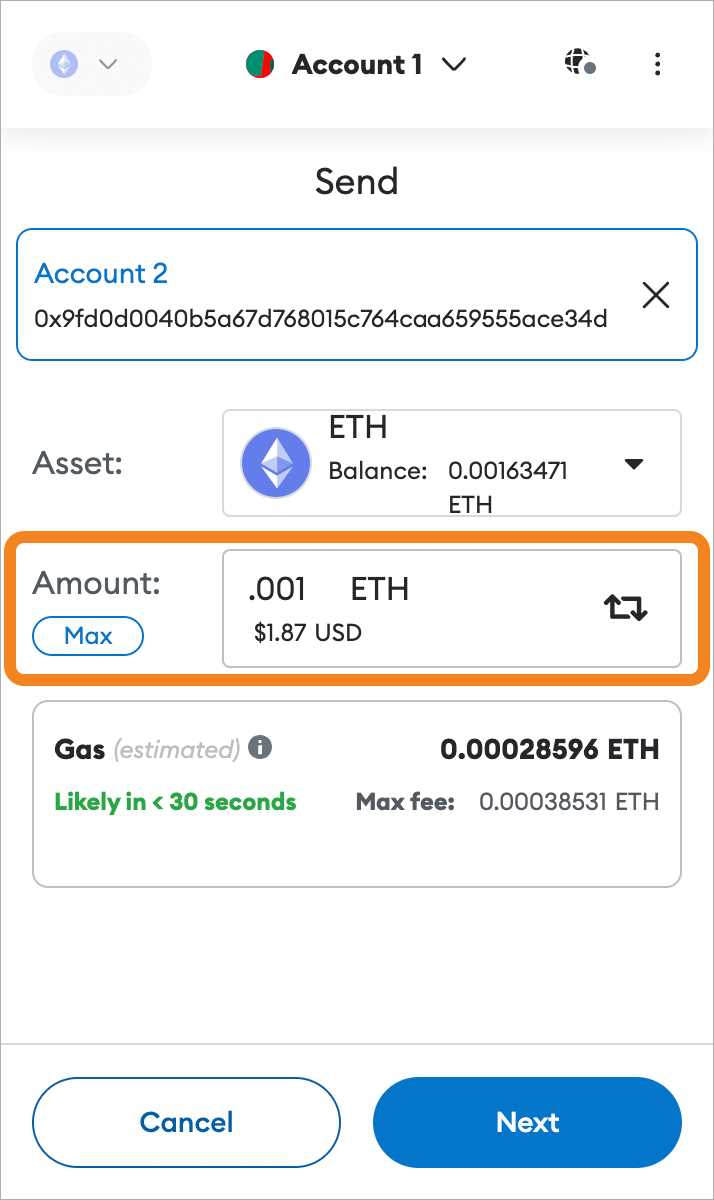
- Enter the recipient’s wallet address in the designated field. Make sure to double-check the address to avoid any mistakes.
- Specify the amount of tokens you want to transfer. You can either enter a specific amount or choose the “Max” option to transfer the maximum amount available.
- Review the transaction details, including the gas fees (transaction fees) required for the transfer. Make sure you have enough ETH in your wallet to cover these fees.
- If everything looks good, click on the “Confirm” or “Send” button to initiate the transfer.
- Wait for the transaction to be confirmed on the Ethereum blockchain. This may take a few moments or longer, depending on network congestion.
- Once the transaction is confirmed, you’ll see the tokens deducted from your Metamask wallet and added to the recipient’s wallet.
And that’s it! You’ve successfully transferred tokens from your Metamask wallet. It’s important to keep in mind that the process may vary slightly depending on the version of Metamask you’re using, but the overall concept remains the same. Now you’re ready to explore the exciting world of cryptocurrency transactions!
Note: Always exercise caution when transferring tokens and double-check all the details to ensure the accuracy of the transaction. Cryptocurrency transactions are irreversible, so any mistakes could result in permanent loss of funds. If you’re unsure or have any questions, it’s advisable to consult with a professional or reach out to the Metamask support team for assistance.
Install and Set Up Metamask
To start transferring tokens from Metamask, you first need to install and set up the Metamask wallet. You can follow these steps to get started:
- Open your preferred web browser and navigate to the Metamask website.
- Click on the “Get Chrome Extension” button if you are using Google Chrome, or select “Get Firefox Extension” if you are using Mozilla Firefox.
- Follow the instructions to add the Metamask extension to your browser.
- Once the extension is installed, you will see the Metamask fox icon in your browser toolbar.
- Click on the Metamask fox icon to open the extension.
- Click on “Create a Wallet” to set up a new wallet or “Import Wallet” if you already have an existing wallet.
- If you are creating a new wallet, enter a strong password and click “Create”.
- Read and agree to the terms of service and privacy policy.
- Click on “Download Secret Backup Phrase” and keep this phrase in a safe place. It is essential for recovering your wallet.
- Confirm your secret backup phrase by selecting the words in the correct order.
- Your Metamask wallet is now set up and ready to use!
Make sure to keep your secret backup phrase secure and never share it with anyone. With Metamask, you can now easily transfer tokens and manage your crypto assets.
Add Tokens to Metamask Wallet
Metamask is a popular browser extension wallet widely used in the cryptocurrency ecosystem. While it supports various tokens by default, there might be instances where you need to manually add tokens to your Metamask wallet. Here’s a step-by-step guide on how to do that:
Step 1: Open Metamask Extension
Start by opening the Metamask extension in your preferred web browser. Ensure that you have installed and set up the extension properly.
Step 2: Access the Wallet
In the Metamask extension, click on the wallet icon in the top-right corner to access your wallet. This will open the wallet interface.
Step 3: Click on “Add Token”
In the wallet interface, locate and click on the “Add Token” button. This will open the token adding interface.
Step 4: Choose the Token Network
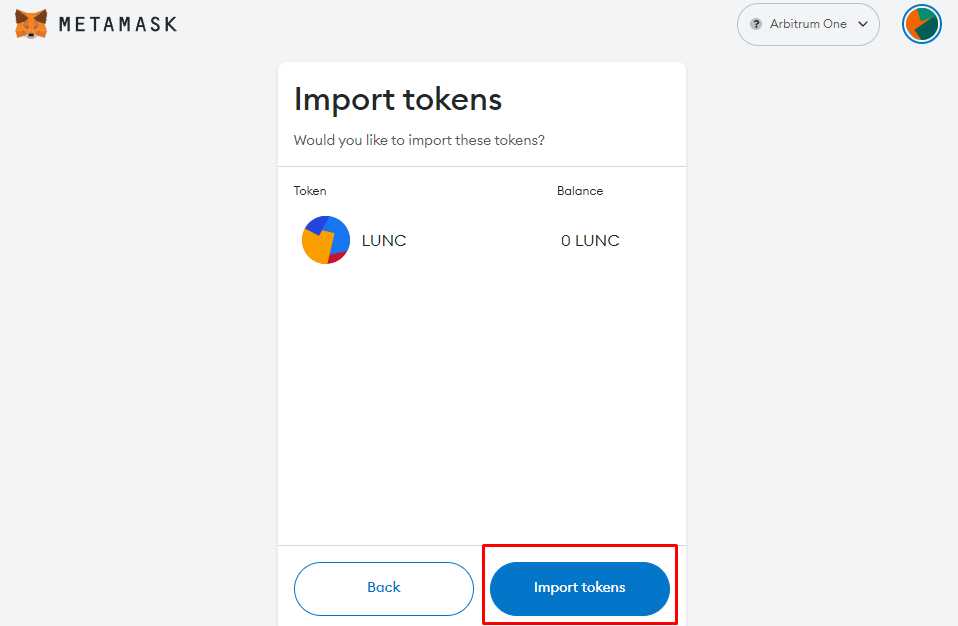
On the token adding interface, you will see two options: “Search” and “Custom Token.” If the token you want to add is on a well-known network like Ethereum, Binance Smart Chain, or Polygon, click on “Search,” enter the token name or symbol, and select the correct token from the search results.
If the token is on a custom network or not recognized by Metamask by default, click on “Custom Token.” This will allow you to manually enter the token contract address and details.
Step 5: Confirm and Add the Token
After choosing the token network and entering the required details, click on the “Next” button. Metamask will validate the token details, and if everything is correct, it will display the token icon and name. Review the information to ensure accuracy, and then click on the “Add Tokens” button to add the token to your Metamask wallet.
Once the token is added, you will be able to view and manage it alongside your other tokens in the Metamask wallet interface.
Note: Be cautious when adding custom tokens to your wallet. Make sure to verify the token details and contract address from a reliable source to avoid scams or mistakenly adding incorrect tokens.
Now that you know how to add tokens to your Metamask wallet, you can easily manage a wider range of tokens within the wallet interface.
Confirm Token Availability
Before transferring tokens from your Metamask wallet, it is essential to confirm that the tokens you want to transfer are available in your wallet.
To check the token availability, follow these steps:
- Open the Metamask extension or wallet on your browser.
- Select the desired wallet from the dropdown menu if you have multiple wallets.
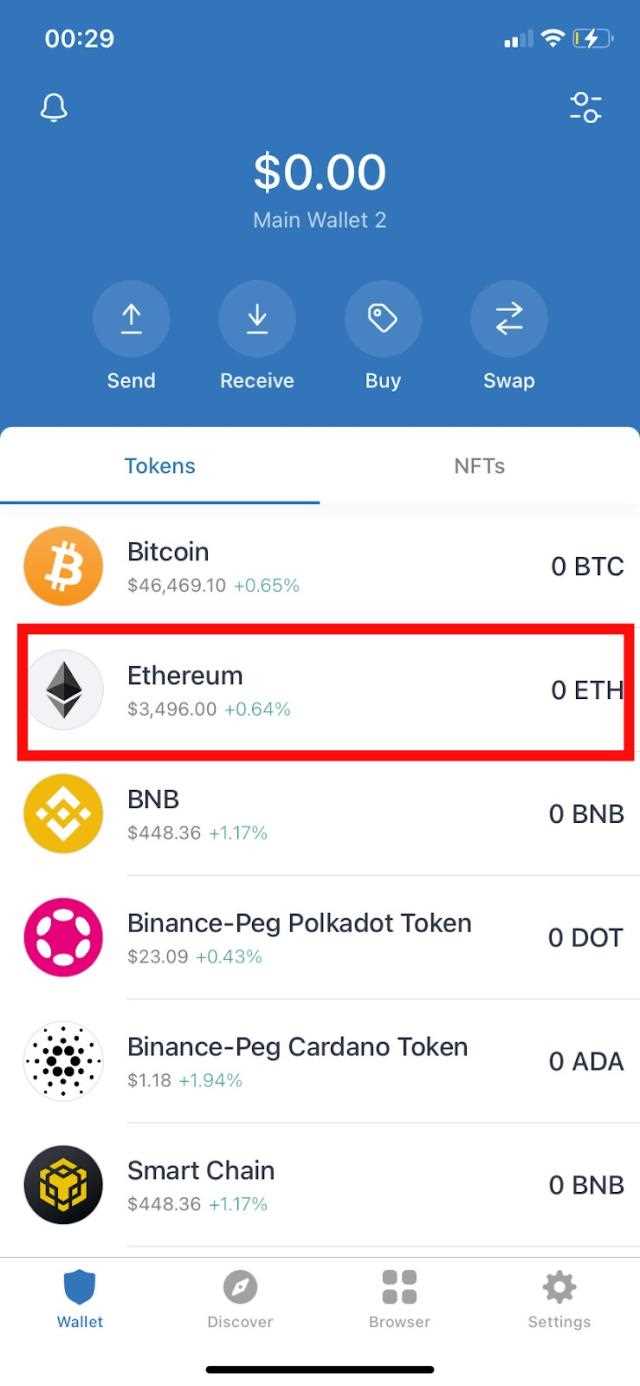
- Click on the “Assets” or “Tokens” tab.
- A list of tokens stored in your wallet will be displayed.
- Scroll through the list to find the token you want to transfer and check if the token balance is greater than zero.
If the token balance is zero or not present in the list, that means you do not have any of the specific tokens in your wallet.
Make sure you have the correct token contract address to ensure the token is the same you want to transfer. Additionally, be aware of any minimum balance requirements or other restrictions set by the token issuer.
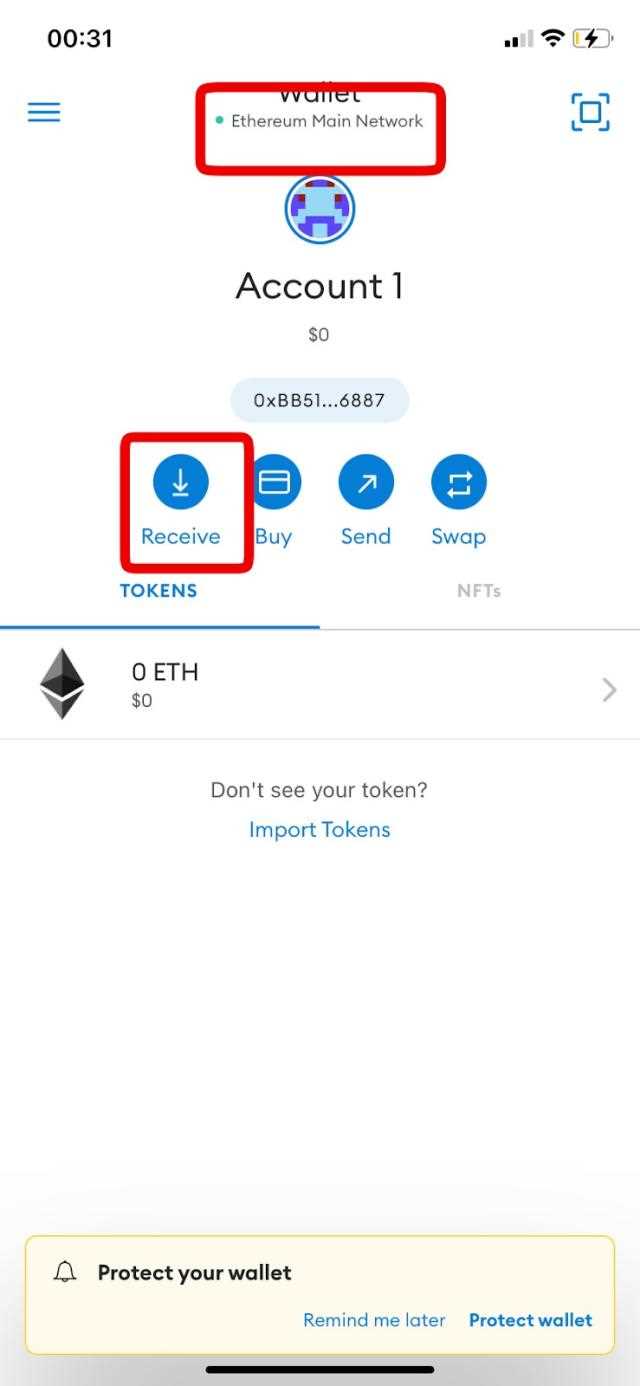
Transfer Tokens from Metamask
Metamask is a popular cryptocurrency wallet that allows users to store, manage, and transfer their tokens on the Ethereum network. If you have some tokens in your Metamask wallet and would like to transfer them to someone else, follow these step-by-step instructions:
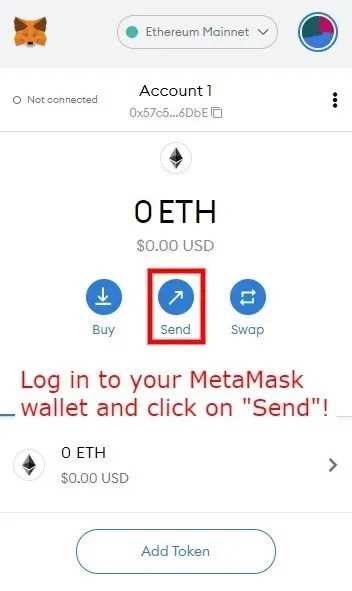
1. Open Metamask
The first step is to open your Metamask wallet. You can do this by clicking on the Metamask extension in your browser toolbar or by opening the Metamask app on your mobile device.
2. Select the Token to Transfer
In Metamask, you can store multiple tokens. To transfer a specific token, start by selecting it from the list of available tokens. You can do this by clicking on the token name in your Metamask wallet.
3. Click on the “Send” Button
Once you have selected the token to transfer, click on the “Send” button in your Metamask wallet. This will open a new window or tab where you can enter the details of the token transfer.
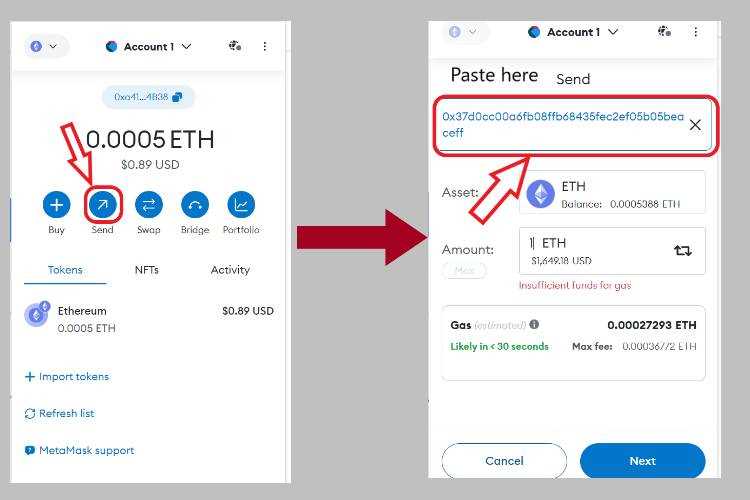
4. Enter the Recipient’s Address
In the token transfer window, enter the recipient’s wallet address in the “To” field. Make sure the address is correct to avoid any loss of tokens.
5. Enter the Amount to Transfer
Next, enter the amount of tokens you want to transfer in the “Amount” field. Double-check the amount to ensure it is accurate.
6. Adjust Gas Fees (optional)
If you want to adjust the gas fees for faster or slower transaction processing, you can do so by clicking on the “Edit” button next to the “Gas Fee” field. Higher gas fees generally result in faster transaction confirmation.
7. Confirm and Send
Review all the details of the token transfer, including the recipient’s address, the amount, and the gas fees. Once you are satisfied, click on the “Confirm” or “Send” button to initiate the transfer.
8. Confirm the Transaction
Metamask will prompt you to confirm the transaction by clicking on another “Confirm” button. Verify the details once again and click on the button to finalize the transfer.
9. Wait for the Transaction to Complete
After confirming the transaction, you will need to wait for the network to process it. This may take a few seconds or several minutes, depending on network congestion and gas fees.
10. Verify the Transfer
Once the transaction is confirmed, you can verify the transfer by checking your wallet’s transaction history or by using an Ethereum blockchain explorer. Make sure the tokens have been successfully transferred to the recipient’s wallet address.
By following these steps, you can easily transfer tokens from your Metamask wallet to another wallet on the Ethereum network.
Frequently Asked Questions:
What is Metamask?
Metamask is a popular cryptocurrency wallet that allows users to manage their digital assets and interact with decentralized applications (dApps) on the Ethereum blockchain.
Can I transfer tokens from my Metamask wallet?
Yes, you can transfer tokens from your Metamask wallet. Here is a step-by-step guide on how to do it:
+ There are no comments
Add yours