


MetaMask is one of the most popular digital wallet extensions for browsing decentralized applications (dapps) on the Ethereum blockchain. However, with the recent surge in popularity of the Binance Smart Chain (BSC), many users are looking to add the BNB network to their MetaMask wallet. In this step-by-step guide, we will walk you through the process of adding the BNB network to MetaMask, allowing you to seamlessly interact with BSC dapps.
Step 1: Install and Set Up MetaMask
If you haven’t already, the first step is to install the MetaMask extension for your preferred browser and set up your wallet. You can download MetaMask from the official website and follow the instructions to create a new wallet or import an existing one.
Step 2: Access the Network Selection Menu
Once you have MetaMask installed and set up, click on the MetaMask extension icon in your browser to open the wallet interface. At the top of the interface, you will see your account balance and a dropdown menu that displays the current network you are connected to. Click on the dropdown menu to access the network selection options.
Step 3: Add the BNB Network
In the network selection menu, scroll down to the bottom and click on the option that says “Custom RPC”. This will allow you to manually add a new network to MetaMask. A form will appear with fields for you to enter the network details.
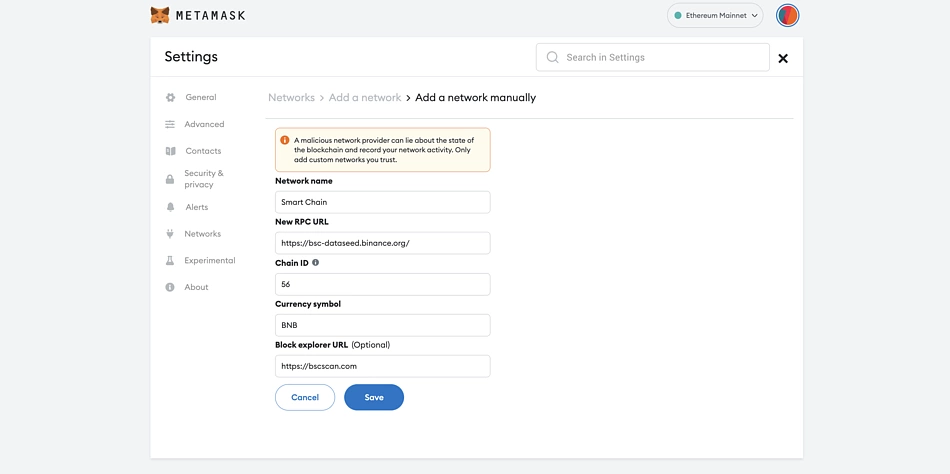
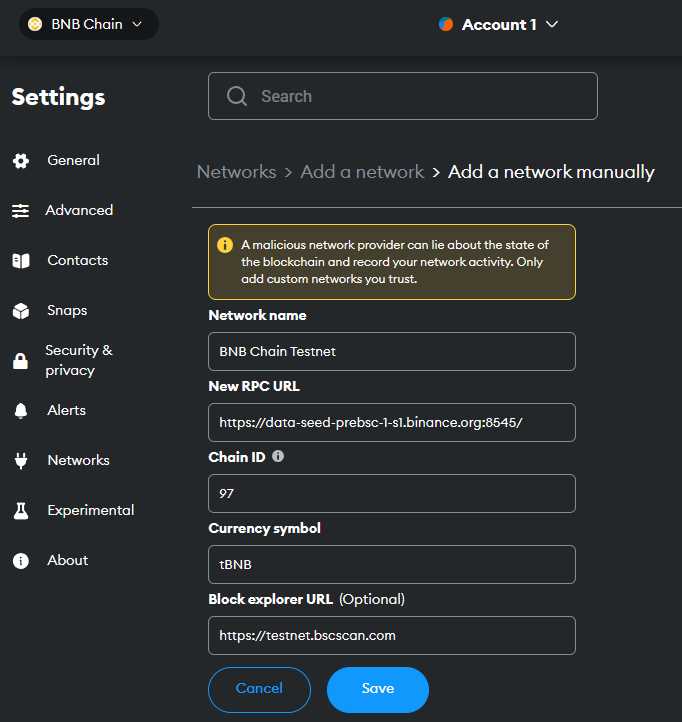
Step 4: Enter BNB Network Details
In the form, you will need to enter the following details to add the BNB network:
Network Name: Enter a name for the network, such as “BNB Mainnet”.
New RPC URL: Enter the RPC (Remote Procedure Call) URL for the BNB network. The mainnet RPC URL for BSC is: https://bsc-dataseed.binance.org/
Chain ID: Enter the Chain ID for the BNB network, which is: 56.
Symbol (optional): You can enter the symbol for the BNB token, which is “BNB”.
Block Explorer URL (optional): You can enter the URL of a block explorer for the BNB network, such as https://bscscan.com/.
Step 5: Save and Connect
After entering the BNB network details, click on the “Save” button to add the network to MetaMask. The BNB network will now appear in the network selection menu. Click on the BNB network to connect to it, and you’re ready to start using MetaMask with the Binance Smart Chain.
By following these simple steps, you can easily add the BNB network to your MetaMask wallet and explore the world of decentralized applications on the Binance Smart Chain. Happy browsing!
Step 1: Accessing MetaMask
To begin the process of adding the BNB network to your MetaMask wallet, you’ll first need to access MetaMask. Follow these steps to access MetaMask:
- Open your preferred web browser.
- Click on the MetaMask extension icon in your browser toolbar. This will open the MetaMask pop-up.
- If you already have a MetaMask account, click on the “Login” button and enter your credentials. Otherwise, click on the “Create a Wallet” button to set up a new MetaMask account.
- Once you’re logged in or have created a new account, you’ll see the MetaMask wallet interface, which displays your account balance and transaction history.
- Congratulations! You have successfully accessed MetaMask and are now ready to proceed to the next step.
Make sure to keep your MetaMask account credentials secure, as they provide access to your digital assets.
Step 2: Adding BNB Network

Now that you have installed MetaMask and created an account, the next step is to add the BNB network to your MetaMask wallet.
Step 2.1: Open MetaMask
First, open the MetaMask extension in your browser. You can typically find the extension as an icon on your browser’s toolbar.
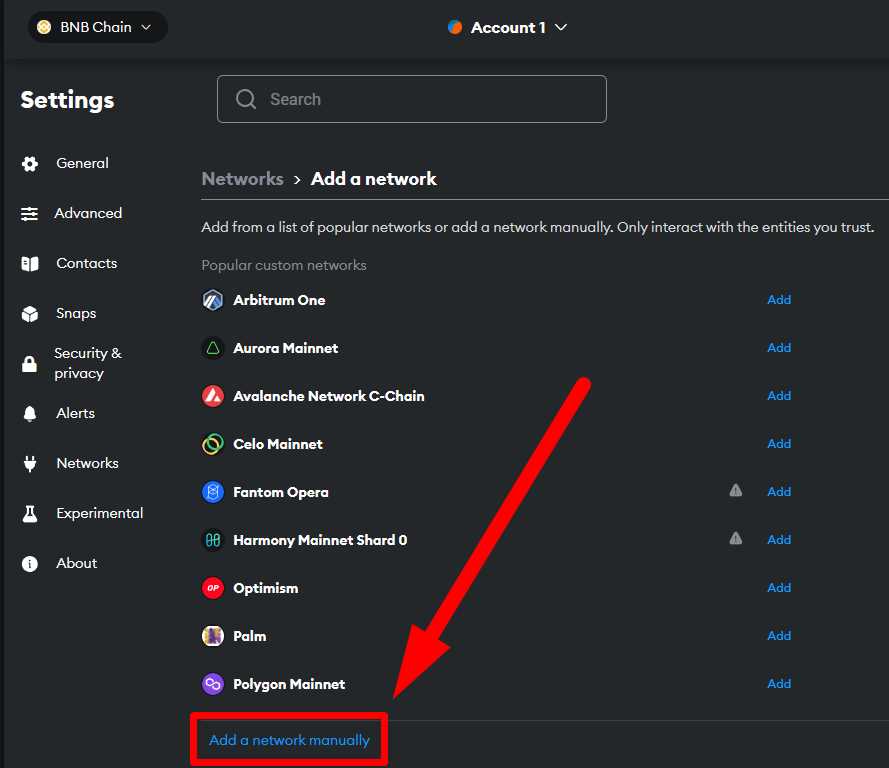
Step 2.2: Access Network Settings
Once you have opened MetaMask, click on the menu icon (usually represented by three horizontal lines) in the top-right corner of the MetaMask window. From the dropdown menu, select “Settings”.
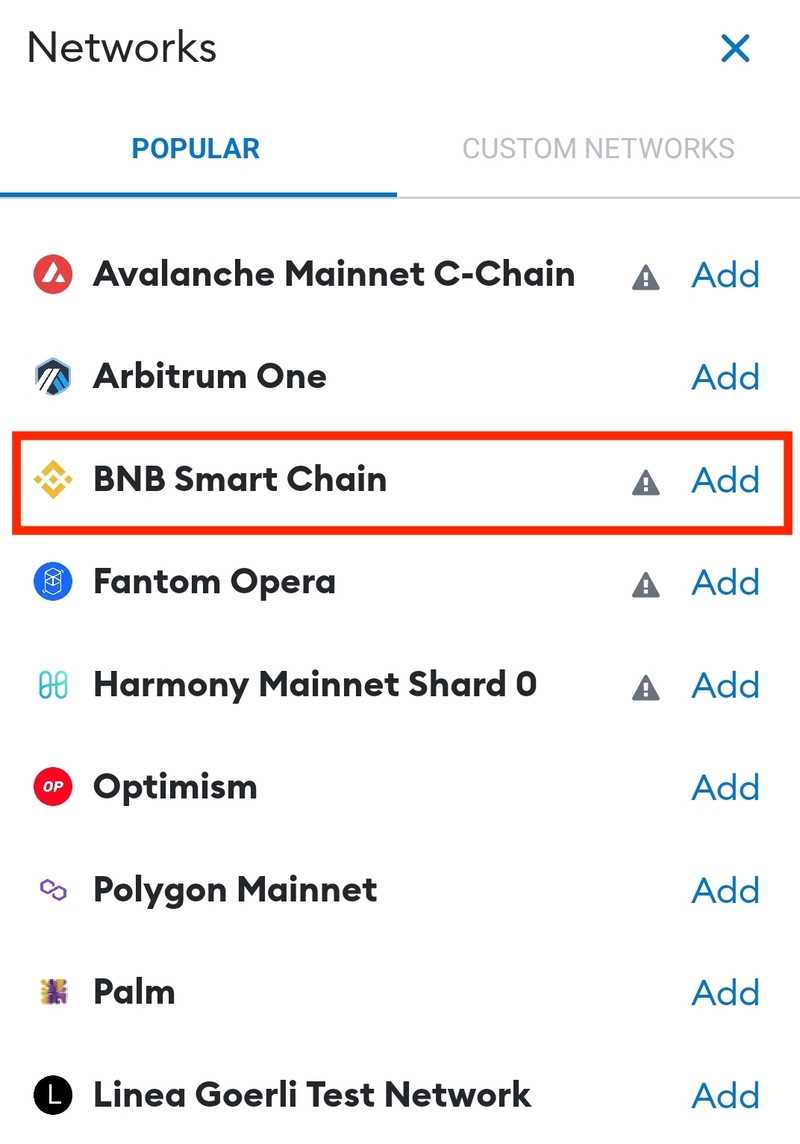
In the Settings tab, you will find various options. Choose “Networks” to access the network settings.
Step 2.3: Add BNB Network
In the Networks tab, click on the “Add Network” button to add a new network.
| Network Name | New RPC URL | Chain ID | Symbol |
|---|---|---|---|
| BSC Mainnet | https://bsc-dataseed.binance.org/ | 56 | BNB |
Fill in the following details in the provided fields for the BNB Mainnet:
- Network Name: BSC Mainnet
- New RPC URL: https://bsc-dataseed.binance.org/
- Chain ID: 56
- Symbol: BNB
Double-check the information to ensure it is accurate, and then click on the “Save” button to add the BNB network to MetaMask.
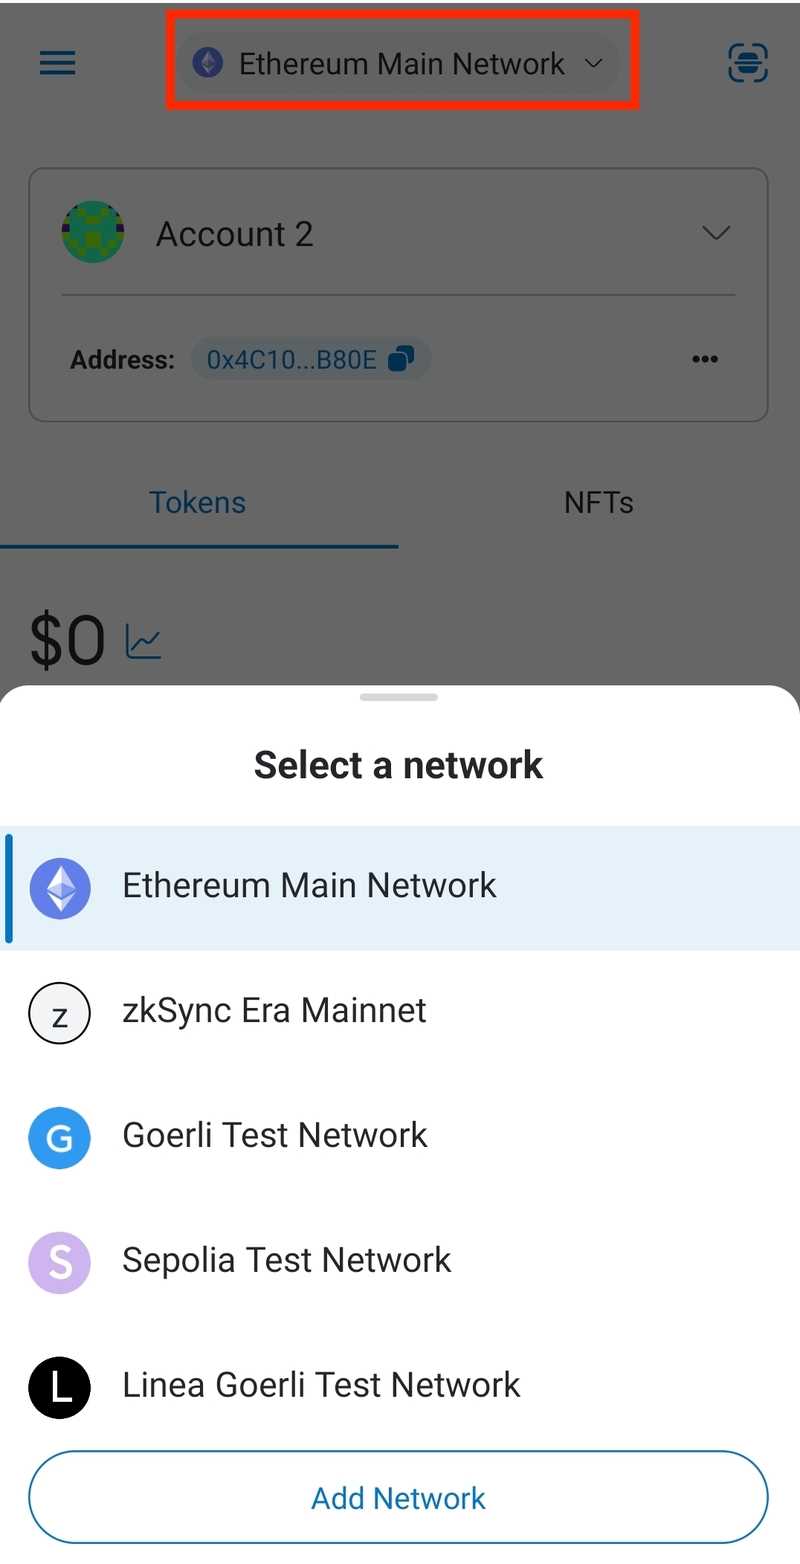
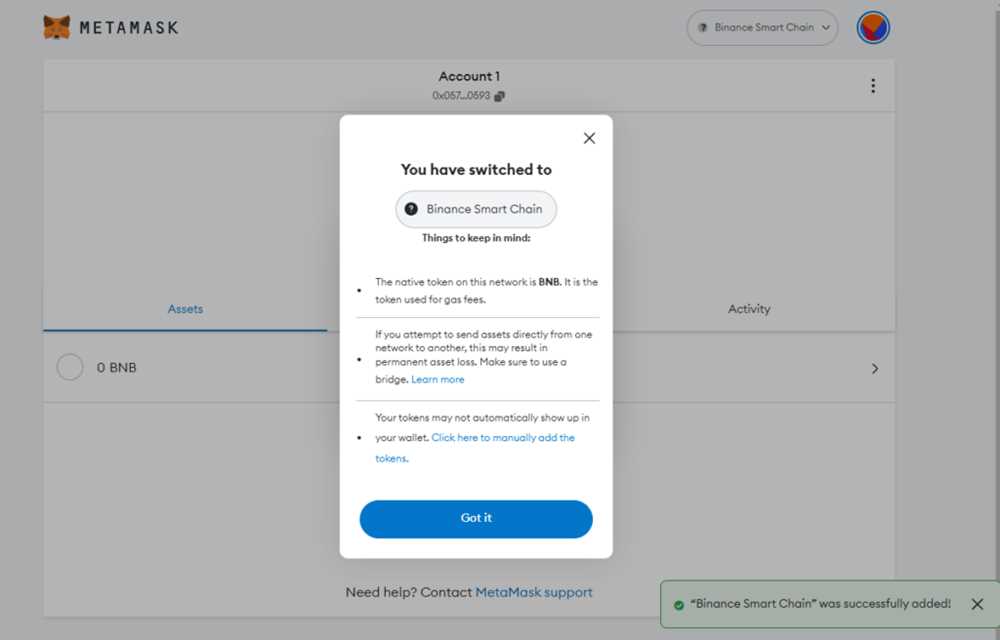
Step 2.4: Switch to BNB Network
Once you have successfully added the BNB network, return to the MetaMask extension and click on the connected network (e.g., “Ethereum Mainnet”) at the top of the MetaMask window. From the dropdown menu, select “BSC Mainnet” to switch to the BNB network.
Congratulations! You have now added the BNB network to MetaMask and switched to it. You are ready to explore Binance Smart Chain and interact with BNB-based decentralized applications (dApps).
Step 3: Entering Network Information
Once you have clicked on the “Settings” button in the MetaMask extension, you will see a new pop-up window. In this window, you can add the BNB network by entering the network information.
- Click on the “Networks” tab located at the top of the pop-up window.
- Scroll down until you see the “Add Network” button.
- Click on the “Add Network” button to open the network configuration form.
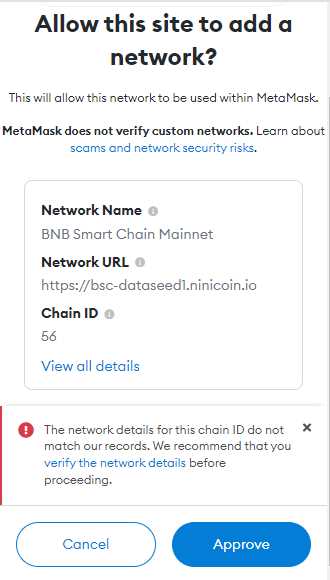
- In the form, enter the following network information:
- Network Name: BNB Network
- New RPC URL:
https://bsc-dataseed.binance.org/ - Chain ID: 56
- Symbol: BNB
- Block Explorer URL:
https://bscscan.com/ - Double-check the entered information for accuracy.
- Click on the “Save” button to save the network information.
Congratulations! You have successfully added the BNB network to your MetaMask extension. You can now use it to interact with Binance Smart Chain and BNB tokens.
Step 4: Confirming Network Addition

After completing the previous steps, you should now have successfully added the BNB Network to your MetaMask wallet. To confirm the network addition, follow these final steps:
| Step | Action |
| 1 | Open your MetaMask wallet by clicking on the extension icon in your browser. |
| 2 | At the top of the MetaMask window, click on the network selection dropdown. |
| 3 | Scroll down the list and find the BNB Network that you added in the previous steps. |
| 4 | Click on the BNB Network to select it. |
| 5 | Once the BNB Network is selected, you should see the wallet balance and other relevant information for the BNB Network. |
| 6 | Ensure that the correct network is selected by checking the URL at the top of the MetaMask window. It should match the network you added. |
| 7 | You have now successfully confirmed the addition of the BNB Network to your MetaMask wallet. You can start using the BNB Network for transactions and interactions with Binance Smart Chain. |
By following these steps, you have added and confirmed the BNB Network in your MetaMask wallet. Make sure to double-check the network selection before initiating any transactions to ensure they are executed on the correct network.
Frequently Asked Questions:
What is MetaMask?
MetaMask is a cryptocurrency wallet and browser extension that allows users to interact with decentralized applications (dApps) built on the Ethereum blockchain.
+ There are no comments
Add yours