


Welcome to the complete guide on how to add BNB Smart Chain to MetaMask! If you are interested in using Binance Smart Chain (BSC) and want to interact with decentralized applications (DApps), this guide will walk you through the process step by step.
MetaMask is a popular browser extension wallet that allows users to manage their Ethereum assets and interact with Ethereum-based DApps. However, by default, MetaMask only supports Ethereum network. But don’t worry, with a few simple steps, you can easily add BNB Smart Chain to MetaMask and start exploring the exciting world of BSC.
Step 1: Install MetaMask Extension
If you don’t already have MetaMask installed, visit the official MetaMask website or search for “MetaMask” in your browser’s extension store and follow the instructions to install it. Once installed, create an account or import an existing one if you have it.
Step 2: Accessing the Settings
After setting up MetaMask, find the MetaMask icon in your browser’s toolbar and click on it to open the extension. From there, click on your account’s avatar to open the menu. In the dropdown menu, select “Settings”.
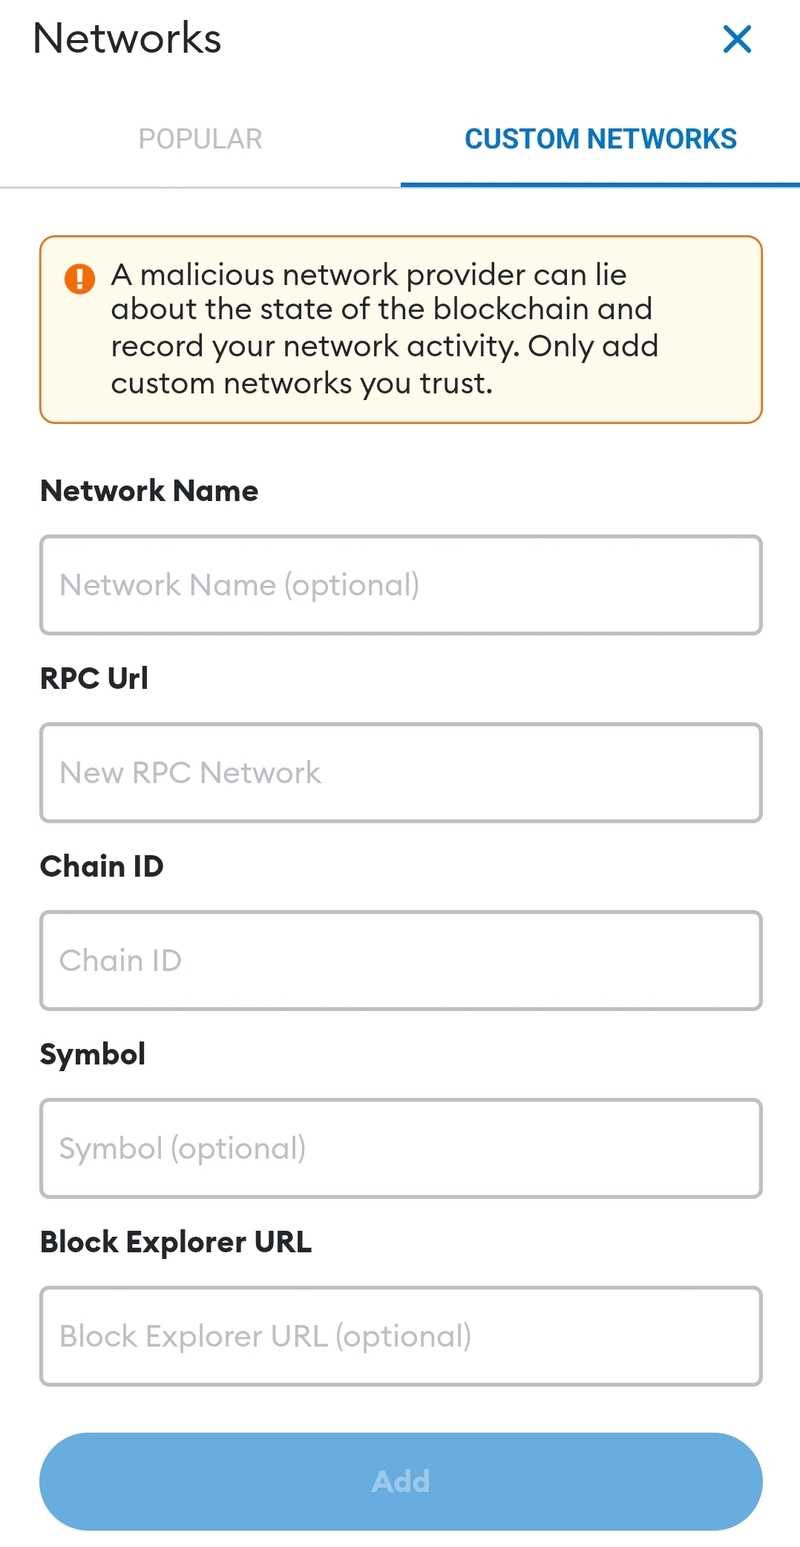
Step 3: Adding a Custom Network
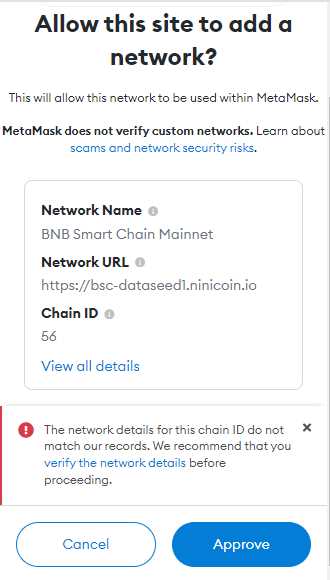
In the settings page, select “Networks” and scroll down to find the “Add Network” button. Click on it to open the network details form. Here, enter the following information:
Network Name: Binance Smart Chain
New RPC URL: https://bsc-dataseed.binance.org/
Chain ID: 56
Symbol: BNB
Leave the rest of the fields empty or with their default values. Once you have entered the details, click on the “Save” button to add the BNB Smart Chain network to your MetaMask.
Congratulations! You have successfully added BNB Smart Chain to your MetaMask extension. Now you can switch between Ethereum and BNB Smart Chain networks with ease, and start exploring a whole new world of decentralized finance (DeFi) on Binance Smart Chain!
Note: Be cautious while using smart contracts and interacting with DApps on any blockchain network. Always do thorough research and ensure the security of your funds before making any transactions.
Step-by-Step Guide: Adding BNB Smart Chain to Metamask
Metamask is a popular cryptocurrency wallet that allows users to interact with decentralized applications (DApps) on various blockchains. By default, it only supports the Ethereum network, but it can also be configured to work with other blockchains such as the Binance Smart Chain (BNB). Adding BNB Smart Chain to Metamask is a simple process that can be done in a few steps.
Step 1: Install Metamask
If you haven’t already, install the Metamask extension on your preferred web browser. Once installed, create a new wallet or import an existing one using the seed phrase or private key.
Step 2: Network Selection
Open Metamask and click on the network dropdown menu which is usually labeled as “Ethereum Mainnet”. Scroll down and click on the “Custom RPC” option.
Step 3: Add BNB Smart Chain Details
In the “New Network” form, enter the following details:
- Network Name: Binance Smart Chain
- New RPC URL: https://bsc-dataseed.binance.org/
- Chain ID: 56
- Symbol: BNB
- Block Explorer URL: https://bscscan.com
Step 4: Save and Select BNB Smart Chain
Click on the “Save” button to add the BNB Smart Chain network to Metamask. Once saved, the network should appear in the network dropdown menu. Select the Binance Smart Chain network to switch to it.
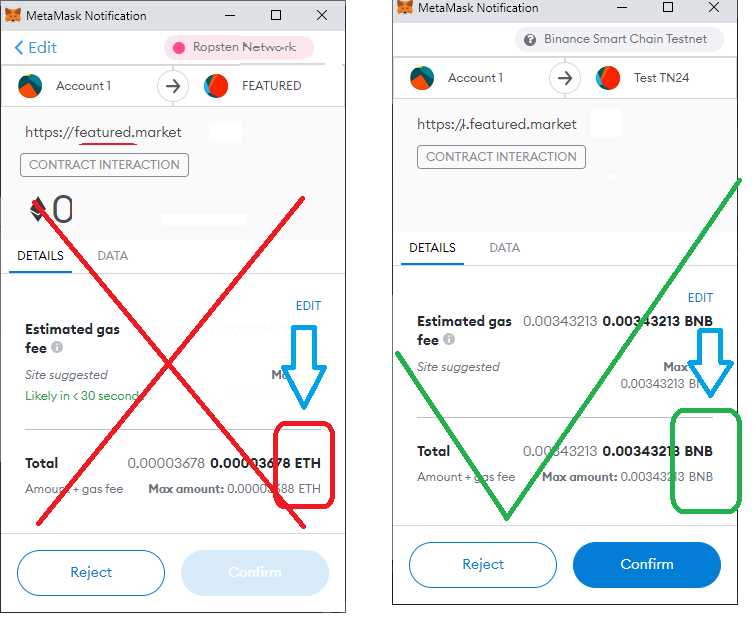
Step 5: Verify Connection
To verify that the BNB Smart Chain network has been successfully added, check the top right corner of Metamask. The selected network should now display as “Binance Smart Chain”.
Step 6: Hold and Interact with BNB Tokens
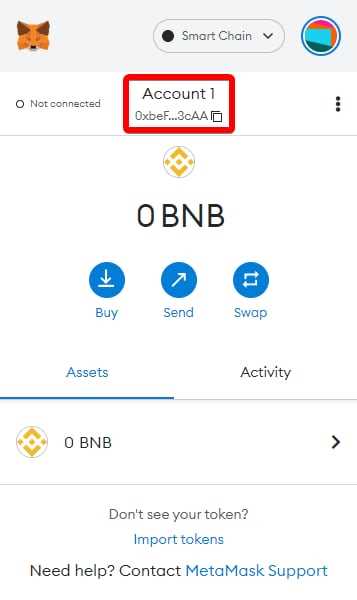
With the BNB Smart Chain added to Metamask, you can now hold and interact with BNB tokens. You can send and receive BNB, as well as access various DApps and decentralized exchanges within the Binance Smart Chain ecosystem.
Disclaimer: Always be cautious when interacting with cryptocurrencies and ensure that you are using official and secure channels to avoid scams and unauthorized access to your funds.
Download and Install Metamask Extension
To add BNB Smart Chain to your Metamask wallet, you must first download and install the Metamask extension. Follow the steps below to get started:
Step 1: Open your web browser
Launch your preferred web browser (such as Google Chrome, Firefox, or Brave) and visit the official Metamask website.
Step 2: Download Metamask
- Once on the Metamask website, click on the “Download” button.
- You will be redirected to the download page. Choose the version of Metamask compatible with your web browser.
- Click on the appropriate download link to start downloading the Metamask extension.
Step 3: Install Metamask

- After the download is complete, locate the downloaded file on your computer.
- Double-click on the file to start the installation process.
- Follow the on-screen instructions to install Metamask on your web browser.
- If prompted, grant any necessary permissions or privileges to complete the installation.
Once the installation is finished, you will see the Metamask icon in your browser’s toolbar. Click on the icon to get started with configuring and using Metamask, including adding the BNB Smart Chain network.
Create a New Wallet
To add Binance Smart Chain to your Metamask wallet, you will need to first create a new wallet on the Binance website. Follow the steps below to create a new wallet:
|
1. Visit the Binance website at www.binance.com. 2. Click on “Register” and enter your email address and password to create a new account. 3. Read and agree to the terms of service and click on “Register” again. 4. Verify your email address by clicking on the link sent to your registered email. 5. Once you have verified your email, log in to your Binance account using your registered email and password. 6. After logging in, click on the “Wallet” tab in the top menu and select “Overview”. 7. In the “Overview” section, click on the “Create Wallet” button. 8. You will be prompted to set up a password for your new wallet. Make sure to choose a strong, unique password. 9. After setting up your password, click on the “Download Keystore File (UTC / JSON)” button to download the Keystore file. 10. Save this Keystore file in a secure location, as it will be required to access your wallet. |
11. Next, click on the “I understand, continue” button. 12. On the next screen, you will be shown your “Mnemonic Phrase”. This is an important backup phrase for your wallet. 13. Write down or print out this mnemonic phrase and store it in a safe place. Never share this phrase with anyone. It can be used to recover your wallet if you ever lose access to it. 14. After saving your mnemonic phrase, click on the “Finish” button. 15. Congratulations! You have successfully created a new Binance wallet. Your wallet address will be displayed on the next screen. 16. Make sure to write down or copy your wallet address, as you will need it later to add Binance Smart Chain to your Metamask wallet. |
By following these steps, you have successfully created a new wallet on Binance. Now, let’s move on to adding Binance Smart Chain to your Metamask wallet.
Add Binance Smart Chain Network

In order to add Binance Smart Chain network to your Metamask wallet, follow these steps:
Step 1: Open Metamask Extension

Open your Metamask wallet extension in your browser. If you don’t have Metamask installed, you can download it from the official website and set up a new wallet.
Step 2: Switch to Custom RPC Settings
Click on the network selection dropdown menu on the top where it says “Main Ethereum Network” and select “Custom RPC” at the bottom of the list.
Step 3: Enter Binance Smart Chain Details
Fill in the following details in the custom RPC settings:
- Network Name: Binance Smart Chain
- New RPC URL: https://bsc-dataseed.binance.org/
- ChainID: 56
- Symbol: BNB
- Block Explorer URL: https://bscscan.com
Make sure all the details are correct and then click on the Save button.
Step 4: Switch to Binance Smart Chain Network
After saving the settings, you will be redirected to the main Metamask screen. To switch to the Binance Smart Chain network, click on the network selection dropdown menu again and select “Binance Smart Chain”.
Now you have successfully added Binance Smart Chain network to your Metamask wallet. You can start exploring and using Binance Smart Chain dapps and tokens.
Note: Make sure to keep track of the network you are currently using to avoid any potential mistakes or losses. Always double-check the network selection before performing any transactions.
Import BNB Smart Chain Wallet
To import your BNB Smart Chain wallet into MetaMask, follow the steps below:
- Click on the MetaMask extension icon in your browser’s toolbar.
- In the MetaMask window, click on the account icon located at the top right corner.
- From the drop-down menu that appears, select “Import Account”.
- A new window will open, prompting you to enter the private key or seed phrase associated with your BNB Smart Chain wallet.
- Enter the private key or seed phrase and click on “Import”.
- MetaMask will validate the information and if everything is correct, your BNB Smart Chain wallet will be imported into MetaMask.
Once your BNB Smart Chain wallet is imported, you can start using it to send and receive BNB and interact with decentralized applications (dApps) on the Binance Smart Chain.
| Tip: | Make sure to keep your private key or seed phrase secure and never share it with anyone. Losing this information may result in permanent loss of access to your funds. |
|---|
Congratulations! You have successfully imported your BNB Smart Chain wallet into MetaMask. Happy exploring!
Frequently Asked Questions:
How do I add BNB Smart Chain to my Metamask?
To add BNB Smart Chain to your Metamask, you need to go to the Metamask extension in your browser and click on the menu icon (three horizontal lines). Then, select “Settings” and click on “Networks”. Scroll down and click on “Add Network”. Fill in the required information for the BNB Smart Chain network, including the network name, RPC URL, and chain ID. Finally, click on “Save” to add the BNB Smart Chain to your Metamask.
What is the RPC URL for the BNB Smart Chain?
The RPC URL for the BNB Smart Chain is “https://bsc-dataseed.binance.org/”. This is the endpoint that allows you to connect to the BNB Smart Chain network and interact with it using your Metamask wallet.
What is the chain ID for the BNB Smart Chain?
The chain ID for the BNB Smart Chain is 56. This is a unique identifier for the BNB Smart Chain network, which helps ensure that your transactions and interactions are directed to the correct network when using Metamask.
Can I use my existing Metamask wallet for BNB Smart Chain?
Yes, you can use your existing Metamask wallet for BNB Smart Chain. By adding BNB Smart Chain as a network in Metamask, you can switch between different networks and use your wallet for BNB transactions and interactions. Just make sure to switch to the BNB Smart Chain network in Metamask before performing any BNB-related actions.
Is it safe to add BNB Smart Chain to Metamask?
Adding BNB Smart Chain to Metamask is generally safe if you follow the official instructions and make sure to download Metamask from a trusted source. However, it’s always important to be cautious and double-check the URLs and information you enter to avoid any potential phishing attempts. It’s recommended to verify the information provided by official sources before proceeding.
+ There are no comments
Add yours