


If you are a cryptocurrency enthusiast and use Metamask as your go-to Ethereum wallet, you may be interested in exploring new networks aside from the default ones. Metamask allows you to connect to various networks, giving you more opportunities to explore decentralized applications and interact with different blockchain ecosystems.
Adding a new network to Metamask is a straightforward process that requires a few simple steps. Once you’ve added a new network, you can easily switch between networks with just a few clicks.
To add a new network, open your Metamask extension and click on the network selection dropdown located at the top of the window. From the dropdown, select “Custom RPC” to add a custom network. This option allows you to connect to networks that are not included in the default list.
After selecting “Custom RPC”, you will be presented with a form to fill out the network details. Enter the network name, currency symbol, and chain ID. Additionally, you will need to provide the RPC URL which is the address where the network’s nodes can be accessed. Make sure to double-check the information to ensure it is accurate.
Once you have filled out the form with the necessary details, click on “Save” to add the new network to your Metamask wallet. You can now switch between networks by selecting the desired network from the dropdown list.
Adding new networks to Metamask opens up a world of possibilities for users who want to explore beyond the default options. Whether you want to experiment with testnets, connect to custom-developed networks, or explore new blockchain ecosystems, Metamask makes it easy to expand your horizons.
So go ahead, add that new network to Metamask and embark on a journey of discovery and innovation in the world of cryptocurrencies!
How to Add New Networks to Metamask?
Metamask is a popular cryptocurrency wallet that allows users to interact with decentralized applications (dApps) on the Ethereum blockchain. By default, it supports the Ethereum network, but you can also add other custom networks to Metamask. Here’s a step-by-step guide on how to do it.
Step 1: Open Metamask
Launch the Metamask extension in your web browser (Chrome, Firefox, etc.) by clicking on the Metamask icon. If you don’t have it installed, you can find it in the Chrome Web Store or the Firefox Add-ons marketplace.
Step 2: Access Network Settings
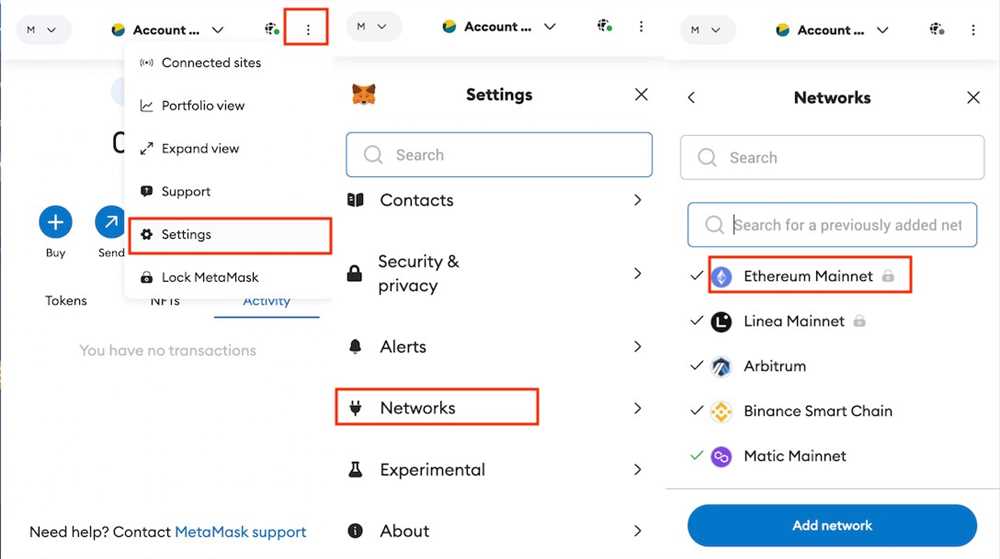
Once Metamask is open, you’ll see the Metamask control panel overlay on your browser. Click on the icon with the three horizontal lines to access the main menu. Then, select “Settings” from the dropdown menu.
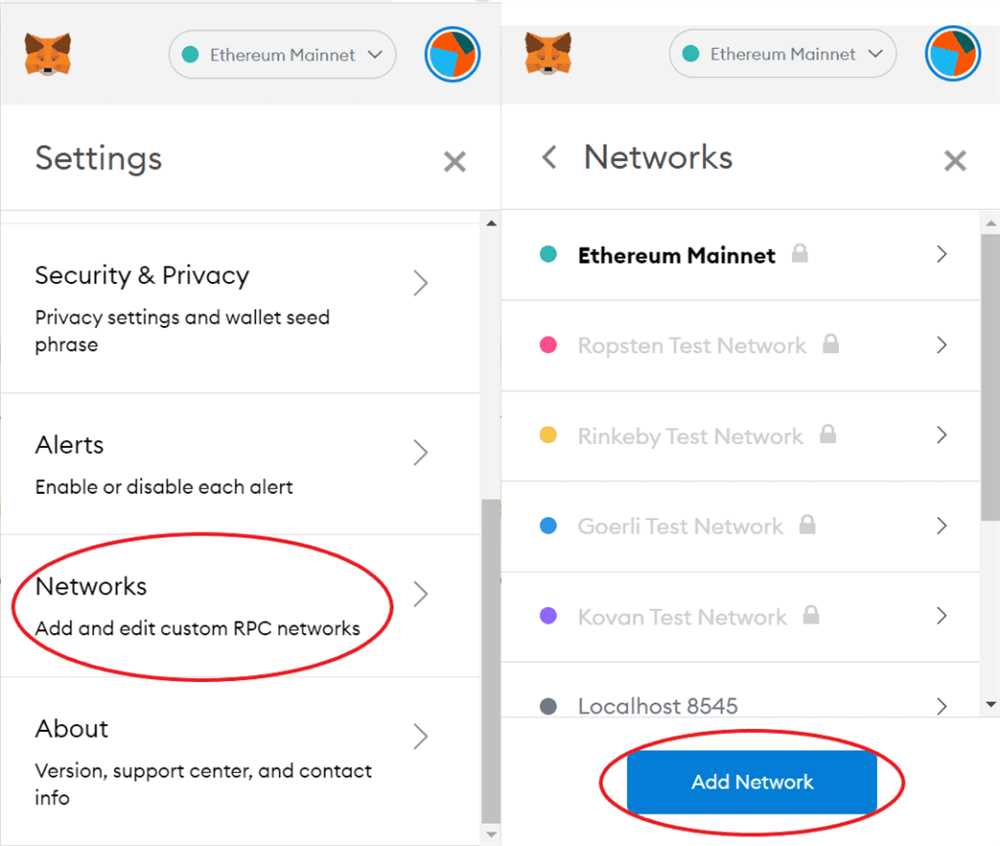
Step 3: Add Network
In the settings menu, select the “Networks” tab. At the bottom, you’ll find an “Add Network” button. Click on it to add a new network to Metamask.
Step 4: Fill in Network Details
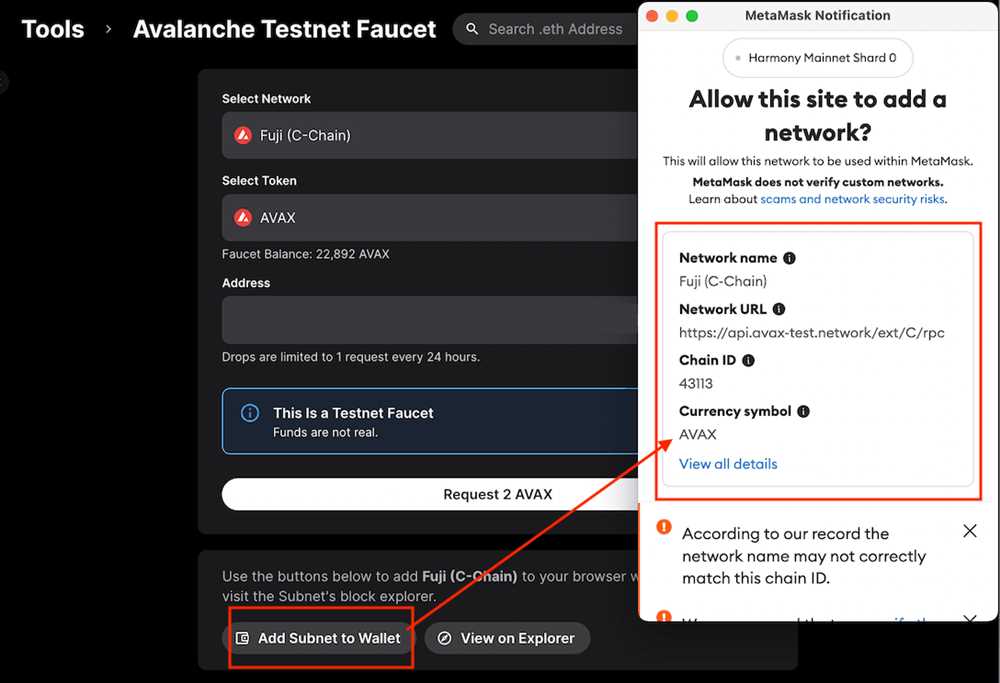
Fill in the required network details in the provided fields. You’ll need to provide the network name, network URL or RPC endpoint, chainID, symbol, and block explorer URL. Make sure to double-check the information for accuracy.
Step 5: Save Changes
After filling in the network details, click on the “Save” button to add the new network to Metamask. It will now appear in the Networks list alongside the default Ethereum network.
Step 6: Switch Networks
To switch to the newly added network, click on the network selector button at the top of the Metamask control panel. Select the desired network from the dropdown list. Metamask will now connect to the selected network, allowing you to interact with dApps on that network.
Adding new networks to Metamask expands its capabilities and allows you to interact with a wider range of dApps. Follow these steps to add any network you want and enjoy a seamless experience in the Ethereum ecosystem.
Step-by-Step Guide for Adding New Networks to Metamask

Metamask is a popular cryptocurrency wallet that allows users to interact with decentralized applications (DApps) on different blockchain networks. By default, Metamask supports the Ethereum network, but it is also possible to add custom networks to the wallet. This step-by-step guide will walk you through the process of adding new networks to Metamask.
Step 1: Open Metamask

To begin, open the Metamask extension in your web browser. You can identify the Metamask icon, which usually appears as a fox or a dot in the top-right corner of your browser.
Step 2: Access the Network Settings
Click on the Metamask icon to open the wallet interface. At the bottom of the drop-down menu, you will see a link that says “Settings.” Click on it to access the settings page.
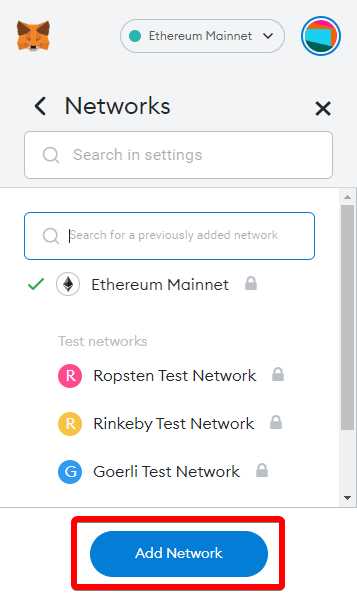
Step 3: Add a New Network
In the settings page, click on the “Networks” tab. Then, scroll down and click on the “Add Network” button at the bottom of the page.
Step 4: Enter Network Details

A form will appear where you can enter the details for the new network you wish to add. You will need to provide the following information:
- Network Name: Enter a name for the network.
- New RPC URL: Enter the URL of the blockchain network you want to connect to.
- Chain ID: Enter the unique identifier for the network. Each network has its own chain ID.
- Symbol (optional): Enter the symbol or ticker for the network’s native currency.
- Block Explorer (optional): Enter the URL of the block explorer for the network.
Make sure to double-check the information you entered to ensure its accuracy.
Step 5: Save the Network
Once you have entered all the required details, click on the “Save” button. Metamask will validate the network and add it to the list of available networks in your wallet.
Step 6: Switch to the New Network
Now that the new network has been added, you can switch to it by clicking on the network name in the top-right corner of the Metamask interface. A drop-down menu will appear, allowing you to select the desired network.
Congratulations! You have successfully added a new network to your Metamask wallet. You can now interact with decentralized applications on this network and manage your assets accordingly.
Common Issues while Adding New Networks to Metamask
When adding new networks to Metamask, you may encounter some common issues that can prevent the network from being successfully added. Here are a few of these issues:
1. Incorrect Network Configuration
One of the most common issues is entering incorrect network configuration details. It is essential to ensure that the network name, RPC URL, chain ID, symbol, and block explorer URL are all entered correctly. Even a minor mistake in any of these details can lead to a failure in adding the network to Metamask.
2. Incompatible Network Version

Metamask might not support all network versions, especially if they are too old or too new. If you are trying to add a network with an incompatible version, Metamask will not be able to connect to that network. Make sure to check the compatibility of the network version with your specific version of Metamask.
3. Firewall or Antivirus Restrictions
Sometimes, firewall or antivirus software can prevent Metamask from connecting to new networks. These programs might classify the network’s RPC URL as a potential security threat and block the connection. To resolve this issue, you can try temporarily disabling the firewall or antivirus software and then add the network to Metamask.
Note: Remember to re-enable the firewall or antivirus software after adding the network.
4. Network Connectivity Issues
If you are experiencing connectivity issues, such as a slow internet connection, Metamask might not be able to connect to the new network. In such cases, it is advisable to check your internet connection and try again. You can also try connecting to a different network to determine if the issue is specific to the network you are trying to add.
5. Insufficient Network Requirements
Certain networks might have specific requirements that need to be fulfilled in order to be added to Metamask. For example, some networks require a minimum balance of a specific token to be held in the wallet. Make sure to check the specific requirements of the network you are trying to add and ensure that you meet those requirements.
If you are experiencing any issues while adding new networks to Metamask, it is recommended to double-check the network configuration details, verify compatibility, check firewall or antivirus settings, ensure network connectivity, and fulfill any specific network requirements. By addressing these common issues, you can successfully add new networks to Metamask and expand your decentralized finance capabilities.
Tips for Successfully Adding New Networks to Metamask
Adding new networks to Metamask can be a useful way to interact with decentralized applications and explore different blockchain networks. However, it’s important to follow a few tips to ensure a successful network addition process:
1. Identify the Network’s RPC URL
Before adding a new network to Metamask, you need to identify the network’s RPC (Remote Procedure Call) URL. This URL serves as the connection between Metamask and the network. Make sure to obtain the correct RPC URL from a reliable source, such as the network’s official documentation or community forums.
2. Choose the Correct Network Name and Symbol
When adding a new network, Metamask requires you to provide a name and a symbol for the network. It’s crucial to input the correct name and symbol to avoid confusion and potential issues. Double-check the network’s official name and symbol to ensure accuracy.
3. Set the Chain ID
Each blockchain network has a unique Chain ID, which helps Metamask identify the network and prevent conflicts. Ensure that you set the correct Chain ID for the new network. Refer to the network’s official documentation or developer resources to find the appropriate Chain ID.
4. Verify Network Information
Before finalizing the addition of a new network, take the time to verify all the network information, including the RPC URL, Chain ID, name, and symbol. Small errors or typos in these details could lead to connectivity problems or confusion while using Metamask.
Remember: Incorrectly added or malicious networks can potentially put your funds and personal information at risk. Ensure that you only add networks that you trust and have verified thoroughly.
Conclusion
By following these tips, you can confidently add new networks to Metamask and explore different blockchain ecosystems. It’s essential to be cautious and double-check all the details to ensure a smooth and secure network addition process.
Frequently Asked Questions:
What is Metamask?
Metamask is a cryptocurrency wallet and browser extension that allows users to interact with decentralized applications on the Ethereum network.
Why would I want to add new networks to Metamask?
Adding new networks to Metamask allows you to access and interact with decentralized applications and tokens on networks other than Ethereum, expanding your options for participating in the crypto space.
+ There are no comments
Add yours