


Metamask is a powerful and popular web browser extension that allows users to interact with the Ethereum blockchain. It provides a user-friendly interface for managing cryptocurrency wallets, executing smart contracts, and browsing decentralized applications (dApps). In this comprehensive guide, we will delve into the functionality of Metamask and explore its various features and capabilities.
One of the key functionalities of Metamask is its wallet management system. With Metamask, users can create and manage multiple Ethereum wallets securely. These wallets are protected with a unique password and a secret recovery phrase, ensuring the safety of users’ funds and assets.
Metamask also acts as a bridge between users and decentralized applications. By seamlessly integrating with web browsers, it allows users to interact with dApps and execute transactions directly from their wallets. This eliminates the need for manual transaction signing and provides a convenient and streamlined experience for users.
Furthermore, Metamask serves as a powerful developer tool by providing an API that allows developers to build and integrate dApps with ease. Developers can leverage Metamask’s functionalities to facilitate seamless blockchain interactions and enable a wide range of innovative applications and use cases.
In this guide, we will explore the step-by-step process of setting up Metamask, managing wallets, and interacting with dApps. We will also discuss advanced features such as gas fees, network settings, and security best practices. By the end, you will have a clear understanding of Metamask and be ready to harness its full potential.
What is Metamask?
Metamask is a browser extension and cryptocurrency wallet that provides users with a convenient way to interact with decentralized applications (DApps) on the Ethereum blockchain. It allows users to securely store, manage, and transact with digital assets using a user-friendly interface.
Metamask acts as a bridge between web browsers and the Ethereum blockchain, enabling users to seamlessly connect to decentralized applications without the need for a separate application or account. It provides users with a unique Ethereum address, which can be used to send and receive Ethereum and other ERC-20 tokens.
Metamask also offers features such as the ability to view and interact with smart contracts, manage multiple wallets, and customize transaction fees. It integrates seamlessly with popular web browsers like Chrome, Firefox, and Brave, making it easily accessible to a wide range of users.
Metamask also plays a crucial role in ensuring security for users. It employs industry-standard encryption protocols to protect user data and private keys, preventing unauthorized access and potential theft of funds. Additionally, users have full control over their data, as Metamask does not store any personal information or user activity data.
Overall, Metamask is an essential tool for anyone looking to explore the world of decentralized applications and interact with the Ethereum blockchain. It provides a simple and secure way to manage digital assets and participate in the decentralized ecosystem.
Key Features of Metamask
Metamask is a widely used browser extension that provides users with access to a secure and convenient way to interact with the Ethereum blockchain. Here are some of the key features that make Metamask an essential tool for Ethereum users:
- Wallet and Account Management: Metamask allows users to create and manage multiple Ethereum wallets, making it easy to store and organize different accounts.
- Secure Digital Identity: Metamask generates a unique, encrypted identity for each user, providing a secure way to authenticate and authorize transactions.
- Transaction Signing: Metamask enables users to sign transactions securely and conveniently, ensuring the integrity and authenticity of each transaction.
- DApp Integration: Metamask seamlessly integrates with decentralized applications (DApps), allowing users to interact with these applications using their Ethereum wallets.
- Token Management: Metamask provides users with the ability to manage and transfer ERC-20 tokens, making it easy to participate in token sales or send tokens to other Ethereum addresses.
- Network Customization: Metamask allows users to connect to different Ethereum networks, such as the mainnet, testnets, and private networks, providing flexibility for developers and users alike.
- Transaction History: Metamask keeps a record of all the transactions made with the connected wallet, providing users with a convenient way to track their activity.
These key features make Metamask an essential tool for anyone looking to interact with the Ethereum blockchain, whether it’s managing accounts, signing transactions, or participating in decentralized applications.
Getting Started with Metamask
Welcome to Metamask, the leading cryptocurrency wallet and gateway to the decentralized web. In this guide, we will walk you through the process of getting started with Metamask, from installation to account setup.
1. Install Metamask
To begin, visit the Metamask website and download the extension for your preferred browser. Metamask is available for Chrome, Firefox, Brave, and Edge. Once the extension is installed, you will see the Metamask icon in your browser toolbar.
2. Create a New Account
Click on the Metamask icon and select “Create a Wallet”. Follow the prompts to generate a strong password and a secret backup phrase. It’s important to write down this backup phrase and store it in a safe place, as it can be used to recover your account if needed.
3. Fund Your Account
After creating a wallet, you will be redirected to your account page. Here, you can view your account address, copy it, and share it with others for transactions. Before you can start interacting with decentralized applications (dapps), you need to fund your account with some cryptocurrency. You can do this by sending cryptocurrency from another wallet or by purchasing it on a cryptocurrency exchange.
4. Connect to a Network
In order to interact with dapps, you need to connect Metamask to a blockchain network. By default, Metamask is set to the Ethereum Mainnet. However, you can also select other networks such as the Ethereum Testnet or custom networks. To change the network, click on the network dropdown menu in the top center of the Metamask interface and select your desired network.
5. Explore Dapps
Now that you have an account and are connected to a network, you can start exploring and using dapps. Visit popular dapp stores such as Dapp.com or DappRadar to discover a wide range of decentralized applications. Once you find a dapp you want to use, simply click on the “Connect” button or follow the instructions provided by the dapp to connect your Metamask wallet.
With these steps, you are now ready to start using Metamask and diving into the world of decentralized finance and the blockchain ecosystem. Happy exploring!
Installation and Setup

Before you can start using Metamask, you will need to install it and set it up on your browser. Follow the step-by-step guide below to get started:
Step 1: Install Metamask
To install Metamask, go to the official Metamask website or visit the browser extension marketplace for your preferred browser. Once there, click on the “Install” button and follow the prompts to add Metamask to your browser.
Step 2: Create a new wallet
After installing Metamask, click on the extension icon in your browser and follow the prompts to create a new wallet. Make sure to choose a strong password and save your seed phrase in a safe place. This seed phrase is crucial for recovering your wallet in case you lose access to your account.
Step 3: Connect to a network
By default, Metamask will connect to the Ethereum main network. However, you can also connect to other networks such as the Ropsten testnet or a local development network. To switch networks, click on the network dropdown menu in Metamask and select the network you want to connect to.
Step 4: Import an existing wallet (optional)
If you already have a wallet with funds in it, you can choose to import it into Metamask rather than creating a new wallet. To do this, click on the “Import Wallet” option in the Metamask menu and follow the prompts to enter your wallet’s private key or JSON file.
Step 5: Enable browser support (optional)
If you want to use Metamask to interact with decentralized applications (DApps) on the web, you may need to enable browser support. Some DApps require specific browser settings to work properly with Metamask. To enable browser support, click on the Metamask icon in your browser and go to the settings page. From there, you can toggle on the option for “Advanced” settings and make any necessary changes.
That’s it! You are now ready to use Metamask and start interacting with the Ethereum blockchain. Make sure to familiarize yourself with the interface and explore the various features and functions that Metamask has to offer.
Creating a Wallet
To access the features offered by MetaMask, you need to create a wallet. Follow the steps below to get started:
Step 1: Visit the official MetaMask website and download the extension for your web browser. Currently, MetaMask supports major browsers like Chrome, Firefox, and Brave.
Step 2: Once the extension is installed, you will see the MetaMask icon in your browser’s toolbar. Click on the icon to open the extension.
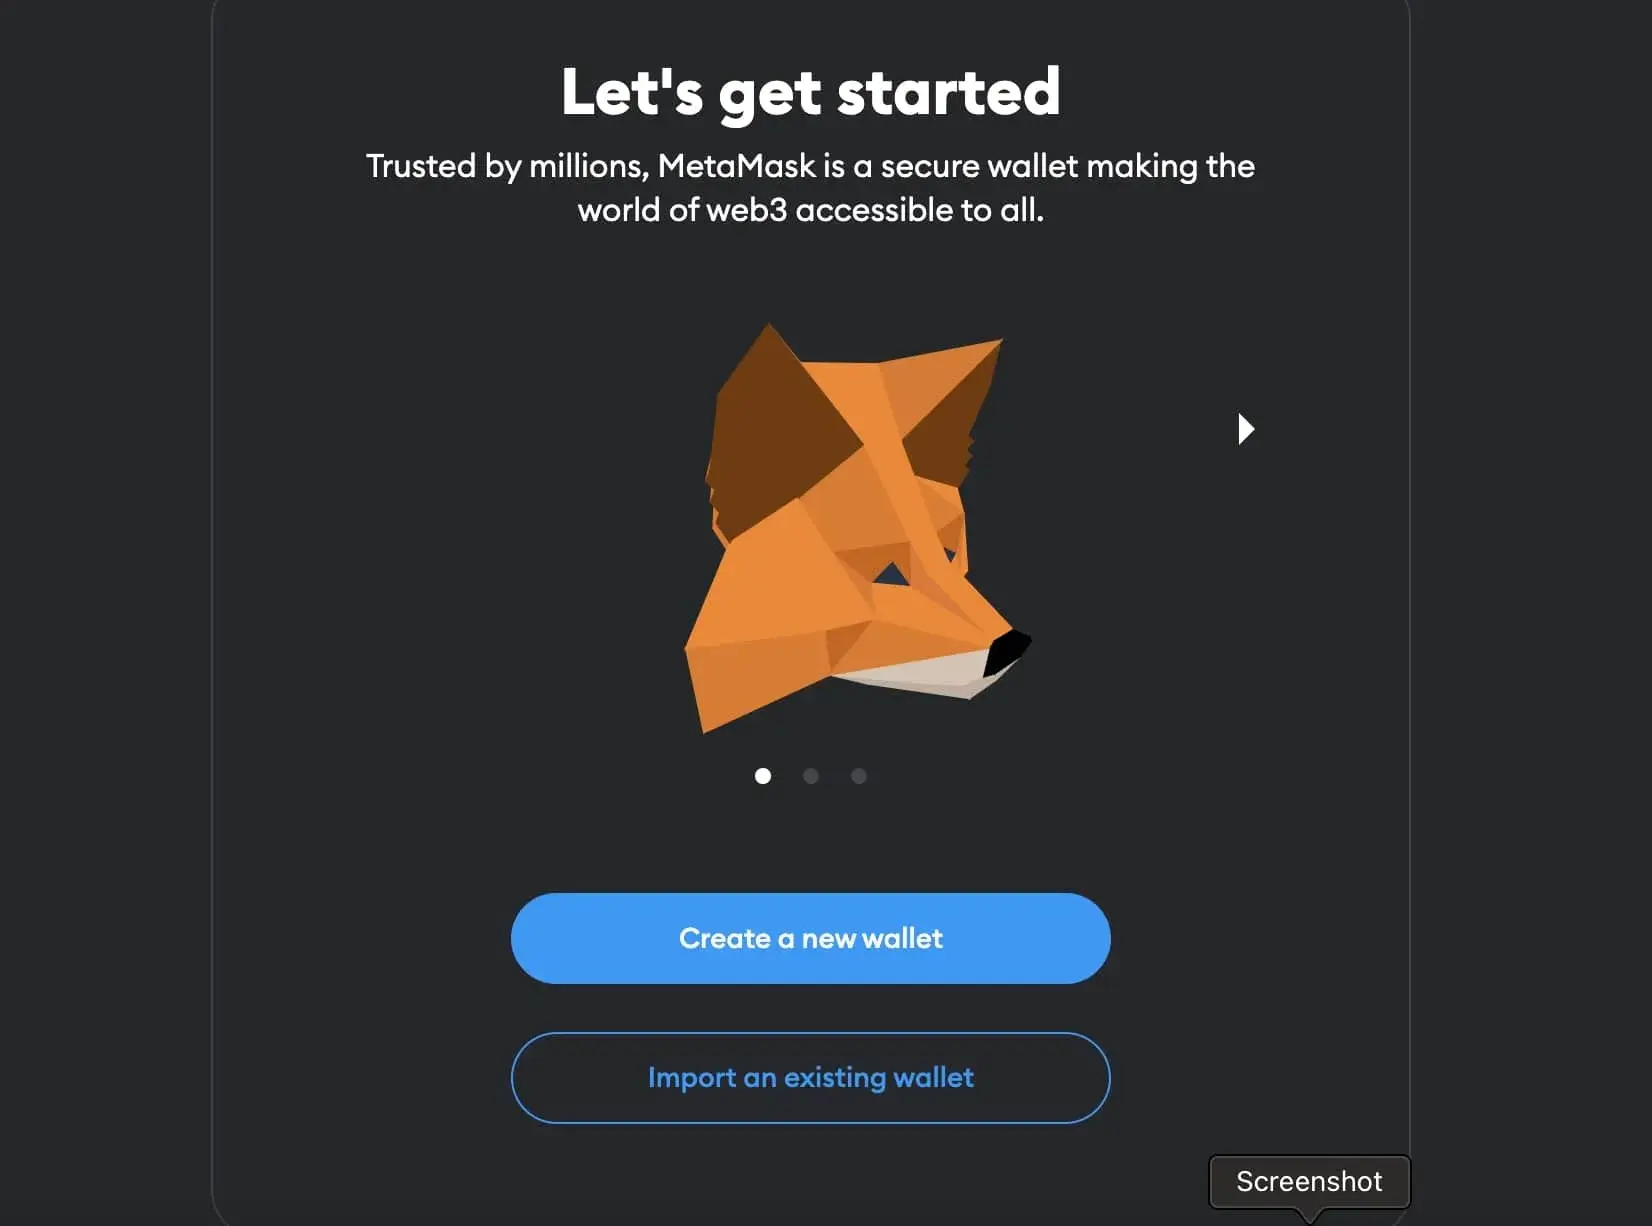
Step 3: Click on the “Get Started” button to begin creating your wallet.
Step 4: You will be presented with the option to either import an existing wallet or create a new one. To create a new wallet, click on the “Create a Wallet” button.
Step 5: Set a strong password for your wallet. Make sure to use a combination of uppercase and lowercase letters, numbers, and special characters to enhance the security of your wallet.
Step 6: After setting the password, you will be provided with a unique 12-word mnemonic phrase. It is crucial to write down this phrase and store it securely. The mnemonic phrase acts as a backup and can be used to restore your wallet in case you lose access to your device.
Step 7: Carefully copy and store your mnemonic phrase in a safe place. Never share it with anyone, as it grants access to your wallet and funds.
Step 8: Confirm your mnemonic phrase by selecting the words in the correct order. This step ensures that you have properly recorded your backup phrase.
Step 9: Congratulations! You have successfully created your MetaMask wallet. You can now use it to manage your Ethereum assets, interact with decentralized applications (dApps), and participate in blockchain transactions.
Note: It is recommended to set up additional security measures, such as enabling two-factor authentication and backing up your wallet securely, to safeguard your funds.
Using Metamask for Transactions
Metamask is a powerful tool that allows you to easily interact with decentralized applications and perform transactions on the Ethereum blockchain. With Metamask, you can securely manage your Ethereum accounts and seamlessly send and receive cryptocurrencies.
To use Metamask for transactions, you first need to install the Metamask extension in your web browser. Once it’s installed, you can create a new Ethereum wallet or import an existing one. Metamask generates a unique wallet address and private key pair for you, which you can use to securely sign and authorize transactions.
To initiate a transaction using Metamask, you need to select the appropriate network from the network dropdown menu. Depending on the decentralized application (DApp) you’re using, you may need to switch to the Ethereum Mainnet, the Rinkeby Testnet, or any other supported network.
Once you’re on the desired network, you can interact with DApps and perform transactions. Most DApps will have a user interface that guides you through the transaction process. You’ll typically see options to specify the recipient address, the amount to send, and any additional data required by the DApp.
After confirming the details of the transaction, Metamask will display a prompt asking you to review and authorize the transaction. This is where your wallet’s private key is used to securely sign the transaction and prove your ownership of the wallet. Make sure to review the transaction details and verify that they are correct before approving the transaction.
Once the transaction is approved, Metamask will send it to the Ethereum network for processing. You can track the progress of your transaction using the transaction hash provided by Metamask. The time it takes for a transaction to be confirmed depends on factors such as network congestion and gas fees.
During the transaction process, it’s important to be mindful of security. Never share your wallet’s private key with anyone, and only use trusted decentralized applications. Additionally, always double-check the transaction details before approving them to avoid any potential mistakes or scams.
In conclusion, Metamask makes it straightforward to perform transactions on the Ethereum blockchain. Its user-friendly interface, wallet management features, and secure transaction signing make it an essential tool for interacting with decentralized applications and managing your digital assets.
Frequently Asked Questions:
What is Metamask?
Metamask is a cryptocurrency wallet and browser extension that allows users to interact with decentralized applications (dApps) on the Ethereum blockchain. It provides a user-friendly interface for managing Ethereum addresses, storing ETH and ERC-20 tokens, and securely signing transactions.
+ There are no comments
Add yours