


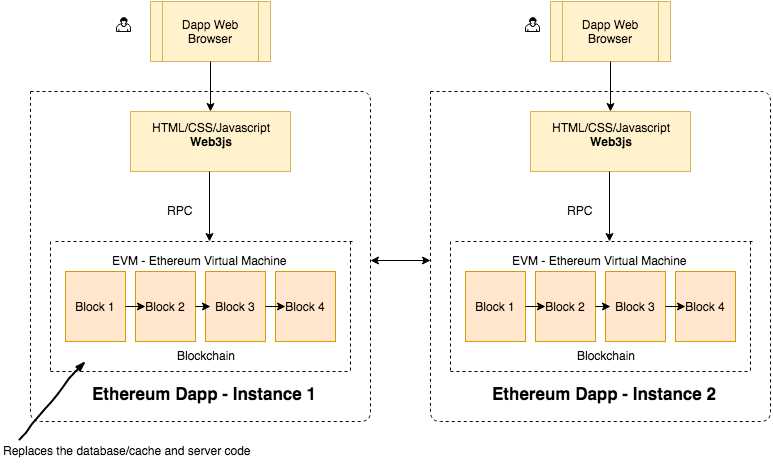
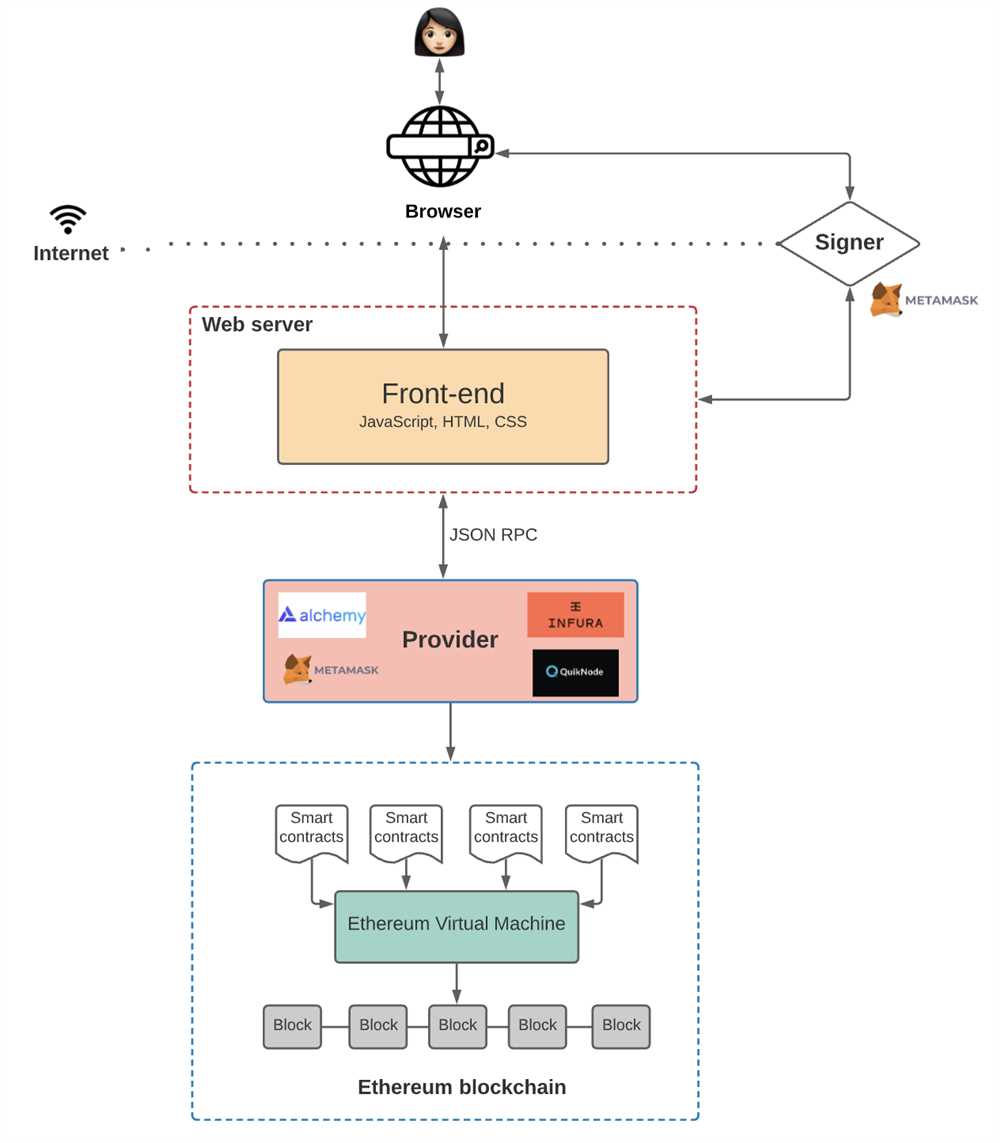
Metamask is a powerful browser extension that allows users to interact with decentralized applications (dApps) on the Ethereum blockchain. With its user-friendly interface and comprehensive developer tools, Metamask makes it easy for both beginners and experienced developers to build and deploy their own dApps.
One of the key features of Metamask is its developer tools, which provide a suite of functionalities that enable developers to test and debug their dApps. These tools include a built-in Ethereum blockchain emulator, a transaction inspector, and a console for executing JavaScript code.
Using the Metamask developer tools, developers can quickly iterate and refine their dApps, ensuring they function as intended before deploying them to the Ethereum mainnet. This not only saves time, but also reduces the risk of expensive mistakes or vulnerabilities in the final product.
In this article, we will explore the various features and functionalities offered by Metamask’s developer tools, and learn how to use them effectively to build decentralized applications.
Setting Up Metamask
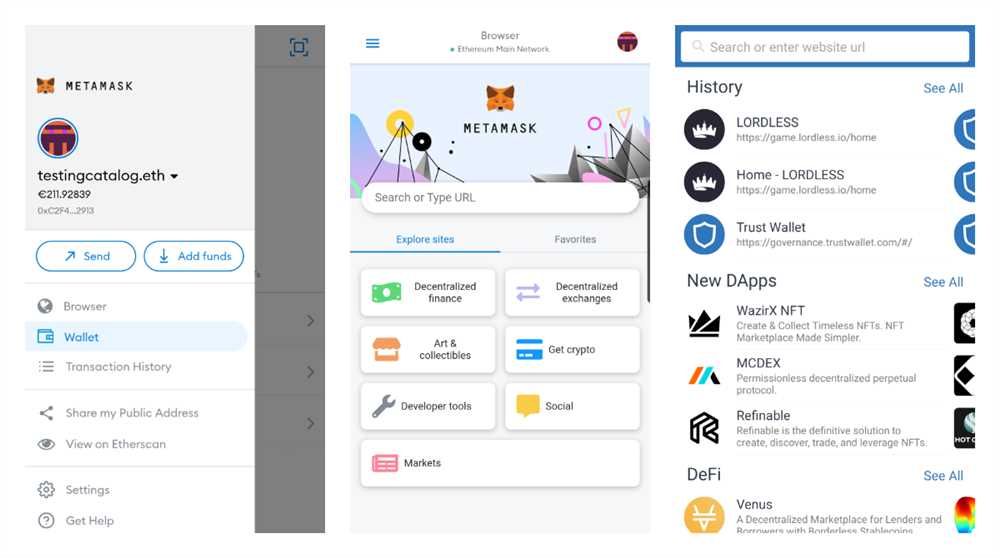
In order to start building decentralized applications (DApps) using Metamask, you first need to set it up on your browser. Here are the steps to get started:
- Install Metamask by navigating to the official Metamask website or searching for it on your browser’s extension store. Metamask is available for Chrome, Firefox, Brave, and other popular browsers.
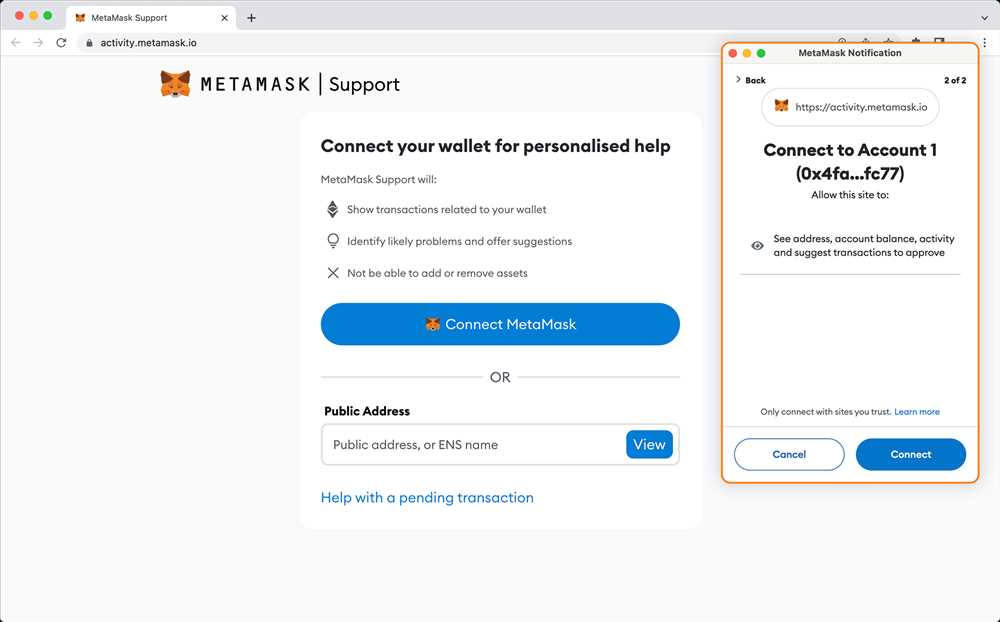
- Once installed, click on the Metamask icon in your browser’s toolbar to open the extension. You will be guided through a setup process.
- Create a new wallet or import an existing one. Metamask allows you to generate a new wallet by creating a new seed phrase or importing an existing one by entering your seed phrase or private key.
- Set a password for your wallet. This password will be required whenever you access your wallet or make transactions, so make sure to choose a strong and secure password.
- After setting up your wallet, you will be asked to agree to the terms and conditions of Metamask. Read through the terms and conditions and click on the checkbox to confirm your agreement.
- Next, you will be asked to back up your seed phrase. Your seed phrase is a randomly generated set of words that can be used to recover your wallet in case you lose access to it. Write down your seed phrase and store it in a safe and secure place.
- Confirm your seed phrase. Metamask will ask you to select the words of your seed phrase in the correct order. Make sure to select the correct words to complete this step.
- Once your seed phrase is confirmed, Metamask will prompt you to connect to a network. Choose the network you want to connect to, such as the Ethereum mainnet or a test network like Ropsten or Rinkeby.
- Congratulations! You have successfully set up Metamask. You can now start using it to interact with decentralized applications and manage your digital assets.
Remember to keep your wallet and seed phrase secure to protect your funds and assets. It is recommended to use additional security measures like enabling two-factor authentication and keeping your software up to date.
Interacting with Smart Contracts
Metamask Developer Tools provide a convenient way to interact with smart contracts deployed on the Ethereum network. By using the smart contract address and ABI (Application Binary Interface), developers can easily call functions, send transactions, and interact with the contract’s state.
Connecting to the Contract
To interact with a smart contract, you first need to connect to it using its address. In the Metamask Developer Tools interface, go to the “Contracts” tab and click on “Connect to Contract”. Enter the contract address and click “Connect”. Metamask will then retrieve the contract’s ABI from the Ethereum network.
Calling Contract Functions
Once you are connected to the contract, you can call its functions. In the “Contracts” tab, you will see a list of all the contract’s functions. You can click on a function to expand its details and view its inputs and outputs. To call a function, you need to provide the necessary inputs. Enter the values in the input fields and click “Call” to execute the function. Metamask will send a read-only transaction to the contract, and the function’s output will be displayed in the UI.
Note: Calling a contract function does not modify the contract state and does not require any gas.
Sending Transactions to the Contract

If you want to modify the contract’s state or perform an action that requires gas, you need to send a transaction to the contract. In the “Contracts” tab, you can find the contract’s state variables and payable functions. To send a transaction, click on a function that requires gas and enter the necessary inputs. Click “Send” to execute the transaction. Metamask will prompt you to confirm the transaction and pay the gas fee.
Note: Sending a transaction will modify the contract state and require gas to be paid.
By using Metamask Developer Tools, developers can easily interact with smart contracts and test their functionality without the need for a separate development environment. It provides a hassle-free way to experiment with contract methods and transactions, making the development process more efficient.
Testing and Debugging
Testing and debugging are crucial steps in the development process of decentralized applications (DApps) using the Metamask developer tools. These tools provide several features that help developers identify and fix issues in their code.
One of the key features is the ability to simulate different network environments. This allows developers to test their DApps on various test networks such as Ropsten or Kovan before deploying them to the main Ethereum network. By doing so, developers can ensure that their DApps function correctly and securely.
The Metamask developer tools also provide a powerful debugging feature called “Injected Web3.” This feature allows developers to inspect and interact with the Ethereum blockchain directly from the browser console. By using functions such as web3.eth.accounts and web3.eth.getBalance, developers can retrieve information about accounts and balances to debug their code.
In addition to testing and debugging on a local machine, developers can also use the Metamask test faucet feature. This feature allows developers to request test Ether (ETH) directly to their Metamask account. By clicking on the faucet button, developers can easily obtain test Ether for testing purposes.
Overall, the testing and debugging features in Metamask developer tools provide developers with the necessary tools to build robust and secure DApps. By simulating different network environments, debugging code using “Injected Web3,” and requesting test Ether through the test faucet, developers can ensure the smooth functioning of their DApps on the Ethereum network.
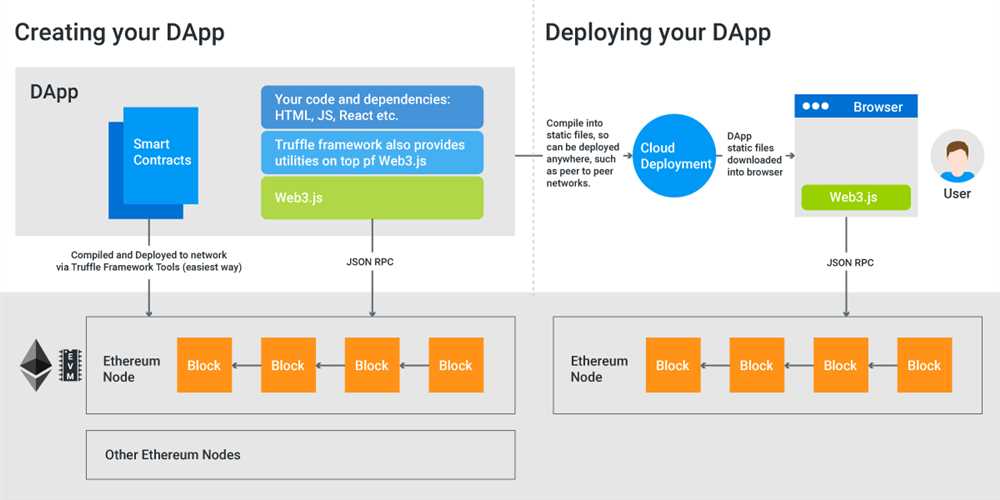
Deploying Your Decentralized Application
Once your decentralized application (DApp) is ready, you need to deploy it on the blockchain so that users can interact with it. Deploying a DApp involves the following steps:
- Create a Smart Contract – To deploy your DApp, you need to create a smart contract. The smart contract defines the logic and functionality of your DApp and is written in a programming language like Solidity.
- Compile the Smart Contract – After creating the smart contract, you need to compile it into bytecode that can be executed on the blockchain. This bytecode is then deployed as part of the DApp.
- Configure the Deployment Settings – Before deploying your DApp, you need to configure the deployment settings. This includes specifying the network on which you want to deploy your DApp, the gas price, and other deployment parameters.
- Deploy the DApp – Once the deployment settings are configured, you can proceed with deploying your DApp. This process typically involves sending a transaction to the blockchain that contains the compiled bytecode of the smart contract.
- Test the Deployment – After the DApp is deployed, it’s important to test its functionality to ensure everything is working as expected. You can interact with the deployed smart contract using Metamask or other tools to verify that the DApp behaves correctly.
Deploying a DApp requires some knowledge of blockchain development and smart contracts. It’s important to thoroughly test your DApp before deploying it to ensure a smooth user experience. Additionally, keep in mind that deploying a DApp on a public blockchain may incur gas fees, so plan accordingly.
Frequently Asked Questions:
What is Metamask Developer Tools?
Metamask Developer Tools is a set of tools that allows developers to build decentralized applications (dApps) by providing them with a development environment and various debugging functionalities.
Can I build decentralized applications without using Metamask Developer Tools?
Yes, you can build decentralized applications without using Metamask Developer Tools, but it provides developers with a convenient development environment and debugging tools that can greatly simplify the development process.

+ There are no comments
Add yours