


Metamask is a popular browser extension wallet that allows users to interact with decentralized applications (dApps) on the Ethereum blockchain. By default, Metamask supports the Ethereum network, but did you know that you can also add custom chains to your Metamask wallet? Adding a custom chain enables you to connect to other blockchain networks and use their unique features and tokens.
Adding a custom chain to Metamask is a relatively simple process, and this step-by-step guide will walk you through it. Whether you want to connect to a test network, a sidechain, or a completely different blockchain, this guide will show you how to do it.
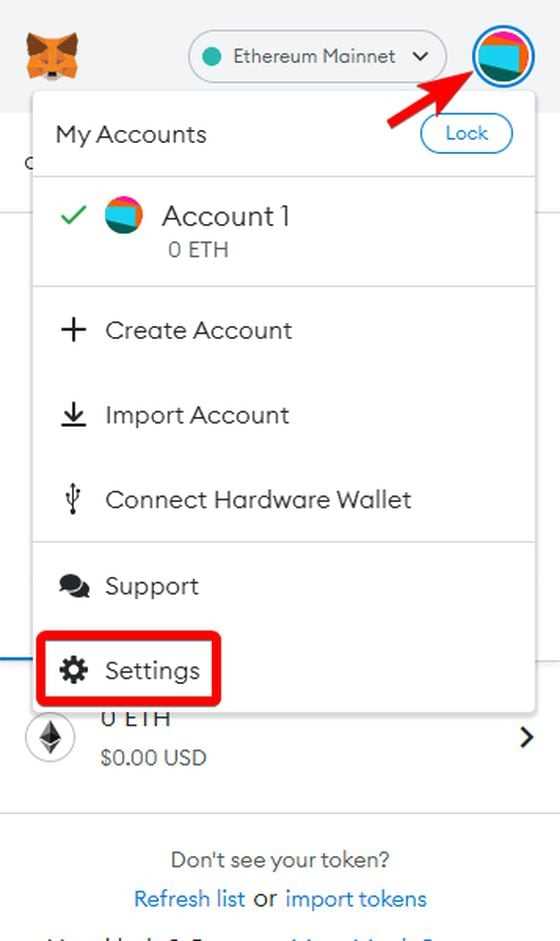
Step 1: Accessing Metamask Settings
The first step is to open your Metamask wallet and click on the menu icon in the top-right corner of the extension. From the dropdown menu, select the “Settings” option. This will open the Metamask settings page.
Step 2: Networks
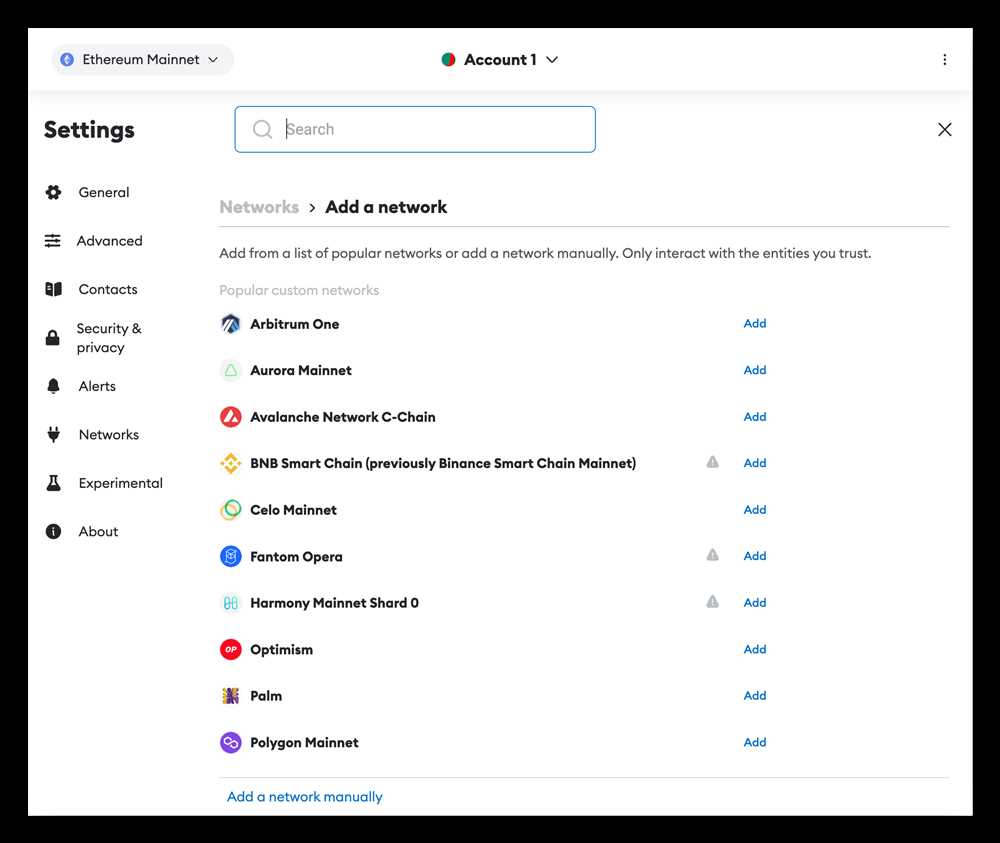
In the Metamask settings page, you will see a list of options on the left-hand side. Click on the “Networks” option to access the network settings.
Step 3: Custom RPC Networks
In the network settings, scroll down until you see the “Custom RPC” section. This is where you can add a custom chain to Metamask.
Step 4: Adding a Custom Chain
Click on the “New Network” button to add a new custom chain. You will then be prompted to enter the network details, such as the network name, RPC URL, symbol, and chain ID. Make sure to fill in these details accurately, as they are crucial for connecting to the desired chain.
Step 5: Saving the Custom Chain
After entering the network details, click on the “Save” button to save the custom chain to your Metamask wallet. Once saved, you will see the custom chain appear in the list of available networks.
Step 6: Switching Networks
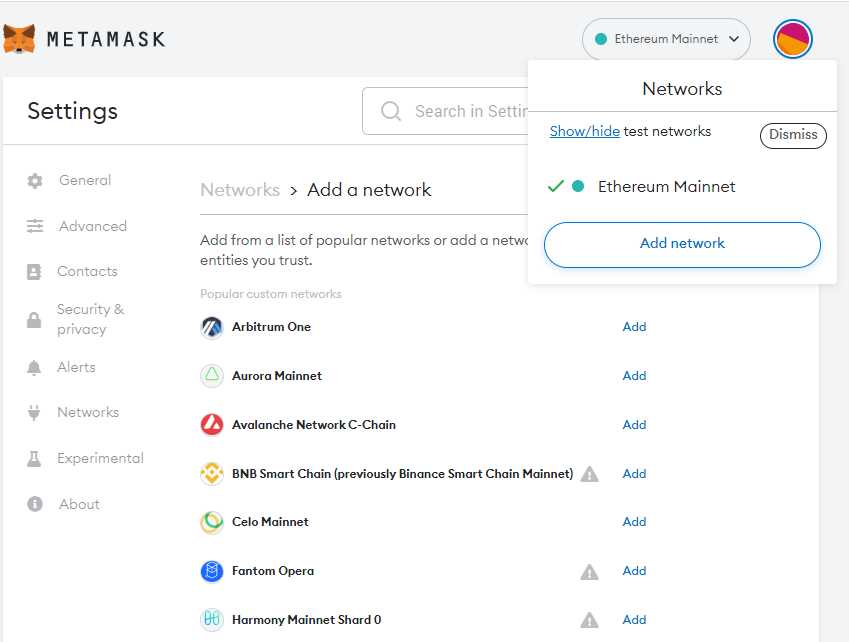
To switch to the custom chain you just added, simply click on the network icon in the top-right corner of Metamask and select the desired network from the dropdown menu. Your Metamask wallet will now be connected to the custom chain, allowing you to interact with dApps and perform transactions specific to that network.
Adding a custom chain to Metamask opens up a world of possibilities for blockchain developers and enthusiasts. Whether you want to explore different blockchain networks, test your dApps on alternative chains, or participate in specific token sales, adding a custom chain to Metamask gives you the flexibility to do so. Now that you know how to add a custom chain, go ahead and start exploring the decentralized world!
What is Metamask?
Metamask is a browser extension that enables users to interact with the Ethereum blockchain and access decentralized applications (dApps) directly from their web browsers. It serves as a digital wallet that allows users to securely store, manage, and trade their cryptocurrencies.
Metamask acts as a bridge between web browsers and the Ethereum blockchain, providing a user-friendly interface for interacting with blockchain networks. With Metamask, users can easily manage their Ethereum accounts, send and receive Ethereum tokens, and interact with dApps without the need to run a full Ethereum node.
Key Features of Metamask:
1. Wallet: Metamask allows users to create multiple Ethereum accounts, import existing wallets, and securely store private keys. It supports multiple wallet types, including hardware wallets like Ledger and Trezor.
2. dApp Browser: Metamask integrates a built-in dApp browser, allowing users to seamlessly access and interact with decentralized applications. It automatically detects Ethereum-enabled websites and provides a streamlined experience for connecting and using dApps.
3. Network Management: Metamask supports multiple Ethereum networks, including the Ethereum mainnet, testnets, and custom networks. Users can easily switch between networks to interact with different blockchain ecosystems.
4. Token Management: Metamask provides a user-friendly interface for managing Ethereum-based tokens. Users can add custom tokens, view token balances, and easily send and receive tokens using Metamask.
5. Security: Metamask prioritizes the security and privacy of user data. Private keys and sensitive information are stored securely on the user’s device, and transactions are signed locally before being broadcasted to the blockchain.
Overall, Metamask simplifies the process of interacting with Ethereum by providing a user-friendly interface and seamless integration with web browsers. It is a popular tool among blockchain enthusiasts, developers, and users seeking to explore and engage with decentralized applications.
Overview of Metamask and its Benefits
Metamask is a popular Ethereum wallet and web3 gateway that allows users to manage their digital assets and interact with decentralized applications (dApps) directly from their browsers. It is a browser extension that can be installed in browsers such as Chrome, Firefox, and Brave.
With Metamask, users can securely store their Ethereum (ETH) and other ERC-20 tokens and conveniently access and manage their accounts without the need to run a full Ethereum node. This makes it a lightweight and user-friendly option for both beginners and experienced Ethereum users.
Key Features of Metamask:
- Wallet Management: Metamask allows users to create multiple Ethereum accounts, import existing accounts, and manage their private keys securely.
- Ethereum Transactions: Users can easily send and receive ETH and ERC-20 tokens using Metamask. It provides a simple interface for setting gas fees and confirming transactions.
- dApp Integration: Metamask seamlessly integrates with various decentralized applications (dApps) and Web3.0 services, allowing users to easily interact with the Ethereum blockchain.
- Smart Contract Interaction: It provides a convenient way to interact with smart contracts by allowing users to execute function calls and send transactions directly from their wallets.
- Network Customization: Metamask supports multiple networks and allows users to connect to different Ethereum networks, such as mainnet, testnet, and custom networks.
- Security and Privacy: Metamask implements various security measures, such as protecting private keys with strong encryption and offering password protection. It also allows users to control their data and disable certain browser permissions for enhanced privacy.
In summary, Metamask provides a convenient and secure way to manage Ethereum accounts and interact with the Ethereum blockchain and dApps. Its user-friendly interface and extensive features make it an essential tool for anyone looking to navigate the world of decentralized finance and blockchain technology.
Why Add a Custom Chain to Metamask?
Metamask is a popular browser extension wallet that allows users to interact with decentralized applications (DApps) on various blockchain networks, such as Ethereum. By default, Metamask supports the Ethereum mainnet and a few other networks like Ropsten, Rinkeby, and Kovan, allowing users to easily transact and interact with the applications built on these networks.
However, there are many other blockchain networks and testnets out there that are not supported by Metamask by default. If you are a developer or a user who wants to interact with DApps on a specific blockchain network, you will need to add a custom chain to Metamask.
Adding a custom chain to Metamask allows you to:
1. Access DApps on Other Blockchains
By adding a custom chain to Metamask, you can connect to DApps running on different blockchain networks. This gives you the flexibility to explore and use applications that are not limited to Ethereum or its testnets.
2. Test and Develop on Other Networks
For developers, adding a custom chain to Metamask is crucial for testing and developing applications on specific networks. Instead of deploying and testing on public networks like Ethereum mainnet, developers can add a custom testnet or a private chain to test and debug their smart contracts and DApps.
3. Interact with Niche Blockchain Networks
There are numerous niche blockchain networks out there that specialize in specific use cases or have unique features. By adding a custom chain to Metamask, you can easily connect to these niche networks and explore the applications and services they offer.
Overall, adding a custom chain to Metamask opens up new opportunities and possibilities for both users and developers. It allows you to access DApps on different blockchain networks, test and develop on specific networks, and explore niche blockchain networks. With the ability to add custom chains, Metamask becomes a more versatile and powerful tool in the world of decentralized applications.
Advantages of Adding a Custom Chain
Adding a custom chain to Metamask can provide several advantages for users. Here are some of the key benefits:
| 1. Access to New and Experimental Networks | Custom chains allow users to access and interact with new and experimental blockchain networks that may not be available on the default Metamask configuration. This opens up opportunities to explore innovative projects and participate in early-stage investments. |
| 2. Support for Specific Use Cases | By adding a custom chain, users can tailor their Metamask experience to support specific use cases that might not be covered by default options. For example, developers can create chains specifically designed for testing smart contracts or building decentralized applications, ensuring a seamless development and testing process. |
| 3. Increased Security | Custom chains can enhance security by reducing the dependence on public networks and enabling private or consortium blockchains. These chains provide more control over the network’s security policies, consensus mechanisms, and access control, minimizing the risk of attacks and unauthorized access. |
| 4. Avoiding Network Congestion | During times of high network congestion, transactions on public chains can become slow and expensive. By adding a custom chain, users can avoid these congestion-related issues and ensure faster and more cost-efficient transactions. |
| 5. Supporting Local and Niche Communities | Custom chains enable the creation of blockchain networks specifically designed to serve local or niche communities. They foster economic growth, support regional currencies, and allow for unique governance models that align with the community’s specific needs and values. |
By adding a custom chain to Metamask, users can unleash the full potential of blockchain technology, explore new networks, and pioneer innovative use cases that may not be possible with the default chain configurations.
Step-by-Step Guide: How to Add a Custom Chain to Metamask
Metamask is a popular cryptocurrency wallet that allows users to interact with decentralized applications (DApps) on the Ethereum blockchain. By default, Metamask supports the Ethereum mainnet and a few test networks. However, if you want to access a custom chain or a network that is not listed by default, you can add it manually to your Metamask wallet. In this step-by-step guide, we will walk you through the process of adding a custom chain to Metamask.
Step 1: Install Metamask
If you don’t have Metamask installed on your browser, you will need to install it first. Metamask is available as a browser extension for Chrome, Firefox, Edge, and Brave. Go to the official Metamask website and follow the instructions to install the extension for your browser.
Step 2: Open Metamask
Once you have installed Metamask, open the extension by clicking on the Metamask icon in your browser’s toolbar. If it’s your first time using Metamask, you will need to set up a new wallet or import an existing one. Follow the prompts to create a new wallet or import your existing wallet.
Step 3: Access Network Settings
After setting up or importing your wallet, you will be redirected to the Metamask main interface. Click on the network dropdown menu located at the top of the Metamask extension window.
Step 4: Click “Custom RPC”
In the network dropdown menu, scroll down to the bottom and click on the “Custom RPC” option. This will allow you to add a custom chain to Metamask.
Step 5: Enter Chain Details
In the “New RPC URL” field, enter the custom chain’s endpoint URL. This URL usually represents the node or API endpoint of the custom chain you want to connect to. Give your custom chain a name in the “Chain Name” field.
Step 6: Enter Chain ID
In the “Chain ID” field, enter the unique identifier for the custom chain. The Chain ID is a number that helps Metamask differentiate between different chains. Make sure to enter the correct Chain ID provided by the custom chain’s documentation or developer.
Step 7: Enter Symbol and Block Explorer URL (Optional)
You can optionally enter the custom chain’s symbol in the “Symbol” field. This is usually a three-letter identifier for the currency used on the custom chain. You can also enter the URL of a block explorer for the custom chain in the “Block Explorer URL” field. This will allow you to easily view transaction details on the explorer.
Step 8: Save and Connect
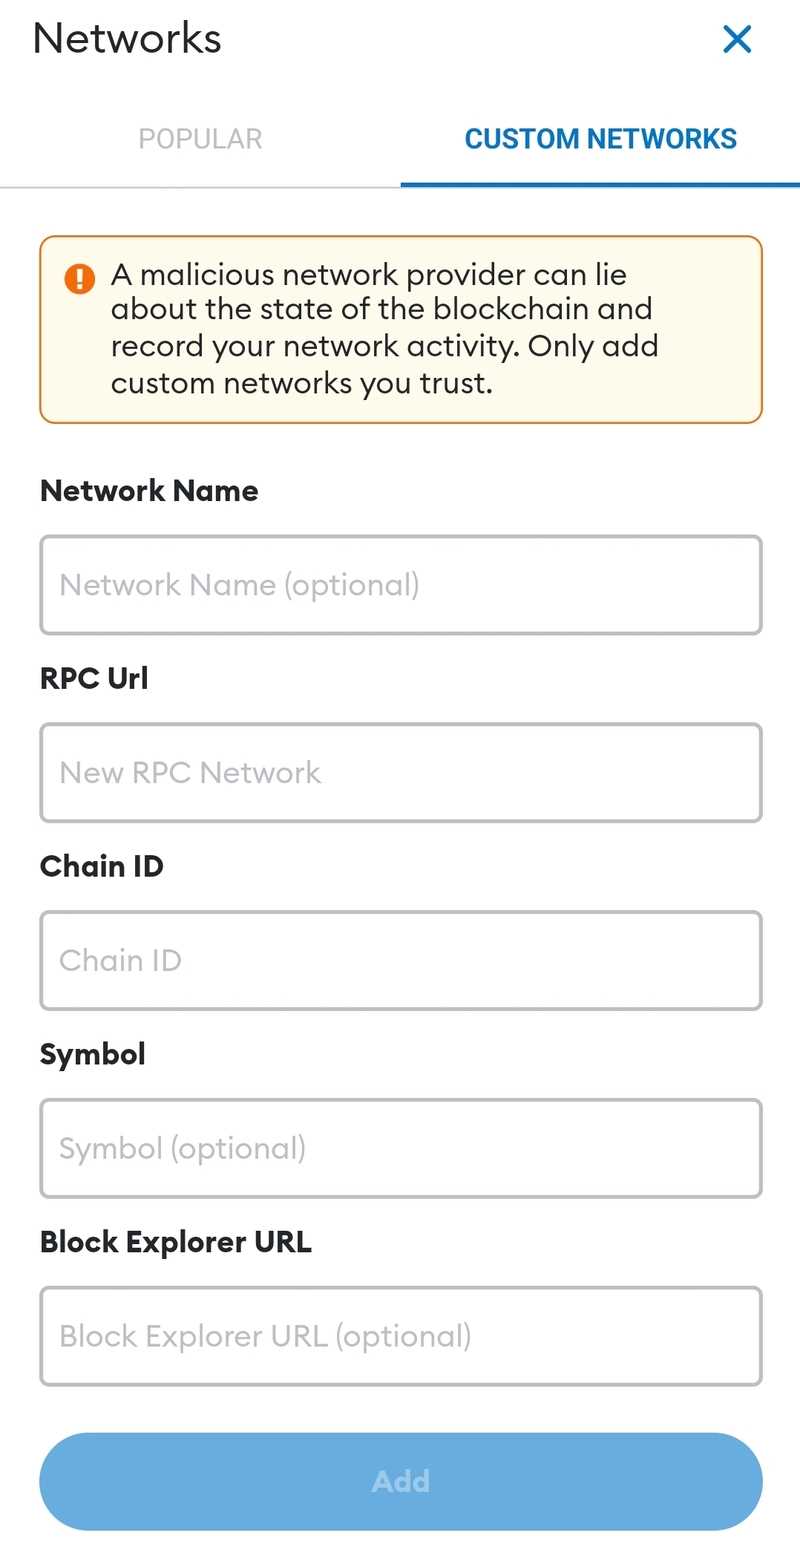
Click on the “Save” button to save the custom chain details. Once saved, the custom chain will appear as an option in the network dropdown menu. Click on the custom chain to connect to it.
That’s it! You have successfully added a custom chain to Metamask. You can now interact with DApps and send transactions on the custom chain directly from your Metamask wallet.
Accessing Metamask Settings
In order to add a custom chain to Metamask, you’ll need to access the settings of the Metamask extension. Follow these steps to access the settings:
Step 1: Open the Metamask Extension
First, make sure that you have the Metamask extension installed in your browser. If you don’t have it installed, you can download it from the official Metamask website and add it to your browser.
Step 2: Open the Metamask Menu
Once the Metamask extension is installed, click on the extension icon to open it. This will open a small popup window that shows your account balance and other basic information.
Step 3: Click on the Settings Icon
In the Metamask popup window, you will see a small icon that looks like three horizontal bars. Click on this icon to open the Metamask settings.
Step 4: Access the Advanced Settings
After clicking on the settings icon, a menu will appear. Scroll down and click on the “Settings” option. This will take you to the Metamask settings page.
From this settings page, you can customize various aspects of Metamask, including adding a custom chain.
Now that you have accessed the Metamask settings, you are ready to proceed with adding a custom chain.
Frequently Asked Questions:
What is Metamask?
Metamask is a cryptocurrency wallet and browser extension that allows users to interact with decentralized applications (dApps) on the Ethereum blockchain.
Why would I want to add a custom chain to Metamask?
Adding a custom chain to Metamask allows you to connect to and interact with other blockchain networks that are not supported by default. This can be useful if you want to participate in a specific blockchain project or use a different cryptocurrency.
How can I add a custom chain to Metamask?
To add a custom chain to Metamask, you need to go to the Metamask extension in your browser and click on the network dropdown menu. Then, select “Custom RPC” and enter the necessary details, such as the network name, RPC URL, chain ID, symbol, and block explorer URL. Once you have filled in all the information, click “Save” and the custom chain will be added to your Metamask.
Can I add multiple custom chains to Metamask?
Yes, you can add multiple custom chains to Metamask. Each custom chain will appear as a separate network in your Metamask extension, allowing you to easily switch between different networks and interact with their respective blockchain projects.
Is it safe to add a custom chain to Metamask?
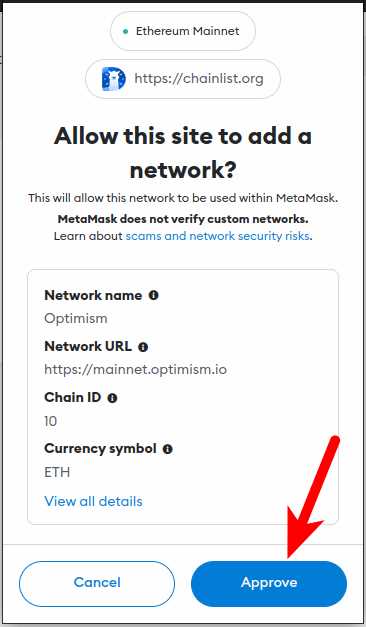
Adding a custom chain to Metamask is generally safe as long as you are careful with the information you enter. It is important to double-check the details of the custom chain, such as the RPC URL and chain ID, to ensure that you are connecting to the correct network. Additionally, make sure to only interact with trusted blockchain projects to minimize the risk of scams or security breaches.
+ There are no comments
Add yours