


Are you a crypto enthusiast looking to connect Avalanche (Avax) to Metamask? Look no further! In this step-by-step guide, we will walk you through the process of connecting your Avax wallet to Metamask, allowing you to seamlessly interact with the Avalanche ecosystem.
Step 1: Install Metamask
The first step is to install the Metamask extension on your browser if you haven’t done so already. Metamask is a popular cryptocurrency wallet that allows you to manage your digital assets and interact with decentralized applications (dApps) on various blockchains.
Step 2: Create a New Wallet or Import an Existing Wallet
Once you have installed Metamask, open the extension and follow the prompts to either create a new wallet or import an existing wallet. Make sure to securely store your wallet’s seed phrase as it is the key to accessing your funds.
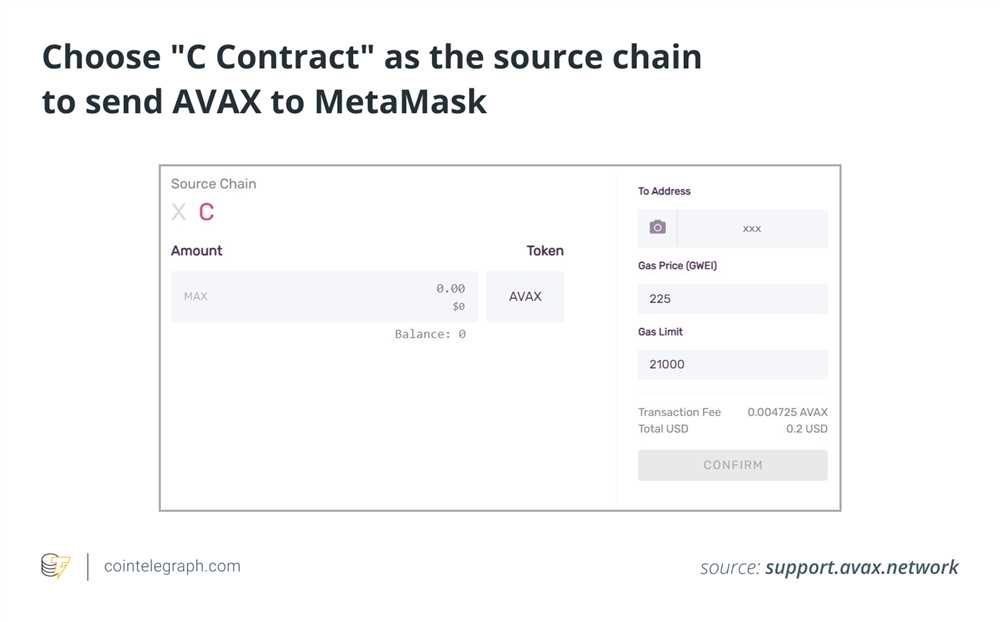
Step 3: Switch Networks to Avalanche
Now that you have a Metamask wallet, you need to switch networks to connect to the Avalanche blockchain. Click on the network dropdown in Metamask and select “Custom RPC”.
Step 4: Add Avalanche RPC Details
In the Custom RPC settings, enter the following details:
Network Name: Avalanche (AVAX)
New RPC URL: https://api.avax.network/ext/bc/C/rpc
Chain ID: 43114
Symbol: AVAX
Block Explorer URL: https://cchain.explorer.avax.network/
Step 5: Save and Connect
After entering the Avalanche RPC details, click “Save” to add the network. You should now see Avalanche (AVAX) listed as one of the network options in Metamask. Select it to connect to the Avalanche blockchain.
Congratulations! You have successfully connected Avax to Metamask. You can now manage your Avax assets, interact with Avax-based dApps, and participate in the Avalanche ecosystem directly from your Metamask wallet.
Install and Set Up Metamask
Step 1: Open your preferred web browser and go to the official Metamask website.
Step 2: Click on the “Get Chrome Extension” button if you are using Google Chrome, or “Get Firefox Extension” if you are using Mozilla Firefox.
Step 3: A new tab will open, redirecting you to the Chrome Web Store or Firefox Add-ons page. Click on the “Add to Chrome” or “Add to Firefox” button to install the Metamask extension.
Step 4: After installation, click on the Metamask extension icon in your browser’s toolbar to open it.
Step 5: Agree to the terms and conditions and create a new wallet by clicking on the “Create a Wallet” button.
Step 6: Set up a strong password to protect your wallet and click “Create”. Make sure to remember your password and keep it safe.
Step 7: Metamask will generate a secret backup phrase, also known as a seed phrase. Write down the seed phrase and store it in a safe place. This phrase can be used to restore your wallet in case you forget your password.
Step 8: Confirm your seed phrase in the correct order by selecting the words from the dropdown menus. Then, click “Confirm”.
Step 9: Congratulations! You have successfully installed and set up Metamask. You can now use it to manage your Ethereum and Avax assets, as well as interact with decentralized applications (dApps) on the blockchain.
Create a Wallet on Avalanche
Before you can connect Avax to your Metamask wallet, you need to create a wallet on the Avalanche network. Follow these steps:
- Go to the official Avalanche website at https://www.avalabs.org/.
- Click on the “Get Started” button.
- Choose the “Create Wallet” option.
- Read and accept the terms and conditions.
- Create a strong password for your wallet.
- Click on the “Create Wallet” button.
- Save your recovery phrase in a safe place. This phrase is used to recover your wallet if you forget your password.
- Confirm your recovery phrase by selecting the correct words in the given order.
- Click on the “Confirm Recovery Phrase” button.
- Your wallet on the Avalanche network is now created.
Once you have created your wallet on Avalanche, you can proceed with connecting Avax to your Metamask wallet following the next steps.
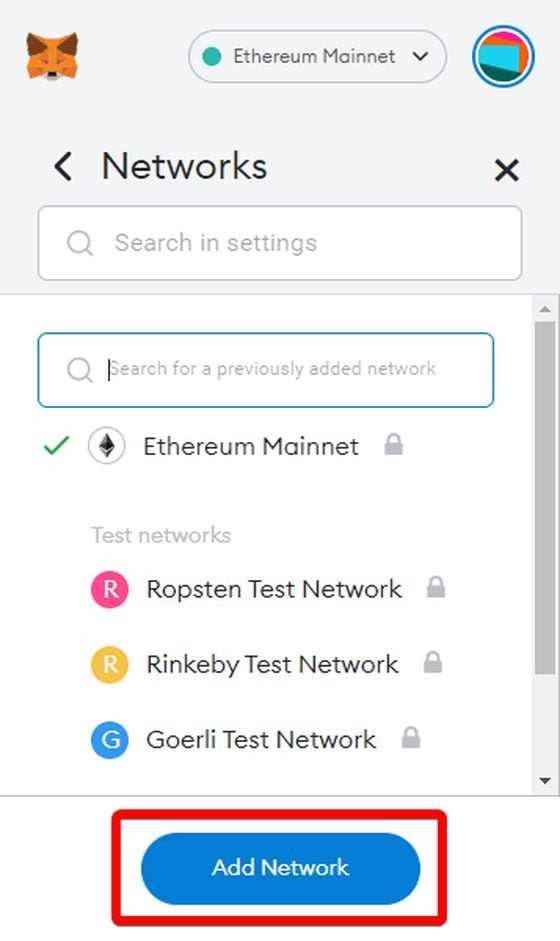
Connect Avalanche Network to Metamask
Metamask is a popular wallet that allows users to interact with various blockchain networks. If you want to connect to the Avalanche network using Metamask, follow these steps:
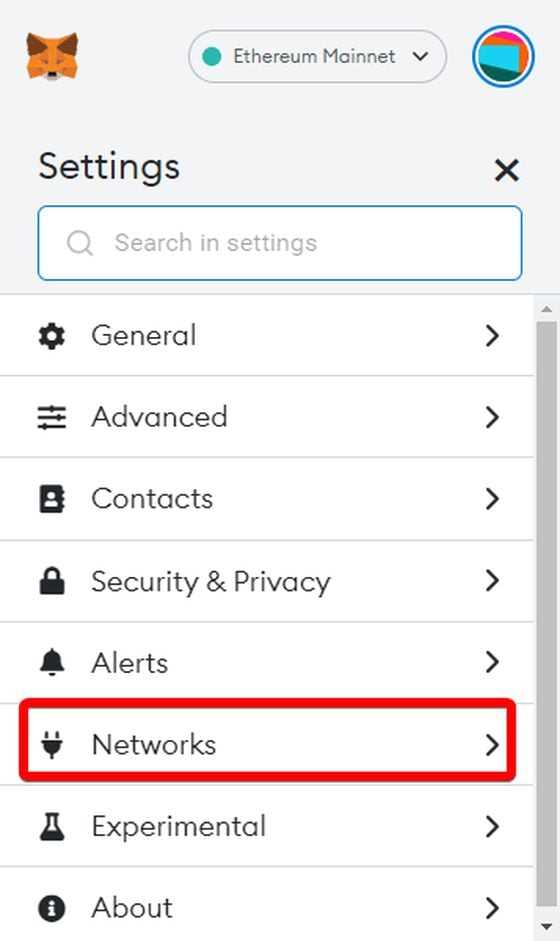
- Open your Metamask wallet extension in your browser.
- In the top right corner, click on the network dropdown to open the network selection menu.
- Scroll to the bottom and select “Custom RPC”.
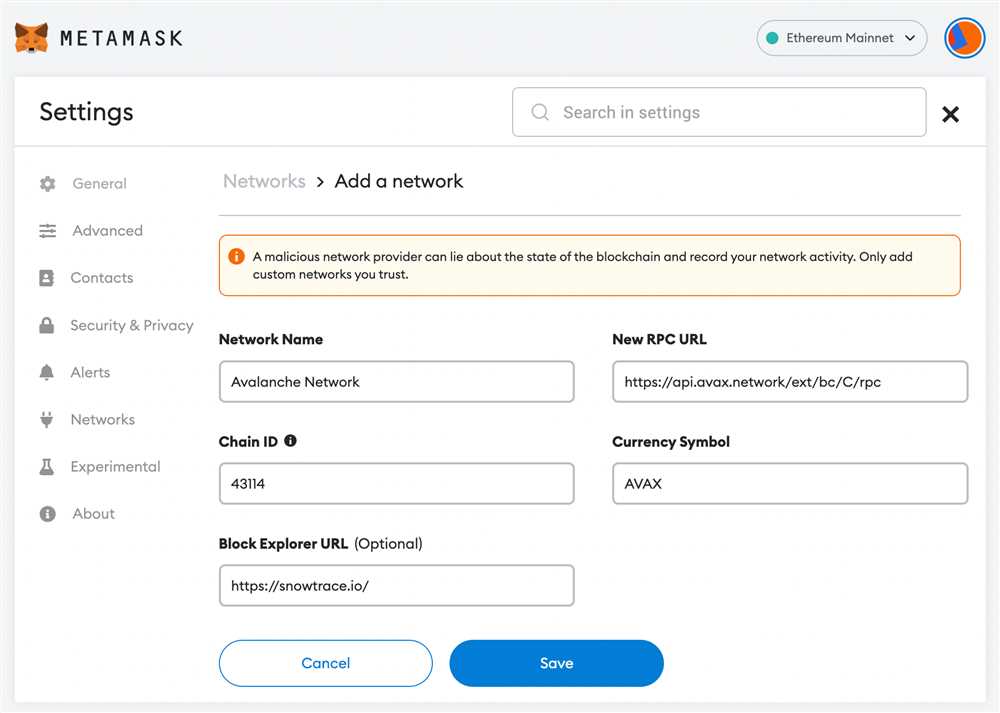
- A form will appear with fields for you to enter the network details.
- Enter a name for the network, such as “Avalanche Mainnet”.
- In the “New RPC URL” field, enter the Avalanche network RPC URL:
https://api.avax.network/ext/bc/C/rpc - In the “Chain ID” field, enter the Avalanche chain ID:
43114 - Leave the “Symbol” and “Block Explorer URL” fields blank.
- Click “Save” to save the network configuration.
- Now, click on the network dropdown again and select the newly added Avalanche network.
Once you have connected to the Avalanche network, you can interact with Avalanche-based dapps and manage your AVAX tokens using Metamask. Make sure you have AVAX tokens in your wallet before attempting any transactions on the Avalanche network.
Keep in mind that connecting to a custom network requires caution, as it may expose you to potential security risks. Ensure that you obtain the network details from trusted sources and exercise proper due diligence.
Add Avax Token to Metamask
To add the Avax token to your Metamask wallet, follow the steps below:
- Open your Metamask wallet extension in your browser.
- In the main menu, click on the “Assets” tab.
- Scroll down and click on the “Add Token” button.
- Click on the “Custom Token” tab.
- In the “Token Contract Address” field, enter the Avax token’s contract address.
- In the “Token Symbol” field, enter the token symbol, which is “AVAX”.
- In the “Decimals of Precision” field, enter the number of decimals the token uses, which is usually 18 for most tokens.
- Click on the “Next” button.
- Review the token details and click on the “Add Tokens” button.
- The Avax token will now appear in your Metamask wallet under the “Assets” tab.
By following these steps, you will successfully add the Avax token to your Metamask wallet and be able to view and manage your Avax tokens within the wallet interface.
Frequently Asked Questions:
What is Avax?
Avax, also known as Avalanche, is a decentralized platform that aims to provide fast and secure transactions in a scalable network. It serves as the native token of the Avalanche ecosystem and is used for various purposes such as paying transaction fees, staking, and governance.
What is Metamask?
Metamask is a popular Ethereum wallet browser extension that allows users to manage their Ethereum-based assets, interact with decentralized applications (dApps), and securely store their private keys. It also supports other blockchains like Avax through custom network configurations.
How can I connect Avax to Metamask?
To connect Avax to Metamask, you need to add a custom network configuration. In Metamask, click on the network selection dropdown and choose “Custom RPC”. Then, enter the Avax network details, including the RPC URL, Chain ID, Symbol, and Block Explorer URL. Save the configuration and you will be able to interact with Avax using Metamask.
Can I use Metamask with Avax on mobile?
Yes, you can use Metamask with Avax on mobile devices. Metamask is available as a mobile app for both iOS and Android. You can follow the same steps as mentioned earlier to add the Avax network configuration on the Metamask mobile app and connect it to Avax.
+ There are no comments
Add yours