


If you’re looking to buy XRP, one of the most popular cryptocurrencies in the market, MetaMask is a great platform to consider. MetaMask is a digital wallet that allows you to store, send, and receive various cryptocurrencies, including XRP. In this step-by-step guide, we will walk you through the process of buying XRP on MetaMask, so you can easily acquire this digital asset and start participating in the exciting world of cryptocurrency.
Step 1: Install MetaMask
The first step to buying XRP on MetaMask is to install the MetaMask extension on your web browser. Simply visit the MetaMask website and follow the instructions to install the extension. Once installed, create a new wallet or import an existing one. Make sure to securely store your seed phrase, as this will be needed to restore your wallet if you ever lose access to your device.
Step 2: Set up and Fund your Wallet
After installing MetaMask, you need to set up and fund your wallet with the desired amount of ether (ETH), which is the native cryptocurrency used on the Ethereum network. You can purchase ether from popular exchanges such as Coinbase or Binance and transfer it to your MetaMask wallet. Once your wallet is funded, you’re ready to move on to the next step.
Step 3: Connect to a Decentralized Exchange
The next step is to connect your MetaMask wallet to a decentralized exchange (DEX) that supports XRP trading. Some popular DEX options include Uniswap, SushiSwap, and PancakeSwap. Simply visit the website of your chosen DEX and connect your MetaMask wallet by clicking the wallet icon and selecting MetaMask from the list of available options.
Step 4: Swap Ether for XRP
Once you’re connected to a DEX, locate the XRP trading pair. This might be listed as XRP/ETH or XRP/WETH, depending on the specific DEX you’re using. Enter the amount of ether you want to swap for XRP and confirm the transaction. MetaMask will prompt you to review and approve the transaction details, including any associated fees. Once approved, the swap will be executed, and you will soon see XRP in your MetaMask wallet.
Step 5: Secure and Manage your XRP
Now that you have successfully bought XRP on MetaMask, it’s important to take steps to secure and manage your digital assets. Enable MetaMask’s security features, such as password protection and hardware wallet integration, to enhance the safety of your funds. Additionally, consider transferring your XRP to a hardware wallet for long-term storage, as this provides an extra layer of security.
With these simple steps, you can easily buy XRP on MetaMask and start exploring the world of XRP and cryptocurrency. Remember to do your own research, stay informed about market trends, and only invest what you can afford to lose. Happy trading!
What is XRP?
XRP is a cryptocurrency that was created by Ripple Labs Inc. in 2012. It is the native digital asset of the Ripple payment protocol, which is a real-time gross settlement system used for currency exchange and remittances.
XRP operates on a decentralized network called the XRP Ledger, which is a blockchain technology that enables fast and low-cost transactions. Unlike other cryptocurrencies such as Bitcoin, XRP does not rely on mining. Instead, all XRP tokens were pre-mined when the network was launched.
One of the key features of XRP is its focus on interoperability. It aims to facilitate fast and efficient cross-border transactions by bridging different fiat currencies and cryptocurrencies. This makes it a popular choice for banks and financial institutions that want to improve their payment systems.
Key Features of XRP:
- Fast transaction speed.
- Low transaction fees.
- Scalability.
- Stable and reliable network.
- Interoperability.
In addition to its use as a digital currency, XRP can also be used as a bridge currency in Ripple’s payment protocol. When a transaction is made between two different currencies, XRP can be used as a temporary bridge to facilitate the exchange.
Overall, XRP has gained popularity in the financial industry due to its fast transaction speed and low fees, making it an attractive option for both individuals and institutions looking for efficient cross-border payment solutions.
What is MetaMask?
MetaMask is a popular cryptocurrency wallet and browser extension that allows users to interact with Ethereum-based decentralized applications (dApps) directly from their web browser. It is compatible with major browsers such as Chrome, Firefox, and Brave.
MetaMask serves as a secure digital wallet that enables users to store, manage, and transact various cryptocurrencies, including Ether (ETH) and ERC-20 tokens. It provides a user-friendly interface for managing blockchain assets and interacting with dApps.
One of the key features of MetaMask is its ability to connect to multiple Ethereum networks, including the mainnet, testnets, and other customized networks. This allows users to seamlessly switch between different networks and test their dApps in different environments.
MetaMask also includes a built-in decentralized exchange (DEX) called MetaMask Swaps, which allows users to trade cryptocurrencies directly within the wallet interface. This makes it easy for users to buy and sell tokens without leaving the MetaMask application.
In addition to its wallet and trading functionalities, MetaMask provides a secure and convenient way to manage digital identities, sign transactions, and interact with smart contracts. It gives users full control over their private keys and allows them to securely access their funds and assets.
Overall, MetaMask is a powerful tool for anyone looking to participate in the decentralized finance (DeFi) ecosystem and leverage the benefits of blockchain technology.
Step-by-Step Guide on buying XRP on MetaMask
If you’re interested in buying XRP (the digital currency associated with Ripple), MetaMask is a popular choice for managing and trading cryptocurrencies. Follow the step-by-step guide below to purchase XRP on MetaMask.
Step 1: Install the MetaMask Extension

First, you need to install the MetaMask extension in your preferred web browser. Visit the official MetaMask website or search for “MetaMask” in your browser’s extension store. Follow the installation instructions provided to add MetaMask to your browser.
Step 2: Create a MetaMask Wallet
After installing MetaMask, open the extension and click on the “Create a Wallet” button. Follow the prompts to set up a strong password for your wallet and generate a secret backup phrase. Make sure to write down and safely store this backup phrase, as it will be required for wallet recovery or migration to another device.
Step 3: Add Funds to Your MetaMask Wallet
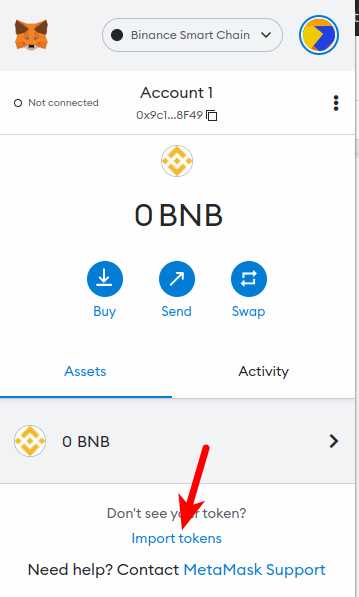
To buy XRP, you’ll need to add funds to your MetaMask wallet. Click on the account name in the top right corner of your MetaMask extension and select “Copy Address” to copy your wallet’s address. Use this address to transfer funds from an external wallet or exchange to your MetaMask wallet. Wait for the transaction to confirm before proceeding to the next step.
Step 4: Connect to a Decentralized Exchange (DEX)
Now that your MetaMask wallet is funded, you can connect it to a decentralized exchange (DEX) that supports XRP trading. Popular DEX platforms include Uniswap, SushiSwap, and PancakeSwap. Open your chosen DEX website and connect your MetaMask wallet by clicking on the “Connect Wallet” or similar button. Allow the connection when prompted by MetaMask.
Step 5: Find XRP listing and set up the trade
Once your MetaMask wallet is connected to the DEX, locate the XRP listing on the platform. It might be listed as “XRP” or “Ripple.” Click on the XRP trading pair you want to use, such as XRP/ETH or XRP/BNB. This will take you to the trading interface.
Here, you’ll need to specify the amount of XRP you want to buy. You can enter the amount either in XRP or in the currency you’re using to trade (e.g., ETH or BNB). Review the transaction details, including the current price, fees, and slippage tolerance. If everything looks good, click on the “Swap” or “Buy” button to execute the trade.
Step 6: Confirm and Complete the Trade
MetaMask will open a transaction confirmation window displaying the trade details and gas fees (transaction fees). Review the information and adjust the gas fees if necessary. Keep in mind that higher gas fees may result in faster confirmation, but at a higher cost. Once you’re satisfied, click on the “Confirm” or “Submit” button to complete the trade.
After a short while, the transaction will be confirmed on the blockchain, and you’ll see the XRP tokens in your MetaMask wallet. You can now view, manage, or trade your XRP directly from the MetaMask interface.
Remember to exercise caution and do thorough research before engaging in any cryptocurrency-related activity. Make sure to double-check the trading pair and transaction details to prevent any mistakes or loss of funds.
Step 1: Install and Set up MetaMask
MetaMask is a popular cryptocurrency wallet and browser extension that allows you to interact with the Ethereum blockchain and decentralized applications (dApps). Follow these steps to install and set up MetaMask:
1. Install MetaMask Extension
To begin, open your web browser (Chrome, Firefox, or Brave) and search for “MetaMask” in the browser’s extension store. Click on the “Add to Chrome” (or equivalent) button to install the MetaMask extension.
2. Create a New MetaMask Wallet
Once the extension is installed, a MetaMask icon should appear in your browser’s toolbar. Click on the icon to open MetaMask. On the welcome screen, click on the “Get Started” button to create a new wallet.
Follow the on-screen prompts to set up a password for your wallet. Make sure to choose a strong, unique password that you can remember. Confirm your password and click “Create” to proceed.
3. Back up your Seed Phrase
After creating a wallet password, MetaMask will display a 12-word seed phrase. This seed phrase is a crucial backup for your wallet and should be kept safe. Write down the seed phrase in the order given, or click on “Download” to save it as a text file.
Do not share this seed phrase with anyone, as it can be used to restore your wallet and access your funds. Store it in a secure location offline, such as a hardware wallet or a piece of paper stored in a safe place.
4. Confirm Seed Phrase
To ensure that you have correctly written down your seed phrase, MetaMask will prompt you to confirm random words from the list. Select the words in the correct order and click “Confirm” to continue.
5. Complete Setup
After confirming the seed phrase, MetaMask will complete the setup process and display your wallet address. This address will be used to send and receive XRP or other cryptocurrencies.
At this point, you have successfully installed and set up MetaMask. You can now proceed to buy XRP or use the wallet to interact with decentralized applications (dApps) on the Ethereum blockchain.
| Pros: | – Secure wallet for storing XRP and other cryptocurrencies |
|---|---|
| – Convenient browser extension for interacting with dApps | |
| – Easy setup process | |
| Cons: | – Limited to Ethereum blockchain and ERC-20 tokens |
Step 2: Add Funds to your MetaMask Wallet
Once you have set up your MetaMask wallet, you will need to add funds to it in order to buy XRP. Follow the steps below to add funds:
Step 2.1: Connect your Wallet to an Exchange
The first step is to connect your MetaMask wallet to a cryptocurrency exchange where you can buy XRP. Choose a reputable exchange that supports XRP and follow their instructions to connect your wallet.
Step 2.2: Deposit Funds into your MetaMask Wallet
Once your wallet is connected to the exchange, you can deposit funds into your MetaMask wallet. Follow the exchange’s instructions for depositing funds, making sure to select MetaMask as your wallet of choice.
Step 2.3: Confirm the Deposit
After making the deposit, you will need to confirm it on the exchange. This may involve entering a verification code or completing a security step to ensure the transaction is legitimate.
Step 2.4: Check your MetaMask Wallet Balance
After confirming the deposit on the exchange, check your MetaMask wallet balance to ensure that the funds have been successfully added. You should see the deposited funds in your wallet’s balance.
Step 2.5: Proceed to Buy XRP
With funds successfully added to your MetaMask wallet, you are now ready to proceed with buying XRP. Follow the next steps in the guide to complete the purchase.
| Tip: | It’s important to only deposit funds from trusted sources and use reputable exchanges to avoid scams or losing your funds. |
|---|
Frequently Asked Questions:
What is MetaMask?
MetaMask is a cryptocurrency wallet that allows users to securely store, manage, and interact with their digital assets.
How can I buy XRP on MetaMask?
To buy XRP on MetaMask, you need to first install the MetaMask browser extension, create an account, and add funds to your wallet. Then, you can use a decentralized exchange (DEX) such as Uniswap or SushiSwap to swap your Ethereum for XRP.
What is the process of installing MetaMask?
To install MetaMask, go to the MetaMask website and click on the “Get Chrome Extension” button. Follow the instructions to add the extension to your browser. Once installed, set up your account and create a secure password.
Are there any fees associated with buying XRP on MetaMask?
Yes, there are fees associated with buying XRP on MetaMask. These fees include transaction fees for using the Ethereum network and any fees charged by the decentralized exchange you use to swap your Ethereum for XRP.
+ There are no comments
Add yours