


Welcome to our step-by-step guide on transferring Ethereum from Coinbase to MetaMask! If you’re new to the world of cryptocurrencies and wondering how to securely move your Ethereum tokens, this article is for you. Coinbase and MetaMask are two popular platforms used to buy, sell, and store Ethereum, and in this guide, we’ll walk you through the process of transferring your funds between these two wallets.
Step 1: Set up a MetaMask wallet
If you don’t already have a MetaMask wallet, the first step is to download the MetaMask extension for your preferred web browser. Once installed, follow the on-screen instructions to set up your wallet by creating a strong password and securely storing your recovery seed phrase. Remember, your seed phrase is crucial for recovering your wallet in case you forget your password or lose access to your device.
Step 2: Get your MetaMask wallet address
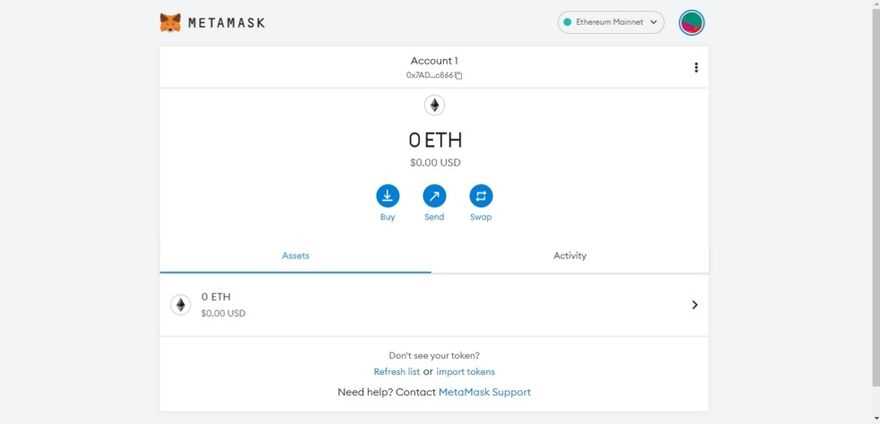
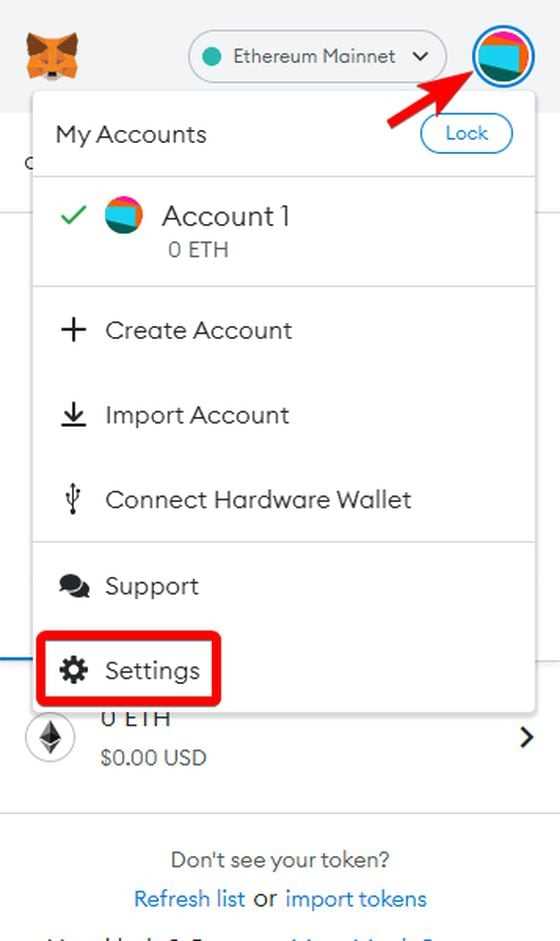
After setting up your MetaMask wallet, you’ll need your wallet address to receive Ethereum from Coinbase. Open MetaMask and click on the account icon to find your wallet address. Copy the address to your clipboard as you’ll need it in the next step.
Step 3: Transfer Ethereum from Coinbase
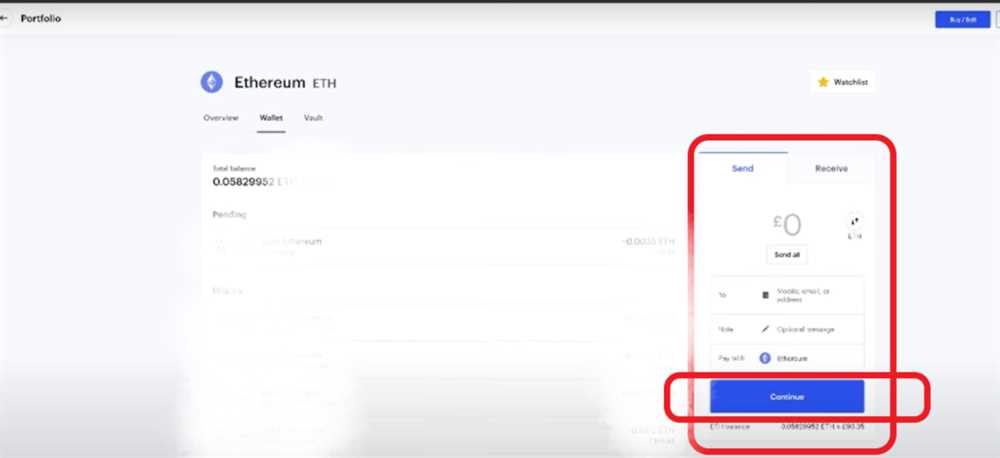
Now, sign in to your Coinbase account and navigate to the “Accounts” tab. Find your Ethereum wallet and click on the “Send” button. Paste your MetaMask wallet address in the recipient field and enter the amount of Ethereum you want to transfer. Double-check the address to ensure it’s correct, as cryptocurrency transactions cannot be reversed once initiated. Finally, click “Send” to initiate the transfer.
Step 4: Confirm and finalize the transfer
After initiating the transfer on Coinbase, you’ll need to confirm the transaction in MetaMask. A pop-up will appear in your browser, asking you to review the details of the transaction. Verify that the recipient address and the amount are correct. You can also adjust the transaction fee if desired, although the default fee is usually sufficient. Once you’re ready, click the “Confirm” button to finalize the transfer.
Congratulations! You have successfully transferred Ethereum from Coinbase to your MetaMask wallet. You can now view your Ethereum balance in MetaMask and enjoy the security and control that comes with using a self-hosted wallet like MetaMask. Remember to keep your wallet and seed phrase secure, and always double-check the address before initiating any cryptocurrency transactions.
Disclaimer: Cryptocurrency investments carry risks. This guide does not constitute financial advice. Please do your own research before making any investment decisions.
Step-by-step guide: Transferring ethereum from Coinbase to MetaMask
Transferring your ethereum from Coinbase to MetaMask is a straightforward process that allows you to have full control over your funds and interact with decentralized applications (DApps).
Step 1: Install and Set up MetaMask
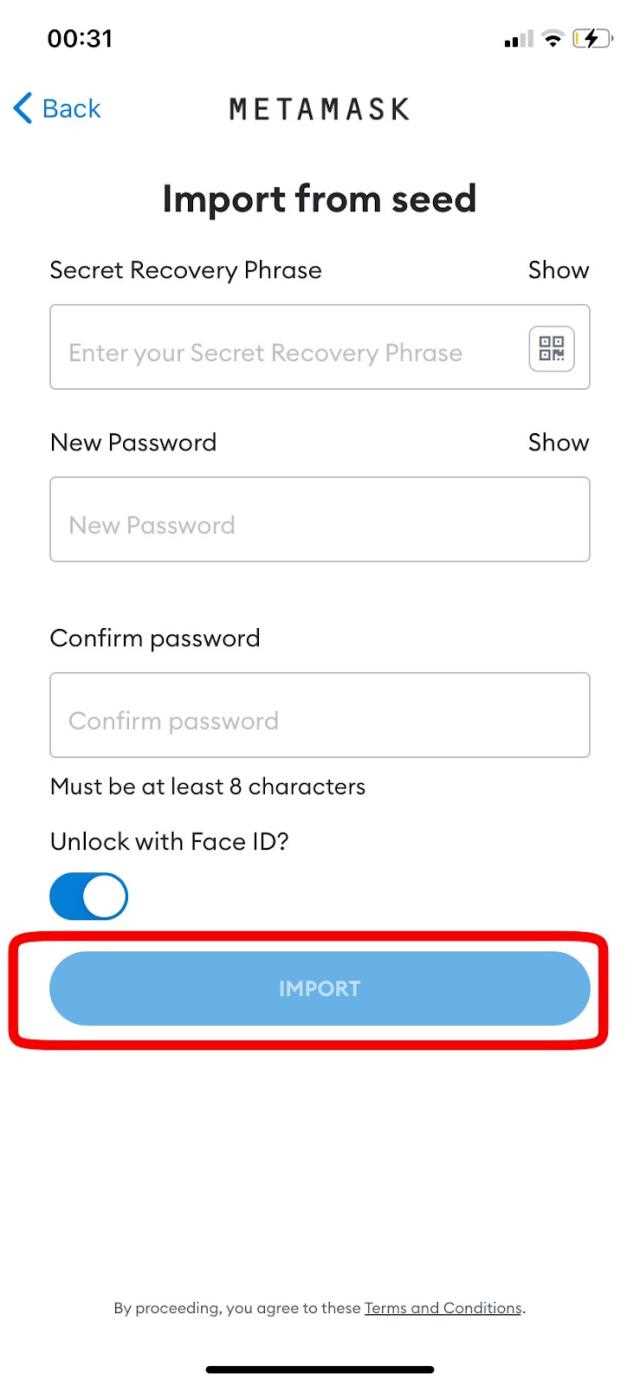
If you haven’t already, you need to install the MetaMask extension in your web browser. Once installed, create a new wallet or import an existing one using your seed phrase.
Step 2: Obtain your MetaMask wallet address
After setting up your MetaMask wallet, click on the extension icon and copy your wallet address.
Step 3: Log in to Coinbase
Open Coinbase in your web browser and sign in to your account.
Step 4: Access your ethereum wallet in Coinbase
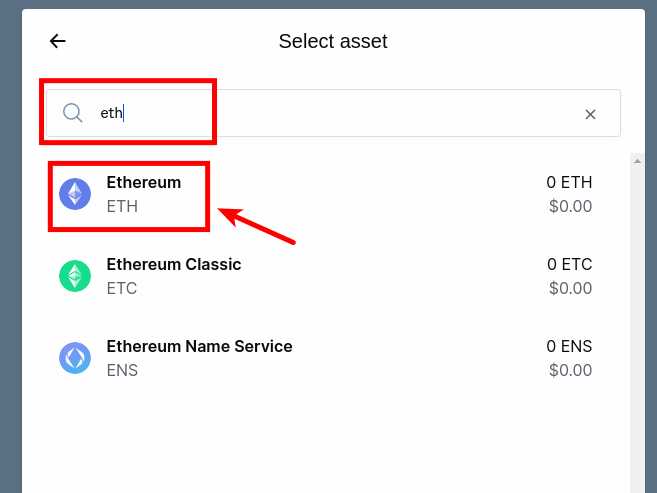
Click on the “Accounts” tab in Coinbase and select your ethereum wallet.
Step 5: Initiate the transfer
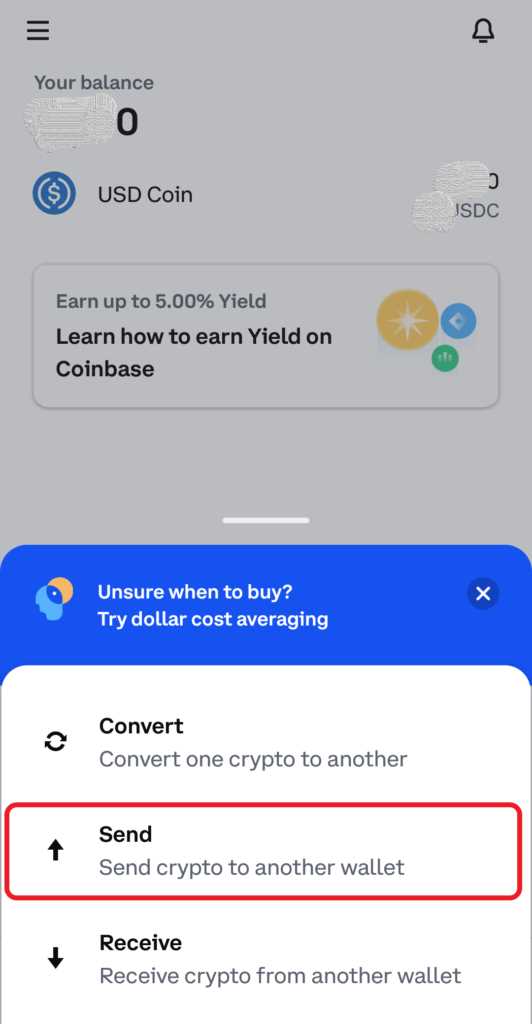
- Click on the “Send” button within your ethereum wallet.
- Paste your MetaMask wallet address into the recipient field.
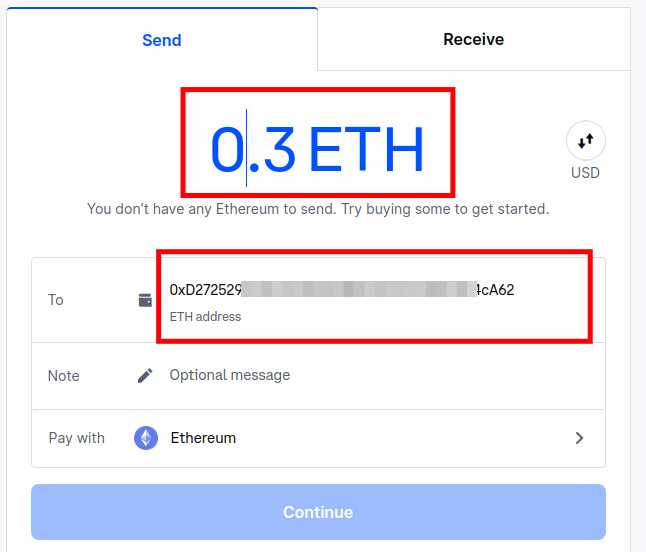
- Enter the amount of ethereum you want to transfer.
- Double-check all the details to ensure accuracy.
- Click “Send” to initiate the transfer.
Step 6: Confirm the transfer in MetaMask
Switch back to your MetaMask wallet and wait for the transaction to appear. Once it appears, review the details and click “Confirm” to complete the transfer.
Step 7: Track the transfer
You can monitor the progress of your transfer by checking the transaction status on the Ethereum blockchain using either Etherscan or a similar blockchain explorer.
Congratulations! You have successfully transferred your ethereum from Coinbase to MetaMask. You can now use your funds in MetaMask to interact with decentralized applications and participate in the Ethereum ecosystem.
Create a MetaMask wallet
MetaMask is a popular cryptocurrency wallet that allows you to manage your Ethereum and ERC-20 tokens. Follow the steps below to create a MetaMask wallet:
Step 1: Install the MetaMask extension
First, you need to install the MetaMask extension in your web browser. MetaMask is available for Chrome, Firefox, Brave, and Edge browsers. Visit the extension store of your preferred browser and search for “MetaMask”. Click on the “Add to Chrome/Firefox/Brave/Edge” button to install the extension.
Step 2: Set up your MetaMask wallet
- After installing the MetaMask extension, click on the MetaMask icon in your web browser’s toolbar. This will open a new tab with the MetaMask interface.
- Click on the “Get Started” button.
- You will be presented with two options: “Import wallet” or “Create wallet”. Since we are creating a new wallet, click on the “Create wallet” option.
- Read and agree to the Terms of Use and Privacy Notice by checking the boxes.
- Click on the “Create” button.
- Set a strong password for your MetaMask wallet. Make sure to remember this password as you will need it to access your wallet in the future.
- Click on the “Create” button.
- You will be presented with a secret backup phrase. This backup phrase is extremely important as it is the only way to recover your wallet if you forget your password or lose access to your device. Write down the backup phrase in a safe place and click on the “Next” button.
- Verify your backup phrase by selecting the words in the correct order.
- Click on the “Confirm” button.
Congratulations! You have successfully created a MetaMask wallet. You can now use this wallet to store and manage your Ethereum and ERC-20 tokens.
Login to Coinbase
1. Open your internet browser and navigate to the Coinbase website.
2. Click on the “Sign In” button located at the top right corner of the homepage.
3. Enter your registered email address and password in the provided fields.
4. Click on the “Sign In” button.
5. Complete the two-factor authentication process if prompted.
6. You will now be logged in to your Coinbase account.
Transfer ethereum from Coinbase to MetaMask
Transferring ethereum from Coinbase to MetaMask is a straightforward process that allows you to access and manage your ethereum within the MetaMask wallet. Follow these simple steps to transfer your ethereum:
Step 1: Install MetaMask
If you haven’t already, install the MetaMask extension in your browser. MetaMask is available for Chrome, Firefox, and Brave browsers.
Step 2: Set up MetaMask
Once MetaMask is installed, set up your MetaMask wallet by creating a new account or importing an existing one. Make sure to securely store your seed phrase as it will be required to restore your wallet if needed.
Step 3: Obtain your MetaMask wallet address
Open the MetaMask extension in your browser, and navigate to the “Account details” section. Copy your wallet address as you will need it for the next step.
Step 4: Log in to Coinbase
Go to the Coinbase website and log in to your account.
Step 5: Navigate to your ethereum wallet
Click on the “Accounts” tab in Coinbase and select your ethereum wallet.
Step 6: Initiate the transfer
Click on the “Send” button within your ethereum wallet in Coinbase. Paste your MetaMask wallet address in the recipient field.
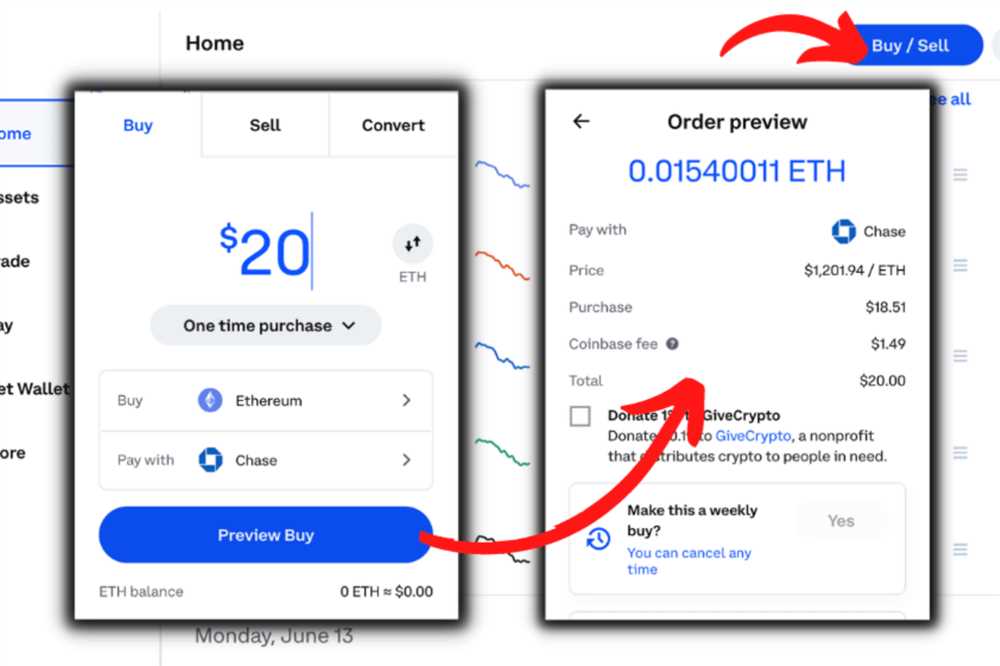
Step 7: Specify the amount and confirm the transaction
Enter the amount of ethereum you want to transfer and review the details of the transaction. Once you have confirmed that everything is correct, click on “Confirm” to initiate the transfer.
It may take some time for the transfer to be processed and reflected in your MetaMask wallet. You can monitor the progress of the transaction by checking the transaction details in Coinbase.
Once the ethereum has been successfully transferred, you will be able to view and manage it within your MetaMask wallet. From there, you can use it for various purposes such as interacting with decentralized applications (dApps) or sending it to other ethereum addresses.
Remember to always double-check the recipient address and transaction details before confirming any transfers to ensure the security of your funds.
Note: Please be aware that fees may apply when transferring ethereum between wallets. These fees are usually network fees and can vary depending on the current network congestion and gas prices.
Frequently Asked Questions:
What is Coinbase and MetaMask?
Coinbase is a cryptocurrency exchange platform where users can buy, sell, and store digital currencies like Ethereum. MetaMask is a digital wallet and browser extension that allows users to manage their Ethereum and interact with decentralized applications (DApps) on the Ethereum blockchain.
Why would I want to transfer Ethereum from Coinbase to MetaMask?
Transferring Ethereum from Coinbase to MetaMask allows you to have more control and security over your funds. MetaMask is a non-custodial wallet, which means you have full control of your private keys. It also allows you to directly interact with decentralized applications on the Ethereum network.
+ There are no comments
Add yours