


If you’re a cryptocurrency enthusiast, chances are you’ve heard of Binance and MetaMask. Binance is one of the largest cryptocurrency exchanges in the world, while MetaMask is a popular Ethereum wallet that allows users to manage their digital assets and interact with decentralized applications. Connecting these two powerful tools can open up a world of possibilities for managing your cryptocurrency portfolio.
In this step-by-step guide, we will walk you through the process of connecting your Binance account with MetaMask, so you can easily transfer and manage your funds across both platforms. By following these simple steps, you’ll be able to take advantage of the benefits offered by these two platforms in a seamless and secure manner.
Before we begin, it’s important to note that you will need an existing Binance account and the MetaMask extension installed on your preferred web browser. If you don’t have these yet, take a moment to create an account on Binance and install the MetaMask extension–it’s quick and easy!
Once you have everything set up, you’re ready to connect Binance to MetaMask. Start by opening the MetaMask extension in your browser and clicking on the account icon in the top right corner. Then, select “Add Account” from the drop-down menu. This will generate a new Ethereum address for your MetaMask wallet.
Installing and Setting Up MetaMask

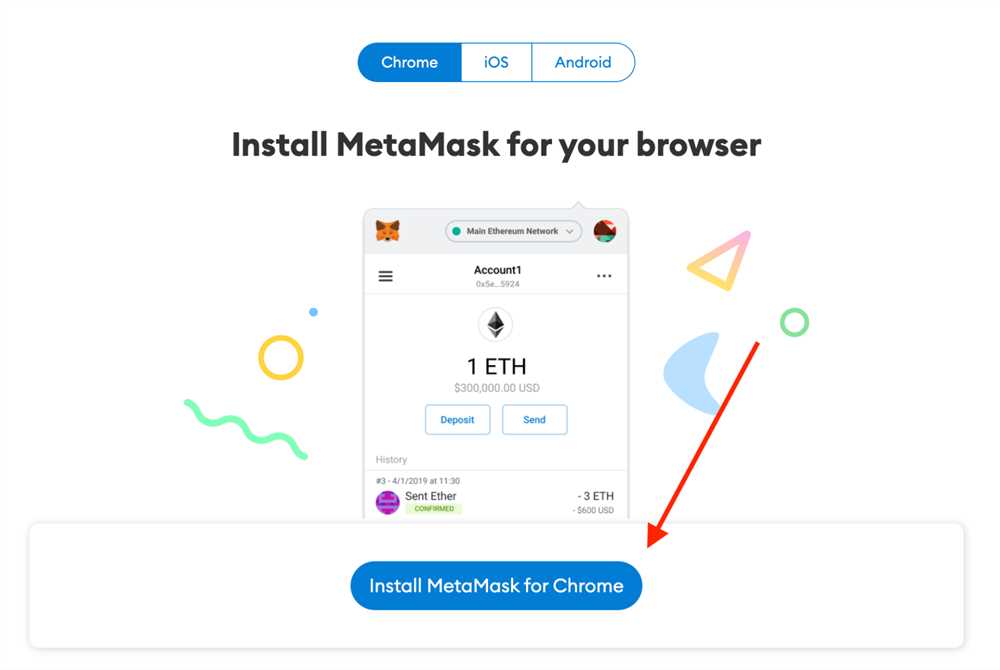
In order to connect Binance to MetaMask, you will first need to install and set up the MetaMask extension in your web browser. Follow these steps to get started:
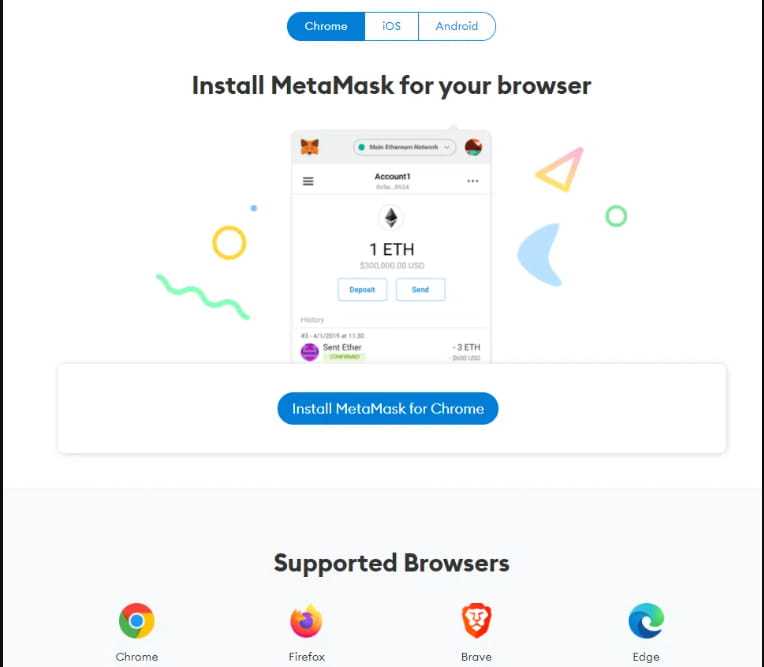
- Open your preferred web browser and go to the MetaMask website.
- Click on the “Download” button to download the MetaMask extension.
- Once the download is complete, click on the downloaded file to start the installation process.
- Follow the on-screen instructions to install the MetaMask extension.
- After the installation is complete, click on the MetaMask icon in your browser’s toolbar to open the extension.
- A welcome screen will appear. Click on the “Get Started” button to begin setting up MetaMask.
- Create a new wallet by clicking on the “Create a Wallet” option.
- Create a strong and unique password for your wallet and click on the “Create” button.
- You will be shown a secret backup phrase. Make sure to store this phrase in a safe place, as it can be used to recover your wallet in case of loss or theft.
- Confirm your backup phrase by selecting the words in the correct order and click on the “Confirm” button.
- Once your wallet is set up, you can choose whether to allow MetaMask to collect anonymous usage data. Make your selection and click on the “Agree” button.
- Your MetaMask wallet is now ready to use! You can now connect it to Binance by following the steps outlined in the previous section.
Installing and setting up MetaMask is an essential first step in connecting Binance to MetaMask. By following the instructions above, you can easily create a new wallet and begin using MetaMask on your preferred web browser.
Installing the MetaMask Extension
In order to connect Binance to MetaMask, you will need to have the MetaMask extension installed in your web browser. Follow the steps below to install the MetaMask extension:
- Open your web browser and go to the MetaMask website at https://metamask.io.
- Click on the “Get Chrome Extension” button if you are using Google Chrome, or the “Get Firefox Extension” button if you are using Mozilla Firefox. This will redirect you to the respective extension store.
- Click on the “Add to Chrome” or “Add to Firefox” button to start the installation process.
- A pop-up window will appear, asking for your confirmation to add the extension. Click on “Add extension” to proceed.
- Once the extension is installed, a new MetaMask icon will appear in the top right corner of your web browser.
After successfully installing the MetaMask extension, you can proceed with connecting Binance to MetaMask by following the steps in the next section.
Creating a New Wallet
To connect Binance to MetaMask, you will first need to create a new wallet on the Binance platform. Here is a step-by-step guide to help you create a new wallet:
- Visit the Binance website and sign up for an account if you don’t already have one.
- Once you’re signed in, navigate to the Wallets section of your Binance dashboard.
- Click on the “Create Wallet” button to start the wallet creation process.
- Choose a strong password for your wallet and enter it in the required field. Make sure to use a combination of uppercase and lowercase letters, numbers, and special characters to create a secure password.
- After entering your password, re-enter it to confirm and click on the “Create Wallet” button.
- Binance will generate your wallet’s mnemonic phrase. This phrase is extremely important as it is the only way to access your wallet. Make sure to write it down and store it in a safe place. Do not share this phrase with anyone.
- Once you have saved your mnemonic phrase, click on the “Confirm” button to proceed.
- After confirming your mnemonic phrase, Binance will ask you to complete a security puzzle. Follow the instructions provided to solve the puzzle.
- Once you have completed the security puzzle, your Binance wallet will be created.
Congratulations! You have successfully created a new wallet on the Binance platform. Now, let’s move on to connecting Binance to your MetaMask wallet.
Importing an Existing Wallet

To import an existing wallet to MetaMask from Binance, you will need to follow the steps below:
- Open the MetaMask extension in your web browser.
- Click on the circular icon at the top-right corner of the extension.
- From the dropdown menu, select “Import Account”.
- In the import window, select the “Wallet” option.
- Copy the wallet address from Binance.
- Paste the wallet address in the field provided in MetaMask.
- Click on “Import” to start the importing process.
After you have successfully imported your existing wallet, you will be able to manage it directly from your MetaMask extension. You can view your wallet balance, send and receive cryptocurrencies, as well as interact with decentralized applications (dApps) on the Ethereum network.
Creating an API Key on Binance

Before you can connect Binance to MetaMask, you need to create an API key on the Binance exchange. This API key will allow MetaMask to access your Binance account and trade on your behalf.
Follow these steps to create an API key on Binance:
- Login to your Binance account and navigate to the API Management page. You can find it by clicking on your profile icon in the top-right corner of the screen and selecting “API Management” from the dropdown menu.
- Click on the “Create API” button to start the API key creation process.
- Enter a name for your API key in the “API Key Name” field. This can be any name that helps you identify the key later.
- Configure the API key permissions by selecting the appropriate options. For MetaMask integration, you need to enable “Spot & Margin Trading” and “Margin Transfer”. You can also enable other permissions if needed.
- Ensure that the IP Restriction settings are set to “Unrestricted” if you want to use MetaMask from any IP address. If you want to restrict access to specific IP addresses, you can enter them in the “Restrict to IPs” field.
- Complete the verification process by solving the CAPTCHA and enabling two-factor authentication (2FA).
- After completing the verification, click on the “Create” button to generate your API key.
- Once the API key is created, you will see a confirmation message along with the API key and secret key. Make sure to copy and save these keys in a safe place as you won’t be able to see the secret key again once you close the window.
Now that you have created an API key on Binance, you can proceed to connect it to MetaMask and start trading with ease.
Logging in to Binance
Before you can connect your Binance account to MetaMask, you need to log in to your Binance account. If you don’t have a Binance account yet, you will need to create one first.
Step 1: Go to the Binance website
Open a web browser and navigate to the Binance website at https://www.binance.com.
Step 2: Click on “Login”
On the top right corner of the Binance website, you will find the “Login” button. Click on it to proceed.
Step 3: Enter your credentials
You will be presented with a login form. Enter your Binance email address and password into the respective fields. If you have two-factor authentication enabled, you will also need to enter the verification code.
Note: If you have forgotten your password, click on the “Forgot Password” link and follow the instructions to reset it.
Step 4: Complete the captcha
After entering your credentials, you may be prompted to complete a captcha to verify that you are not a bot. Follow the instructions and solve the captcha if required.
Step 5: Click on “Login”

Double-check all the information you have entered and click on the “Login” button to access your Binance account.
| Troubleshooting tip: |
|---|
| If you are having trouble logging in, make sure your internet connection is stable and try clearing your browser cache or using a different browser. |
Frequently Asked Questions:
What is Binance?
Binance is one of the largest cryptocurrency exchanges in the world. It provides a platform for users to trade various cryptocurrencies.
What is MetaMask?
MetaMask is a cryptocurrency wallet and browser extension that allows users to interact with decentralized applications (dApps) on the Ethereum blockchain. It enables users to store and manage their Ethereum-based tokens, as well as connect to various dApps.
+ There are no comments
Add yours