


If you’re a cryptocurrency enthusiast or a decentralized finance (DeFi) enthusiast, chances are you’ve heard of both Metamask and Binance Smart Chain (BSC). Metamask is a popular digital wallet that allows users to store and manage different cryptocurrencies, while Binance Smart Chain is a blockchain platform that enables the creation of decentralized applications (dApps) and smart contracts. Connecting Metamask to Binance Smart Chain can give you access to a wide range of DeFi applications and opportunities. In this step-by-step guide, we will walk you through the process of connecting Metamask to Binance Smart Chain.
Step 1: Install the Metamask Wallet
If you haven’t already, the first step is to install the Metamask wallet extension on your web browser. Metamask is available for Google Chrome, Mozilla Firefox, and Brave browsers. Visit the official Metamask website or search for “Metamask” in your browser’s extension store to download and install the wallet extension.
Step 2: Create or Import a Metamask Account
Once you have installed the Metamask wallet, open it by clicking on the Metamask icon in your browser’s toolbar. You will be prompted to either create a new account or import an existing one. If you are new to Metamask, click on “Create a Wallet” and follow the instructions to set up a new account. If you already have a Metamask account, click on “Import Wallet” and enter your 12-word recovery phrase to import your account.
Step 3: Switch to the Binance Smart Chain Network
By default, Metamask is connected to the Ethereum network. To connect it to Binance Smart Chain, you will need to switch to the Binance Smart Chain network. Click on the network dropdown menu in the Metamask wallet and select “Custom RPC”. In the “New Network” settings, enter the following details:
Network Name: Binance Smart Chain
RPC URL: https://bsc-dataseed.binance.org/
ChainID: 56
Symbol: BNB
Block Explorer URL: https://bscscan.com/
After entering these details, click on “Save” to switch to the Binance Smart Chain network.
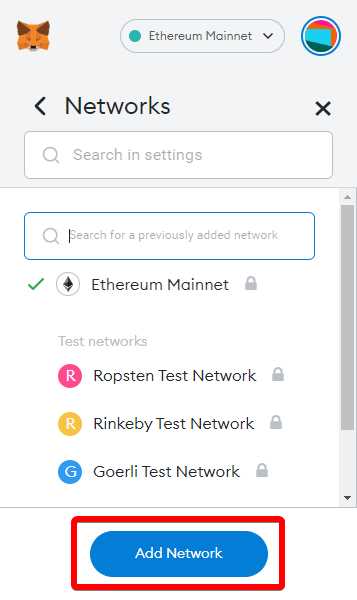
Step 4: Add Binance Smart Chain as a Custom Network
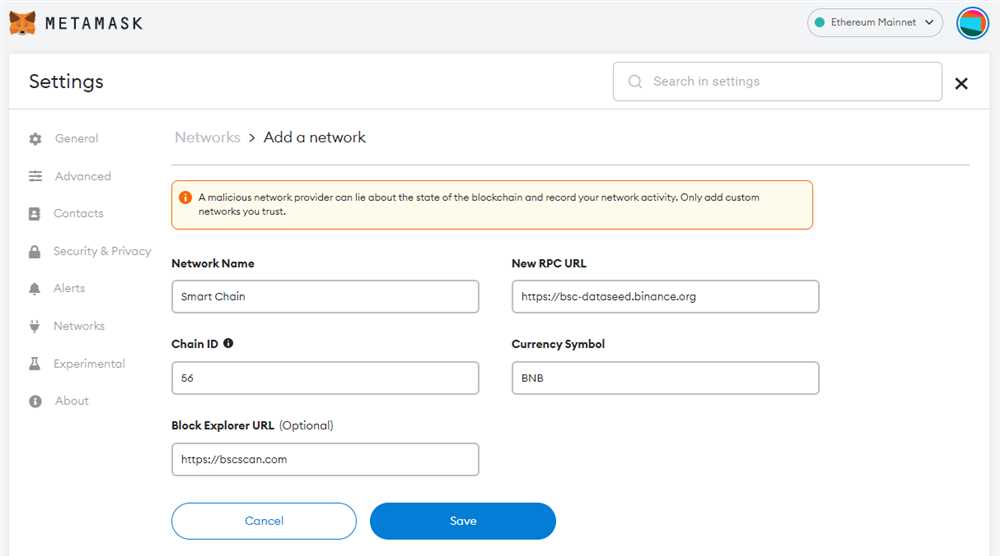
In some cases, you may need to add Binance Smart Chain as a custom network in Metamask. To do this, click on the network dropdown menu again and select “Add Network”. Enter the following details:
Network Name: Binance Smart Chain
RPC URL: https://bsc-dataseed.binance.org/
ChainID: 56
Symbol: BNB
Block Explorer URL: https://bscscan.com/
Click on “Save” to add Binance Smart Chain as a custom network.
Step 5: Connect Metamask to Binance Smart Chain
Now that you have switched to the Binance Smart Chain network, you are ready to connect Metamask to Binance Smart Chain. Visit Binance DEX (https://www.binance.org/en/trade) or any other DeFi application that supports Binance Smart Chain. Click on the Metamask icon in your browser’s toolbar and authorize the connection request. Once connected, you can use your Metamask wallet to interact with Binance Smart Chain dApps, trade cryptocurrencies, and take advantage of various DeFi opportunities.
That’s it! You have successfully connected your Metamask wallet to Binance Smart Chain. Enjoy exploring the world of DeFi on the Binance Smart Chain network!
Setting up Metamask
To connect Metamask to the Binance Smart Chain, you will need to follow these step-by-step instructions:
1. Install Metamask Extension
If you don’t have Metamask installed, you can download the extension for your preferred web browser by visiting the Metamask website. Follow the installation instructions provided by Metamask to add the extension to your browser.
2. Create or Import a Wallet
Once you have the Metamask extension installed, open it and click on “Create a Wallet” if you don’t have a wallet already. Follow the prompts to set up a new wallet, including creating a password and backing up your seed phrase.
If you already have a Metamask wallet, click on the account icon in the top-right corner and select “Import Account.” Enter your seed phrase or private key to import your wallet into Metamask.
3. Connect to Binance Smart Chain
In the Metamask extension, click on the network dropdown (usually set to “Ethereum Mainnet”) and select “Custom RPC.”
In the “New Network” section, enter the following details:
- Network Name: Binance Smart Chain
- New RPC URL: https://bsc-dataseed1.binance.org/
- Chain ID: 56
- Symbol: BNB
- Block Explorer URL: https://bscscan.com/
After entering these details, click “Save” to connect Metamask to the Binance Smart Chain network.
4. Add Binance Smart Chain Tokens
To view and manage Binance Smart Chain tokens in your Metamask wallet, click on “Add Token” and select “Custom Token.”
Enter the contract address of the token you want to add and click “Next.” Metamask will automatically fill in the Token Symbol and Decimals of Precision fields. Click “Add Tokens” to complete the process.
That’s it! You have successfully set up Metamask and connected it to the Binance Smart Chain network. Now you can use Metamask to interact with decentralized applications (DApps) and manage your Binance Smart Chain tokens.
Download and Install Metamask Extension
To connect Metamask to Binance Smart Chain, you will first need to download and install the Metamask extension for your preferred web browser. Metamask is available for popular browsers such as Chrome, Firefox, and Brave.
Follow these steps to download and install Metamask:
- Open your web browser and go to the official Metamask website (https://metamask.io).
- Click on the “Get Chrome Extension” button if you are using Google Chrome, or select the appropriate option for your browser.
- You will be redirected to the extension page of your browser’s web store. Click on the “Add to Chrome” button (or relevant button for your browser).
- A pop-up window will appear, asking for confirmation to add the extension. Click on “Add extension” to continue.
- Once the extension is installed, you will see the Metamask icon in your browser’s toolbar.
Congratulations! You have successfully downloaded and installed the Metamask extension.
Metamask on Mobile
If you prefer to use Metamask on your mobile device, you can download the Metamask app from the App Store (for iOS) or Google Play Store (for Android).
Once you have downloaded the app, open it and follow the on-screen instructions to create a new wallet or import an existing one. Make sure to choose “Binance Smart Chain” as the network in the settings of the Metamask app to connect to Binance Smart Chain.
Configuring the Metamask Extension
After installing Metamask, you will need to configure it to connect to Binance Smart Chain:
- Click on the Metamask icon in your browser’s toolbar to open the extension.
- If this is your first time using Metamask, you will be prompted to create a new wallet or import an existing one. Follow the on-screen instructions to complete the process. If you already have a wallet, click on “Import Wallet” and enter your recovery phrase.
- Once you are logged in, click on the network dropdown at the top of the extension and select “Custom RPC”.
- In the “New RPC URL” field, enter the Binance Smart Chain RPC URL: https://bsc-dataseed.binance.org/
- Click “Save” to save the network settings.
That’s it! You have successfully downloaded, installed, and configured the Metamask extension to connect to Binance Smart Chain. You are now ready to use Metamask for interacting with Binance Smart Chain and its decentralized applications.
It is important to note that when using Metamask, you should always be cautious of phishing attempts and only enter your seed phrase or private key on official and trusted websites.
Create a Metamask Wallet
Before connecting Metamask to Binance Smart Chain, you need to have a Metamask wallet. If you already have one, you can skip this step. If not, follow the instructions below to create a new Metamask wallet:
Step 1: Install Metamask Chrome Extension

If you don’t have Metamask installed on your browser, go to the Chrome Web Store and search for “Metamask”. Click on the “Add to Chrome” button to install the extension.
Step 2: Create a New Wallet
Once the Metamask extension is installed, click on the Metamask icon in your browser toolbar. You will see a welcome screen, where you can either import an existing wallet or create a new one. Click on the “Create a Wallet” option.
Read and accept the terms of use, then click on the “Create” button to proceed.
Step 3: Set up a Strong Password
In this step, you need to set up a strong password for your Metamask wallet. Enter a secure password that you can remember, and make sure to follow the password requirements provided on the screen. After entering the password, click on the “Create” button.
Step 4: Backup Seed Phrase
|
After setting up the password, Metamask will display a seed phrase – a series of 12 or 24 random words. This seed phrase is crucial for recovering your wallet, so it’s important to back it up in a secure place. Write down the seed phrase on a paper or store it in a password manager. Make sure to keep this information private and secure. Once you have backed up the seed phrase, click on the “Next” button. |
Step 5: Confirm Seed Phrase
Metamask will ask you to confirm your seed phrase in the right order to verify that you have properly backed it up. Select each word in the correct order and click on the “Confirm” button.
Step 6: Wallet Created

Congratulations! You have successfully created a new Metamask wallet. You will be redirected to your wallet dashboard, where you can view your account address, balance, and activity.
Keep in mind that you can also link your Metamask wallet to other blockchains, such as Binance Smart Chain, to access decentralized applications (DApps) and participate in the decentralized finance (DeFi) ecosystem.
Connect Metamask to Binance Smart Chain
If you’re looking to connect Metamask to Binance Smart Chain, you’re in the right place. By configuring Metamask to work with Binance Smart Chain, you’ll be able to seamlessly interact with decentralized applications (DApps) and trade Binance Smart Chain tokens.
Step 1: Install Metamask

If you haven’t already, start by installing and setting up Metamask. Metamask is a browser extension that serves as a digital wallet and allows you to interact with Ethereum-based applications. You can easily find and install Metamask by searching for it in the extensions marketplace of your browser (Chrome, Firefox, or Brave).
Step 2: Create or Import a Wallet
Once you’ve installed Metamask, open the extension and create a new wallet if you haven’t already. Alternatively, you can import an existing wallet if you already have one. Make sure to securely backup your wallet’s seed phrase to prevent losing access to your funds.
Step 3: Add the Binance Smart Chain Network
In order to connect Metamask to Binance Smart Chain, you need to add the Binance Smart Chain network to your Metamask settings. Here’s how:
- Click on the Metamask extension icon.
- In the dropdown menu, click on “Settings”.
- In the settings page, scroll down and click on “Networks”.
- Click on “Add Network” to add a new network.
- Fill in the following information for the Binance Smart Chain network:
| Network Name | New RPC URL | ChainID | Symbol | Explorer URL |
|---|---|---|---|---|
| Binance Smart Chain Mainnet | https://bsc-dataseed.binance.org/ | 56 | BSC | https://bscscan.com/ |
After filling in the information, click on “Save” to add the Binance Smart Chain network.
Step 4: Switch to Binance Smart Chain
Now that you’ve added the Binance Smart Chain network, you can easily switch to it. Here’s how:
- Click on the Metamask extension icon.
- In the dropdown menu, click on the network name (e.g. “Ethereum Mainnet”).
- Select “Binance Smart Chain Mainnet” from the list.
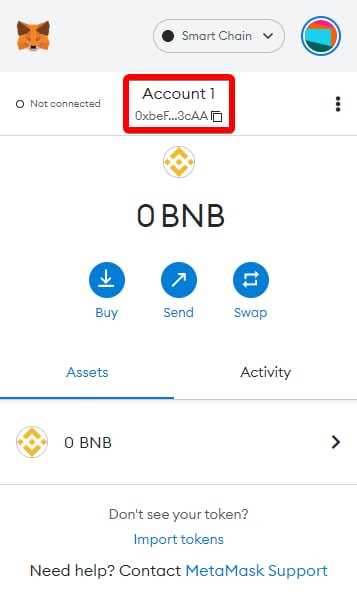
Once you’ve switched to the Binance Smart Chain network, you’re ready to start using Metamask with Binance Smart Chain. You can now interact with DApps and trade Binance Smart Chain tokens directly from your Metamask wallet.
Remember to always double-check the network you’re connected to when transacting to ensure you’re using the correct network.
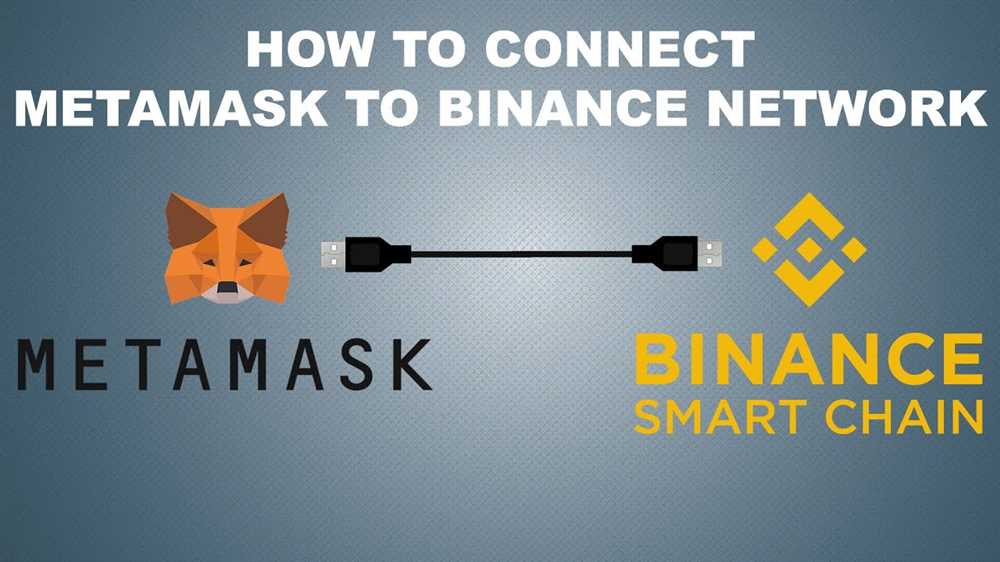
Connecting Metamask to Binance Smart Chain
Metamask is a popular wallet browser extension that allows users to interact with decentralized applications (dApps) on various blockchain networks. Binance Smart Chain (BSC) is a blockchain platform that provides fast and low-cost transactions for decentralized finance (DeFi) applications.
To connect Metamask to Binance Smart Chain, you need to follow these steps:
- Install the Metamask extension on your preferred web browser (Chrome, Firefox, or Brave).
- Create a new wallet or import an existing one into Metamask.
- Open Metamask and click on the network dropdown on the top, then select “Custom RPC.”
- In the “New Network” screen, enter the following details:
- Network Name: Binance Smart Chain
- RPC URL: https://bsc-dataseed.binance.org/
- Chain ID: 56
- Symbol: BNB
- Block Explorer URL: https://bscscan.com/
- Click “Save” to add the Binance Smart Chain network to Metamask.
- Now, you can select the Binance Smart Chain network from the network dropdown in Metamask.
- If you have BNB in your Metamask wallet, you can start using dApps on Binance Smart Chain.
- If you don’t have BNB, you can obtain it by transferring from another wallet or by purchasing it on a cryptocurrency exchange.
Once you have successfully connected Metamask to Binance Smart Chain, you can explore and interact with various DeFi platforms and tokens on the BSC network. Make sure to verify the legitimacy and security of any dApps or projects before participating.
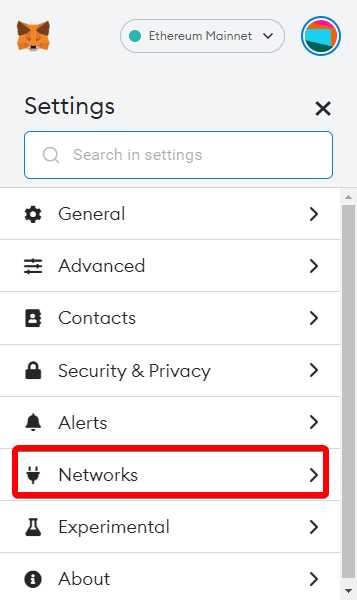
Open Metamask Settings
To connect Metamask to Binance Smart Chain, you must first open the Metamask settings. Follow the steps below:
Step 1: Install Metamask
If you haven’t already, you need to install the Metamask browser extension. Visit the Metamask website and follow the instructions to add it to your preferred browser.
Step 2: Access Metamask

Once Metamask is installed, click on the extension icon in your browser toolbar to open the Metamask pop-up window.
Step 3: Open Settings
In the Metamask pop-up window, click on the profile icon in the top right corner.
A drop-down menu will appear. From the menu, select “Settings”.
Step 4: Networks
In the “Settings” section, you will see different tabs. Click on the “Networks” tab.
Here, you can manage the networks that Metamask is connected to.
Make sure you are on the “Networks” tab and not on any other options.
Scroll down to find the “Networks” section with a list of networks available on Metamask.
Step 5: Add Network
At the bottom of the “Networks” section, click on the “Add Network” button.
A form will appear where you can enter the network details.
Enter the following information:
Network Name: Binance Smart Chain
New RPC URL: https://bsc-dataseed.binance.org/
Chain ID: 56
Symbol: BNB
Block Explorer URL: https://bscscan.com
Double-check the information you entered to ensure accuracy.
Step 6: Save Network
After entering the network details, click on the “Save” button to save the Binance Smart Chain network to Metamask.
Metamask will now be connected to Binance Smart Chain, and you will be able to use it to interact with Binance Smart Chain dApps and wallet services.
Frequently Asked Questions:
Why should I connect Metamask to Binance Smart Chain?
Connecting Metamask to Binance Smart Chain allows you to access and interact with decentralized applications (dApps) and protocols on the Binance Smart Chain network. It opens up a wide range of possibilities for trading, staking, and participating in various DeFi projects on the Binance ecosystem.
What are the benefits of using Binance Smart Chain with Metamask?
Using Binance Smart Chain with Metamask offers several benefits. Firstly, you can leverage the wide range of decentralized applications available on the Binance Smart Chain network. Secondly, you can take advantage of lower transaction fees compared to the Ethereum network. Additionally, you can seamlessly connect your existing Metamask wallet to the Binance ecosystem without the need to create a new wallet.
Can I switch back to Ethereum network after connecting Metamask to Binance Smart Chain?
Yes, you can switch back to the Ethereum network after connecting Metamask to Binance Smart Chain. To do this, simply click on the network selection dropdown in Metamask, and select the Ethereum network. You can switch between different networks as per your requirements.
+ There are no comments
Add yours