


If you’re interested in accessing the Binance Chain network and its decentralized applications (dApps), one of the essential steps is to connect your Binance Chain wallet to Metamask, a popular Ethereum wallet. By doing so, you’ll be able to enjoy the benefits of both Binance Chain and Metamask, expanding your cryptocurrency experience.
Connecting your Binance Chain wallet to Metamask may seem like a complex process, but fear not! In this step-by-step guide, we’ll walk you through the necessary steps to make the connection seamlessly. Whether you’re a beginner or an experienced cryptocurrency user, this guide will help you navigate the process with ease.
To begin, make sure you have both the Binance Chain wallet and Metamask installed on your device. If you haven’t installed them yet, visit their respective websites and follow the instructions for your operating system. Once installed, open both wallets and make sure they are functioning correctly.
Once you have your wallets up and running, the next step is to connect your Binance Chain wallet to Metamask. Open your Metamask wallet and select the network dropdown menu. Here, you’ll find an option to add a custom RPC. Click on it, and you’ll be prompted to enter the network details. For Binance Chain, you’ll need to input the following information:
Network Name: Binance Smart Chain
New RPC URL: https://bsc-dataseed1.binance.org/
ChainID: 56
Symbol: BNB
Block Explorer URL: https://bscscan.com/
Once you’ve entered the necessary details, click “Save” to add the Binance Chain network to Metamask. Congratulations! You have successfully connected your Binance Chain wallet to Metamask. Now, you can enjoy the benefits of both networks and explore a wide range of dApps available on Binance Chain.
How to Connect Your Binance Chain Wallet to Metamask: A Step-by-Step Guide
If you are using Binance Chain Wallet and would like to connect it to your Metamask account, follow these step-by-step instructions:
Step 1: Install the Binance Chain Wallet Extension

In order to connect your Binance Chain Wallet to Metamask, you need to have the Binance Chain Wallet extension installed on your browser. Visit the Binance website and follow the instructions to install the extension for your specific browser.
Step 2: Create a New Binance Chain Wallet

Once you have installed the Binance Chain Wallet extension, open it and click on the “Create New Wallet” button. Follow the prompts to set up your new Binance Chain Wallet. Make sure to save your seed phrase and password in a safe place.
Step 3: Connect Binance Chain Wallet to Metamask

Now that you have your Binance Chain Wallet created, open Metamask on your browser and click on the account icon. From the drop-down menu, select “Import Account”.
On the import screen, select “Binance Chain” as the network and choose the option to import using the mnemonic phrase. Enter the seed phrase that you saved earlier from your Binance Chain Wallet and set a password for your Metamask account.
Click on “Import” to complete the process. Metamask will now import your Binance Chain Wallet and connect it to your Metamask account.
Step 4: Verify and Approve
To ensure that your Binance Chain Wallet is successfully connected to Metamask, go to the Metamask extension and click on the account icon again. From the drop-down menu, select your Binance Chain Wallet account.
You should now be able to see your Binance Chain Wallet’s address and balance in Metamask. You can also use your Binance Chain Wallet to interact with decentralized applications (DApps) using Metamask.
Remember to always double-check the URL and the security of the websites you visit to ensure the safety of your crypto assets.
Congratulations! You have successfully connected your Binance Chain Wallet to Metamask. Enjoy using both wallets together seamlessly.
Step 1: Install Metamask Extension

To connect your Binance Chain wallet to Metamask, the first step is to install the Metamask extension in your web browser. Follow the steps below to install the Metamask extension:
- Open your web browser and go to the official Metamask website.
- Click on the “Get Chrome Extension” or “Get Firefox Extension” button, depending on the browser you are using.
- A pop-up window will appear. Click on the “Add to Chrome” or “Add to Firefox” button to start the installation.
- Once the installation is complete, a new tab will open with the Metamask welcome screen. Click on the “Get Started” button.
- Create a new wallet by following the on-screen instructions. Make sure to secure your wallet with a strong password and write down the seed phrase provided.
- After creating your wallet, you will be taken to the main Metamask interface. Here, you can see your account address and balance.
Congratulations! You have successfully installed the Metamask extension on your web browser. In the next step, we will learn how to import your Binance Chain wallet into Metamask.
Step 2: Create a Binance Chain Wallet

In order to connect your Binance Chain Wallet to Metamask, you first need to create a Binance Chain Wallet. Follow the steps below to do so:
Step 1: Visit the Binance website and click on “Wallet” at the top right corner of the homepage.
Step 2: If you already have a Binance account, click on “Log In” and enter your credentials. If not, click on “Register” to create a new account.
Step 3: Once you are logged in, hover over the “Wallet” tab and click on “Funds” in the drop-down menu.
Step 4: In the “Wallet” section, click on “Overview” and then select “Binance Chain Wallet” from the list of available wallets.
Step 5: Click on “Create My Wallet” and enter a password for your Binance Chain Wallet. Make sure to choose a strong and secure password that you can remember.
Step 6: After setting your password, click on “I have copied my mnemonic phrase” and write down the 24-word mnemonic phrase that is shown on the screen. This phrase will be used to recover your wallet if you ever lose access to it.
Step 7: Carefully follow the instructions provided to confirm and verify your mnemonic phrase. Make sure to keep this phrase safe and secure, as anyone with access to it can potentially access your wallet.
Step 8: Congratulations! You have successfully created your Binance Chain Wallet. Make sure to keep your password and mnemonic phrase safe and do not share them with anyone.
Note: It is important to remember that losing your password or mnemonic phrase will result in permanent loss of access to your wallet and funds. It is recommended to backup your mnemonic phrase in a safe and secure location.
Step 3: Connect Binance Chain Wallet to Metamask
Once you have successfully installed the Binance Chain Wallet extension on your browser, follow the steps below to connect it to your Metamask:
- Open your Metamask extension by clicking on the Metamask icon in your browser’s toolbar.
- In the Metamask window, click on the account icon located in the top right corner of the screen, and then select “Settings” from the dropdown menu.
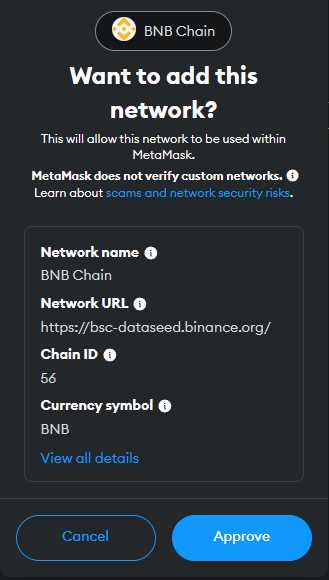
- In the Settings tab, scroll down to the “Networks” section and click on “Add Network”.
- A new window will appear where you need to enter the following details:
- Network Name: Binance Smart Chain
- New RPC URL: https://bsc-dataseed.binance.org/
- Chain ID: 56
- Symbol (optional): BNB
- Block Explorer URL (optional): https://bscscan.com
- After entering the details, click on the “Save” button to add the Binance Smart Chain network to your Metamask.
- Now, click on the account icon in the top right corner of the Metamask window, and then select “Networks” from the dropdown menu.
- In the Networks tab, select “Binance Smart Chain” from the list of available networks.
- After selecting the Binance Smart Chain network, you will need to import your Binance Chain Wallet account into Metamask. To do this, click on the account icon in the top right corner of the Metamask window, and then select “Import Account”.
- In the import account window, select the “Binance Chain” option and click on “Next”.
- You will be prompted to enter your Binance Chain Wallet’s 12-word recovery phrase. Enter the recovery phrase and click on “Import”.
- After importing the account, you will see your Binance Chain Wallet account listed in Metamask alongside your other accounts.
Congratulations! You have now successfully connected your Binance Chain Wallet to Metamask. You can now use your Binance Chain Wallet account to interact with decentralized applications (DApps) on the Binance Smart Chain network through Metamask.
Frequently Asked Questions:
What is Binance Chain Wallet?
Binance Chain Wallet is a cryptocurrency wallet that allows users to store, send, and receive digital assets on the Binance Chain. It is developed by Binance, one of the largest cryptocurrency exchanges in the world.
What is Metamask?
Metamask is a cryptocurrency wallet browser extension that allows users to manage their digital assets and interact with decentralized applications (dApps) on the Ethereum network. It is commonly used by users who want to connect their wallets to various blockchain networks.
Why would I want to connect my Binance Chain Wallet to Metamask?
By connecting your Binance Chain Wallet to Metamask, you can easily manage your Binance Chain assets alongside your Ethereum assets in one wallet interface. This allows for a more convenient and streamlined user experience when interacting with both Binance Chain and Ethereum-based dApps.


+ There are no comments
Add yours