


Are you tired of high transaction fees and slow confirmation times on the Ethereum network?
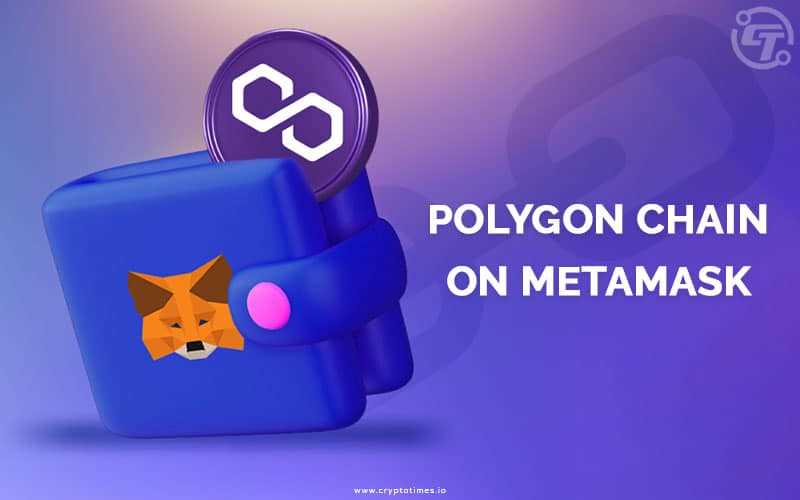
Introducing the Polygon Layer 2 Network, the next-generation Ethereum scaling solution designed to make your Metamask experience faster, cheaper, and more efficient than ever before.
With Polygon, you can enjoy lightning-fast transactions and significantly lower fees, allowing you to seamlessly navigate the decentralized finance (DeFi) ecosystem without breaking the bank.
Unlock a world of possibilities by leveraging the power of Polygon’s Layer 2 technology. Seamlessly bridge your assets between Ethereum and Polygon, and gain access to a wide range of decentralized applications (dApps) and financial services.
Experience the benefits of Polygon:
- Lightning-fast transactions: Say goodbye to long confirmation times and hello to instant transactions.
- Lower fees: Save money with significantly reduced transaction fees compared to the Ethereum network.
- Interoperability: Seamlessly bridge your assets between Ethereum and Polygon for enhanced flexibility.
- Expanded ecosystem: Access a thriving ecosystem of dApps and financial services built on Polygon’s Layer 2 technology.
Enhance your Metamask experience today by integrating with the Polygon Layer 2 Network. Enjoy faster transactions, lower fees, and a world of possibilities at your fingertips.
The Benefits of Using the Polygon Layer 2 Network
There are several benefits to using the Polygon Layer 2 Network to enhance your Metamask experience.
- Reduced Transaction Fees: By utilizing the Polygon Layer 2 Network, you can significantly reduce the transaction fees associated with using Metamask. This is especially important for frequent traders or users who engage in multiple transactions.
- Increased Scalability: The Polygon Layer 2 Network offers enhanced scalability compared to the Ethereum mainnet. This means that you can experience faster and more efficient transactions, even during peak usage times when the Ethereum network may become congested.
- Improved User Experience: With the Polygon Layer 2 Network, you can enjoy a smoother and more seamless user experience when interacting with decentralized applications (dApps) and conducting transactions. This is achieved through quicker confirmation times and reduced network latency.
- Compatibility with Existing Ethereum Infrastructure: The Polygon Layer 2 Network is fully compatible with existing Ethereum infrastructure, including wallets like Metamask. You can continue to use your familiar tools and interfaces while taking advantage of the benefits offered by Layer 2 solutions.
- Access to a Growing Ecosystem: By joining the Polygon Layer 2 Network, you gain access to a rapidly growing ecosystem of dApps, platforms, and services. This opens up opportunities for new and exciting experiences, such as decentralized finance (DeFi) applications, non-fungible tokens (NFTs), and more.
Overall, integrating the Polygon Layer 2 Network with Metamask unlocks a range of benefits that enhance your overall user experience, improves scalability, reduces transaction fees, and extends the capabilities of the Ethereum ecosystem.
How to Get Started with Metamask and Polygon
Metamask is a popular cryptocurrency wallet that allows users to manage their digital assets and interact with decentralized applications (dApps) on the Ethereum blockchain. By integrating the Polygon Layer 2 network with Metamask, users can enjoy faster and cheaper transactions while still benefiting from the security of the Ethereum network.
To get started with Metamask and Polygon, follow the steps below:
| Step 1: | Install Metamask |
| Step 2: | Create Metamask Wallet |
| Step 3: | Add the Polygon Network |
| Step 4: | Transfer Funds to Metamask |
| Step 5: | Connect to Polygon Network |
| Step 6: | Start Using Polygon dApps |
Step 1: Install Metamask
Visit the official Metamask website and download the extension for your preferred web browser (Chrome, Firefox, or Brave). Install and set up the extension on your browser.
Step 2: Create Metamask Wallet
Open Metamask and follow the instructions to create a new wallet. Make sure to securely store your seed phrase in a safe place, as it is the key to accessing your wallet.
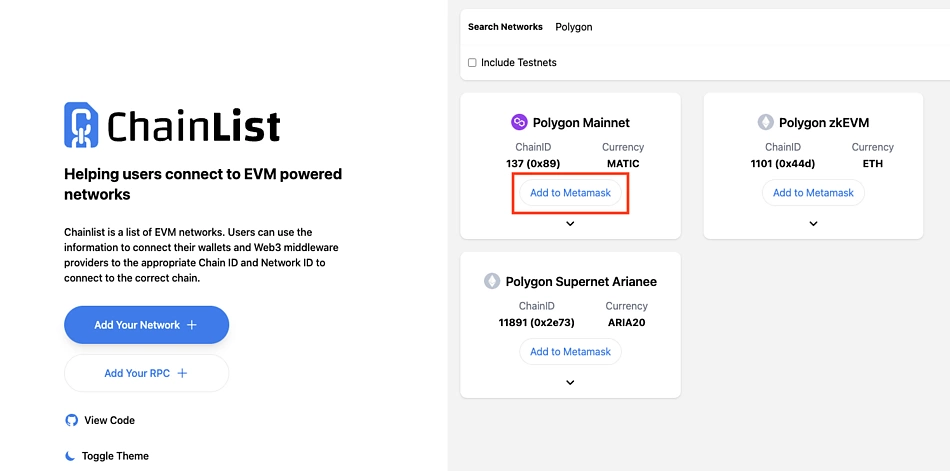
Step 3: Add the Polygon Network
In the Metamask wallet, click on the network dropdown and select “Custom RPC”. Enter the following details to add the Polygon network:
- Network Name: Polygon
- New RPC URL: https://rpc-mainnet.matic.network
- Chain ID: 137
- Symbol: MATIC
- Block Explorer URL: https://explorer.matic.network
Step 4: Transfer Funds to Metamask
To use Polygon, you’ll need to have funds in your Metamask wallet. Transfer some Ethereum or other ERC-20 tokens to your Metamask address by using the deposit feature of your preferred cryptocurrency exchange or wallet.
Step 5: Connect to Polygon Network
In Metamask, ensure you have selected the Polygon network from the network dropdown. If not, click on the network dropdown and select “Polygon”. You are now connected to the Polygon network.
Step 6: Start Using Polygon dApps
With Metamask and Polygon set up, you can now start exploring and using dApps on the Polygon network. Visit popular Polygon-based dApps like Aave, SushiSwap, or QuickSwap to enjoy a seamless and cost-effective user experience.
By following these steps, you can enhance your Metamask experience by leveraging the benefits of the Polygon Layer 2 network. Enjoy faster transactions, lower fees, and access to a vibrant ecosystem of dApps on Polygon while still benefiting from the security and trust of the Ethereum blockchain.
Installing Metamask
To enjoy the enhanced experience of the Polygon Layer 2 Network with Metamask, you first need to install the Metamask extension on your web browser. Follow the simple steps below to get started:
Step 1: Open your web browser
Launch your preferred web browser.
Step 2: Go to the Metamask website
Visit the official Metamask website at https://metamask.io/.
Step 3: Download Metamask extension
Click on the “Get Chrome Extension” or “Get Firefox Extension” button located on the Metamask website.
Step 4: Add Metamask to your browser
Follow the browser-specific instructions to add the Metamask extension to your browser. Once installed, the Metamask icon should appear in your browser’s toolbar.
Step 5: Set up your Metamask wallet
Click on the Metamask icon in your browser’s toolbar and follow the on-screen instructions to set up your Metamask wallet. Create a strong password and securely backup your wallet seed phrase.
Step 6: Connect to the Polygon Network
After setting up your Metamask wallet, click on the network selection dropdown in Metamask and choose “Custom RPC”. Enter the following details to connect to the Polygon Network:
| Network Name | RPC URL | Chain ID | Currency Symbol |
|---|---|---|---|
| Polygon Mainnet | https://rpc-mainnet.matic.network | 137 | MATIC |
| Polygon Testnet | https://rpc-mumbai.matic.today | 80001 | MATIC |
Once you have entered the correct details, click on “Save” to connect to the Polygon Network.
Congratulations! You have successfully installed and set up Metamask, and connected it to the Polygon Layer 2 Network. Now you can enjoy faster and more cost-effective transactions with the power of Polygon!
Connecting Metamask to the Polygon Network
Metamask is a popular browser extension wallet that allows you to interact with decentralized applications (dApps) on the Ethereum network. By connecting Metamask to the Polygon Layer 2 network, you can enjoy faster and cheaper transactions while still using the same Ethereum wallet you know and love.
Step 1: Install Metamask
If you haven’t already, install the Metamask browser extension from the official website. Metamask is available for Chrome, Firefox, and Brave browsers.
Step 2: Create or Import a Wallet
Once Metamask is installed, create a new wallet or import an existing one. Make sure to safely store your seed phrase in a secure location, as it is the only way to recover your wallet if you lose access.
Step 3: Switch to the Polygon Network
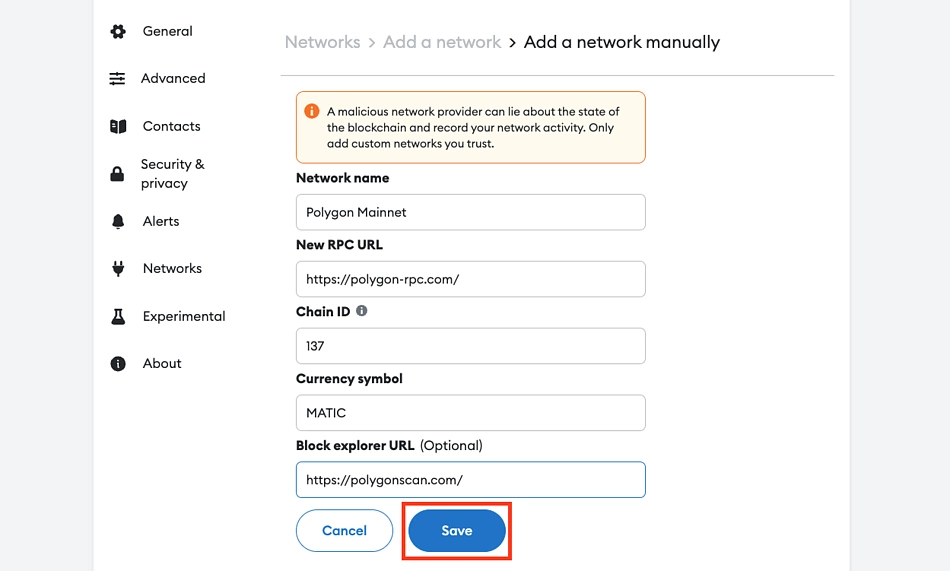
After setting up your wallet, open the Metamask extension and click on the network dropdown menu. Select “Custom RPC” to manually add a network.
In the network settings, enter the following details:
| Network Name: | Polygon Mainnet |
| New RPC URL: | https://polygon-rpc.com/ |
| Chain ID: | 137 |
| Symbol: | MATIC |
| Block Explorer URL: | https://polygonscan.com/ |
Click “Save” to add the Polygon Network to Metamask.
Step 4: Add MATIC to your Metamask Wallet
In order to interact with the Polygon network, you’ll need some MATIC tokens. You can obtain MATIC by purchasing it on a cryptocurrency exchange and sending it to your Metamask wallet address.
Once you have MATIC in your wallet, you’re ready to start using Metamask on the Polygon Network. Enjoy faster and cheaper transactions while seamlessly connecting with your favorite dApps!
Transferring Funds to Polygon
To start using the benefits of the Polygon Layer 2 Network, you need to transfer your funds from the Ethereum network to Polygon. Follow the steps below to easily transfer your funds:
- Set up your Polygon Wallet: If you haven’t already, set up your Polygon wallet by installing the Metamask extension and creating a new wallet.
- Add Polygon Network: Open the Metamask extension and click on the network selection dropdown. Choose “Custom RPC” and enter the following details for the Polygon network:
- Network Name: Polygon
- New RPC URL: https://rpc-mainnet.maticvigil.com/
- Chain ID: 137
- Symbol: MATIC
- Block Explorer URL: https://explorer.matic.network/
- Transfer Funds: Now that you have added the Polygon network, you can transfer your funds from the Ethereum network to Polygon. Open your Ethereum wallet in Metamask and click on “Send”. Enter the address of your Polygon wallet as the recipient, choose the amount you wish to transfer, and confirm the transaction.
- Confirm Transaction: Wait for the transaction to be confirmed on the Ethereum network. Once confirmed, your funds will be transferred to Polygon and will be available for use on the Polygon Layer 2 Network.
By transferring your funds to Polygon, you can enjoy faster and cheaper transactions, making your Metamask experience even better. Start using the Polygon Layer 2 Network today!
Exploring the Various Features of Metamask and Polygon
Metamask is a popular web extension wallet that allows users to interact with the Ethereum blockchain. With the recent integration of the Polygon Layer 2 network, the Metamask experience has been enhanced, providing users with even more powerful features and capabilities.
Seamless Cross-Chain Transactions
One of the key features of Metamask and Polygon is their ability to facilitate seamless cross-chain transactions. With the Polygon Layer 2 network, users can effortlessly transfer assets between different blockchains, such as Ethereum and Polygon, without the need for complicated processes or multiple wallets.
Fast and Affordable Transactions
Another major advantage of using Metamask and Polygon is the speed and affordability of transactions. The Polygon Layer 2 network has significantly reduced transaction fees and processing times compared to the Ethereum network. This means that users can send and receive payments quickly and without spending excessive amounts on gas fees.
Customizable Security Settings
Metamask and Polygon provide users with customizable security settings to ensure maximum protection for their digital assets. Users can easily set up multi-factor authentication, create backup recovery phrases, and manage their private keys. This level of control gives users peace of mind and confidence in the security of their funds.
Seamless integration with other dApps
Metamask and Polygon seamlessly integrate with a wide range of decentralized applications (dApps), allowing users to access and interact with various platforms and services. Whether it’s decentralized exchanges, lending platforms, or gaming applications, users can explore a whole new world of possibilities with the combined power of Metamask and Polygon.
In conclusion, the integration of the Polygon Layer 2 network with Metamask has unlocked a new era of possibilities for blockchain users. With its seamless cross-chain transactions, fast and affordable transactions, customizable security settings, and seamless integration with other dApps, users can expect an enhanced and streamlined experience when using Metamask with Polygon.
Frequently Asked Questions:
What is the Polygon Layer 2 network?
The Polygon Layer 2 network is a scaling solution for Ethereum, designed to improve the scalability and usability of the Ethereum blockchain.
How does the Polygon Layer 2 network enhance my Metamask experience?
The Polygon Layer 2 network enhances your Metamask experience by providing fast and low-cost transactions, allowing you to make transactions on the Ethereum network without worrying about high gas fees or slow confirmation times.
Can I use the Polygon Layer 2 network with my existing Metamask wallet?
Yes, you can use the Polygon Layer 2 network with your existing Metamask wallet. All you need to do is add the Polygon network to your Metamask wallet settings.
Are there any limitations to using the Polygon Layer 2 network?
While the Polygon Layer 2 network offers many benefits, there are some limitations to consider. Not all Ethereum dapps and contracts are compatible with the Polygon network, so you may not be able to use all your favorite dapps and contracts with it.
+ There are no comments
Add yours