


If you’re new to the world of cryptocurrencies and have been using the Metamask wallet, you may be wondering how to cash out your digital assets. Metamask is a popular Ethereum wallet that allows users to securely store, manage, and trade their cryptocurrencies. In this step-by-step guide, we will walk you through the process of cashing out on Metamask, so you can easily convert your digital assets into traditional currency.
Step 1: Make sure you have the latest version of the Metamask extension installed on your browser. You can download it from the official Metamask website or through the browser’s extension store. Once installed, create a new wallet or import an existing one using your seed phrase or private key.
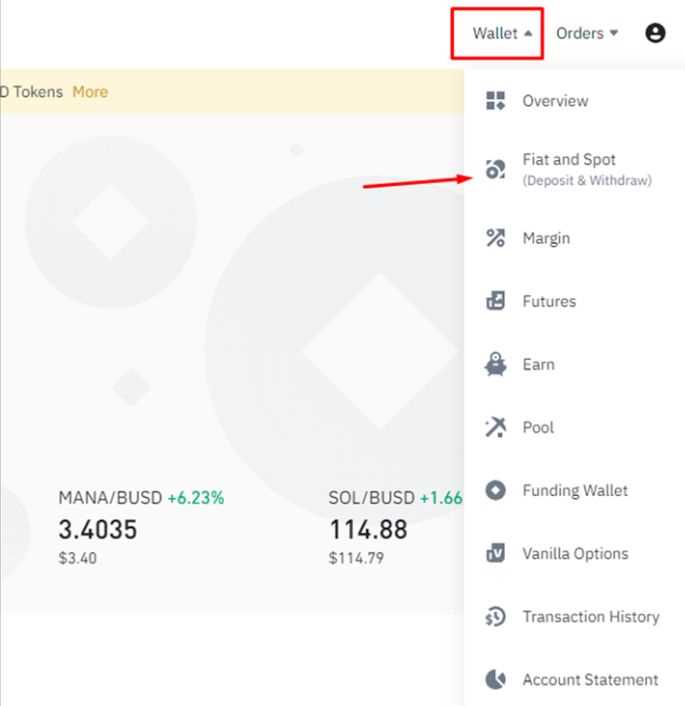
Step 2: Connect your Metamask wallet to a cryptocurrency exchange platform that supports cashing out. Some popular exchanges include Coinbase, Binance, and Kraken. Once connected, authorize the exchange to access your Metamask wallet by clicking on the “Connect Wallet” or similar button.
Step 3: Choose the digital asset you want to cash out. Metamask supports a wide range of cryptocurrencies, including Ethereum, Bitcoin, and many others. Select the asset you want to cash out and make sure you have enough balance in your wallet.
Step 4: Initiate the cashing out process. Depending on the exchange platform, you may need to specify the amount you want to cash out and choose the preferred withdrawal method, such as bank transfer, PayPal, or cryptocurrency.
Step 5: Review and confirm the transaction details. Double-check the withdrawal amount, fees, and withdrawal method to ensure they are accurate. Once you’re satisfied, click on the “Confirm” or similar button to proceed with the cashing out process.
Please note that the cashing out process may take some time, depending on the exchange platform and the chosen withdrawal method. Be patient and keep an eye on your Metamask wallet and exchange account for updates on the status of your withdrawal.
Cashing out on Metamask is a relatively straightforward process with the right steps. By following this step-by-step guide, you can easily convert your digital assets into traditional currency and enjoy the fruits of your cryptocurrency investments.
A Beginner’s Guide to Using Metamask for Cashing Out
If you’re new to the world of cryptocurrency and want to cash out your digital assets, Metamask is a great tool to use. Metamask is a browser extension that allows you to interact with decentralized applications (dApps) and manage your Ethereum assets.
What is Metamask?
Metamask acts as a bridge between your browser and the Ethereum blockchain. It allows you to securely store and manage your Ethereum assets, such as Ether (ETH) and ERC-20 tokens. With Metamask, you can easily access and transact with dApps without needing to set up a full Ethereum node.
Steps for Cashing Out with Metamask
| Step 1 | Make sure you have Metamask installed on your browser. If not, visit the Metamask website and follow the instructions for installing the extension. |
| Step 2 | Create a Metamask wallet by setting up a strong password and storing the generated seed phrase in a safe place. The seed phrase is crucial for recovering your wallet if you ever lose access to your Metamask account. |
| Step 3 | Once your wallet is set up, you’ll need to add some Ethereum assets to it. You can either purchase Ethereum from a cryptocurrency exchange or receive it from another wallet. Make sure you have enough ETH to cover gas fees for your transactions. |
| Step 4 | If you’re looking to cash out your Ethereum assets, you’ll need to find a cryptocurrency exchange that supports ETH withdrawals. Sign up for an account on the exchange and follow their instructions for linking your Metamask wallet. |
| Step 5 | With your Metamask wallet linked to the exchange, you can now initiate a withdrawal. Specify the amount of ETH you want to cash out and provide the recipient address where you want the funds to be sent. Double-check the address to avoid any errors. |
| Step 6 | Confirm the withdrawal request on the exchange and wait for the transaction to be processed. The processing time may vary depending on network congestion and other factors. |
| Step 7 | Once the transaction is confirmed, you should see the ETH balance in your recipient address increase. You have successfully cashed out your Ethereum assets using Metamask! |
Remember to keep your Metamask wallet and seed phrase secure at all times. Don’t share your password or seed phrase with anyone and be cautious of phishing attempts.
With Metamask, cashing out your Ethereum assets becomes a straightforward process. Start exploring the world of decentralized finance with confidence!
Installing Metamask on Your Browser
To begin using Metamask, you’ll first need to install the extension on your web browser. Follow the steps below to get started:
1. Open your web browser and visit the official Metamask website.
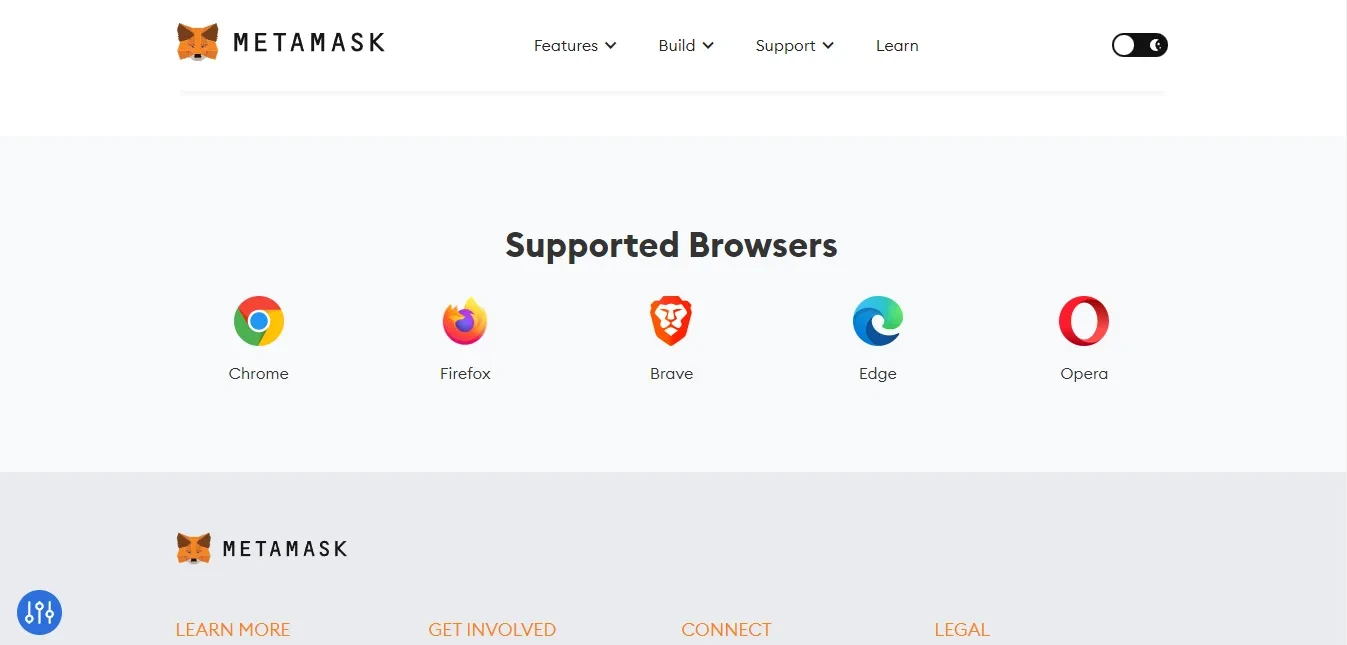
Metamask supports various browsers, including Chrome, Firefox, and Brave. Make sure you’re using a compatible browser before proceeding.
2. Download the Metamask extension.
On the Metamask website, you’ll find a dedicated download button for your browser. Click on the button and wait for the extension to download.
3. Add Metamask to your browser.
Once the extension is downloaded, click on it to open the installation page. Follow the prompts to add Metamask to your browser.
4. Create a new Metamask wallet.
After successfully adding Metamask, you’ll be asked to create a new wallet. Follow the instructions on the screen to set up a new wallet.
5. Set up your password and backup phrase.
During the wallet creation process, you’ll need to set up a password and backup phrase. Make sure to choose a strong password and store your backup phrase in a secure location.
6. Connect Metamask to a network.
Once your wallet is created, you’ll be prompted to connect Metamask to a network. Choose the network that you wish to use, such as the Ethereum mainnet or a testnet.
7. You’re ready to use Metamask!
After completing the setup process, you can start using Metamask to interact with decentralized applications (dApps) and manage your cryptocurrency assets.
Creating and Setting Up a Metamask Wallet
If you’re new to the world of cryptocurrencies, one of the first steps you’ll need to take is creating and setting up a Metamask wallet. Metamask is a popular digital wallet that allows users to interact with decentralized applications (dApps) on the Ethereum blockchain.
Step 1: Installing Metamask
The first thing you’ll need to do is install the Metamask extension for your web browser. Metamask is available for Chrome, Firefox, and Opera. Simply visit the respective browser’s extension store and search for “Metamask.” Click on the Metamask extension and follow the installation prompts.
Step 2: Creating a new wallet
Once you have installed the Metamask extension, you can easily create a new wallet. Click on the Metamask icon in your browser’s toolbar and select “Create a Wallet” from the drop-down menu. You will be asked to create a strong password for your wallet. Make sure to choose a password that is unique and secure.
Tip: It is important to write down your password and keep it in a safe place. Losing your password may result in permanent loss of access to your wallet and funds.
Step 3: Saving your seed phrase
After creating your password, Metamask will provide you with a unique seed phrase. This seed phrase is a series of 12 or 24 words that can be used to restore your wallet in case you forget your password or lose access to your device. Write down this seed phrase and store it in a secure location, preferably offline.
Important: Never share your seed phrase with anyone. It is the key to your wallet and funds, and anyone with access to it can steal your funds.
Step 4: Account setup and security
Once you have saved your seed phrase, you can proceed with the account setup. Metamask will ask you to confirm your seed phrase by selecting the words in the correct order. This step ensures that you have accurately recorded your seed phrase.
After confirming your seed phrase, you will be prompted to set up a security question. This additional layer of security will help you recover your wallet if needed. It is important to choose a question that is memorable, but not easily guessed by others.
Finally, you will need to agree to the terms of use and privacy policy before your wallet setup is complete.
Step 5: Funding your wallet
With your wallet successfully set up, you can now fund it with Ethereum (ETH) or any other supported cryptocurrency. Metamask provides you with a unique wallet address that you can use to receive funds from exchanges or other wallets.
Copy your wallet address and use it to send Ethereum or other cryptocurrencies to your Metamask wallet. Once the transaction is confirmed on the blockchain, your wallet will be funded and ready to use.
Remember: Always double-check the wallet address before sending any funds. Sending funds to the wrong address may result in permanent loss of your cryptocurrency.
Now that you have created and set up your Metamask wallet, you’re ready to explore the world of decentralized finance (DeFi), trade cryptocurrencies, and interact with dApps on the Ethereum blockchain.
Connecting Your Wallet to a Decentralized Exchange
Once you have set up and funded your Metamask wallet, the next step is to connect it to a decentralized exchange (DEX). A DEX allows you to trade cryptocurrencies directly from your wallet, without the need for a centralized platform.
Step 1: Choose a Decentralized Exchange
There are several DEX platforms available, such as Uniswap, SushiSwap, and PancakeSwap. Research and select the DEX that best suits your needs, based on factors like supported tokens, fees, and user interface.
Step 2: Open the DEX Platform
After selecting a DEX, open the platform in your web browser. Make sure to visit the official website of the DEX to avoid phishing scams. Look for the “Connect Wallet” or similar button to proceed.
Step 3: Connect Metamask
Click on the “Connect Wallet” button, and a pop-up window will appear asking you to select your wallet provider. Choose Metamask from the list of options.
Step 4: Grant Permission
After selecting Metamask, another pop-up window will appear, asking for permission to connect your wallet. Review the permissions requested, and click “Connect” to proceed.
Step 5: Confirm Connection
Once you have granted permission, Metamask will prompt you to confirm the connection with the DEX. Review the details, such as the wallet address and network, before clicking “Confirm” to establish the connection.
Step 6: Explore the DEX Interface
After connecting your wallet, you will have access to the DEX interface. Take some time to explore the platform, familiarize yourself with the layout, and understand the available features.
Step 7: Start Trading
Now that your wallet is connected to the DEX, you can start trading cryptocurrencies. Navigate to the trading section, select the tokens you want to trade, and specify the amount. Review the transaction details, including fees and slippage, before confirming the trade.
Remember to stay cautious when using decentralized exchanges, as they do not offer the same level of security as centralized platforms.
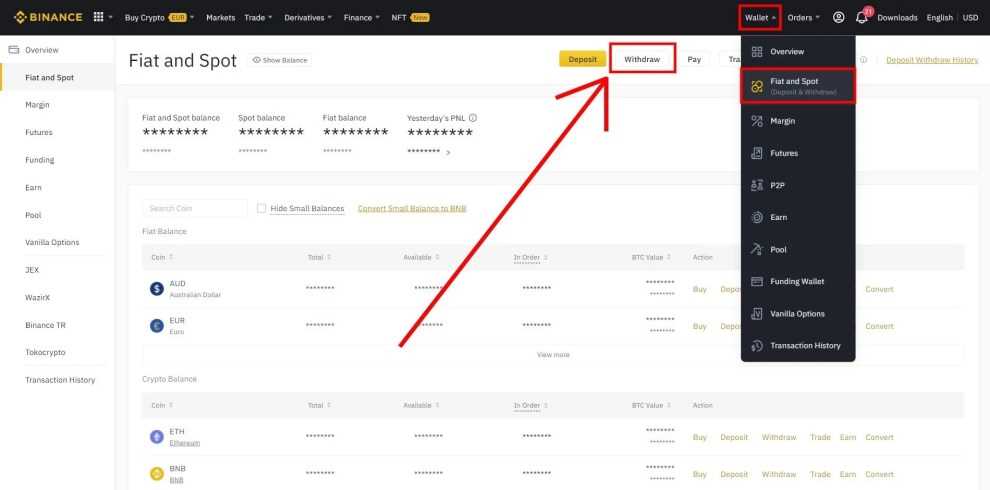
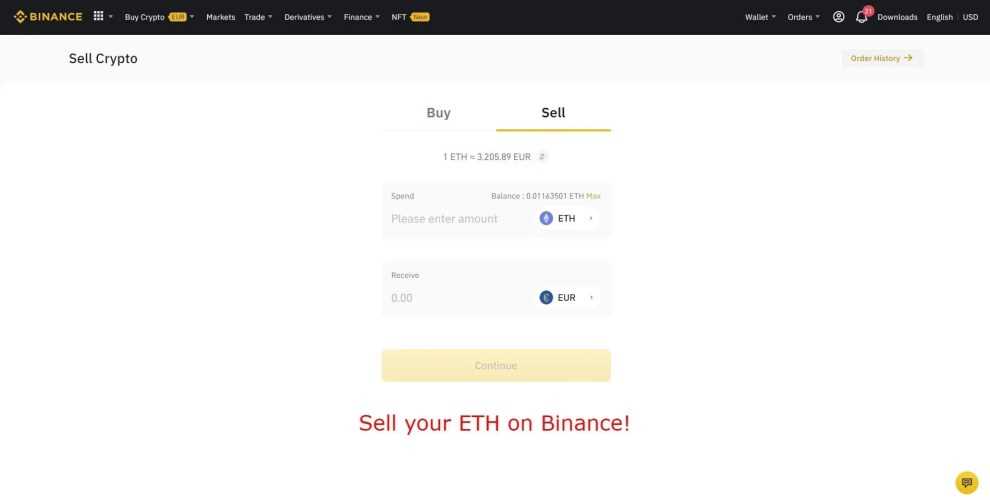
Cashing Out Your Crypto to Fiat Currency
Once you have accumulated enough cryptocurrency in your Metamask wallet, you may want to cash out and convert it into fiat currency, such as USD or EUR. Here is a step-by-step guide on how to cash out your crypto:
- Choose a reputable cryptocurrency exchange that supports fiat withdrawals. Some popular options include Coinbase, Kraken, and Binance.
- Create an account on the chosen exchange and complete any necessary verification steps, such as providing identification documents.
- Once your account is set up and verified, navigate to the wallet or balance section of the exchange.
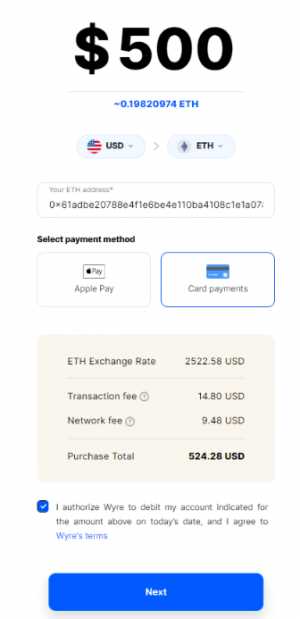
- Locate the option to deposit or add funds to your account. Choose the cryptocurrency you want to cash out from your Metamask wallet.
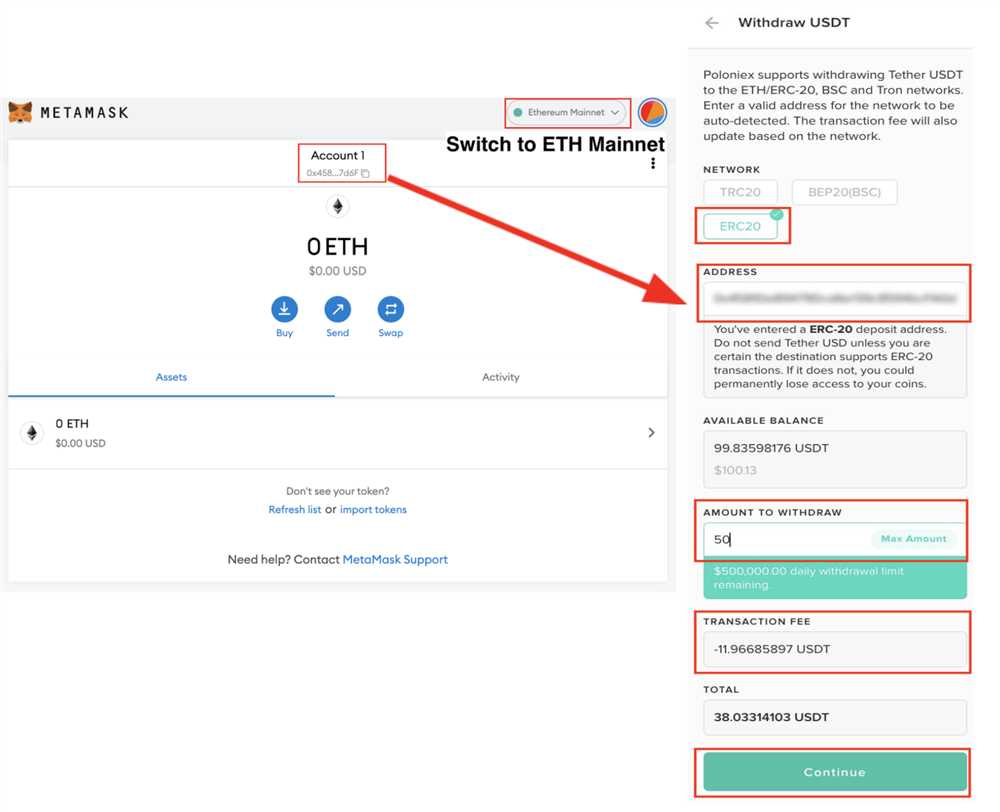
- Generate a deposit address on the exchange. This address will be used to transfer your cryptocurrency from Metamask to the exchange.
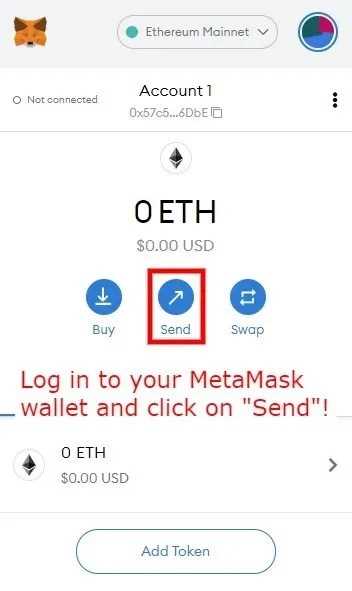
- In your Metamask wallet, open the wallet interface and navigate to the “Send” or “Transfer” section. Enter the deposit address generated by the exchange and specify the amount of cryptocurrency you want to transfer.
- Double-check the accuracy of the deposit address and the entered amount before confirming the transaction.
- Initiate the transfer and wait for the transaction to be confirmed on the blockchain. This may take some time depending on the congestion of the network.
- Once the transaction is confirmed, go back to the exchange and check your account balance. The transferred cryptocurrency should now be available in your exchange wallet.
- Locate the option to withdraw or sell your cryptocurrency for fiat currency on the exchange.
- Choose the fiat currency you want to convert your cryptocurrency into and specify the amount you want to cash out.
- Confirm the sale or withdrawal and wait for the funds to be credited to your bank account, PayPal, or other designated payment method.
Remember to consider any applicable fees, withdrawal limits, and processing times when cashing out your crypto to fiat currency. It is also recommended to consult with a tax professional or financial advisor to ensure compliance with relevant regulations and tax obligations.
Frequently Asked Questions:
What is Metamask?
Metamask is a cryptocurrency wallet that acts as a browser extension and allows users to interact with decentralized applications (DApps) on the Ethereum blockchain.
Can I cash out my cryptocurrency on Metamask?
Yes, you can cash out your cryptocurrency on Metamask. Metamask allows you to connect to decentralized exchanges (DEX) such as Uniswap or Sushiswap, where you can trade your cryptocurrency for fiat currency or another cryptocurrency that can be easily converted to fiat.
+ There are no comments
Add yours