


Welcome to the ultimate tutorial on transferring NFTs from Coinbase Wallet to MetaMask! If you are new to the world of non-fungible tokens (NFTs), you may be wondering how to move your digital collectibles from one wallet to another. Fear not, as we will guide you through the process step-by-step, ensuring a smooth transfer and seamless access to your valuable NFTs.
Firstly, it is important to understand that Coinbase Wallet and MetaMask are both popular cryptocurrency wallets that support NFTs. Coinbase Wallet is a mobile application that allows you to store, manage, and trade various digital assets, including NFTs. On the other hand, MetaMask is a browser extension wallet that provides a secure and user-friendly interface for interacting with decentralized applications (dApps) on the Ethereum network.
To start the transfer process, you will need to have both the Coinbase Wallet and MetaMask installed on your device. Once you have them set up, we can proceed with the transfer. We recommend taking a few precautionary steps before initiating any transfers to ensure the safety of your NFTs:
- Backup your wallets: Before making any transfers, it is crucial to backup your Coinbase Wallet and MetaMask. This will protect you from any potential loss of data or access to your NFTs.
- Verify the NFT contract: Ensure that the NFT you want to transfer is supported by both Coinbase Wallet and MetaMask. You can find this information by checking the contract address of the NFT and verifying it on the respective wallet platforms.
- Check gas fees: Gas fees are charges for executing transactions on the Ethereum network. Different wallets may have different gas fee structures, so it is important to compare and choose the wallet that offers the most cost-effective transfer.
Once you have completed these preliminary steps, you are ready to transfer your NFTs from Coinbase Wallet to MetaMask. Follow our comprehensive tutorial below to ensure a successful transfer!
Mastering NFT Transfers: The Ultimate Tutorial
In the rapidly evolving world of cryptocurrencies, non-fungible tokens (NFTs) have gained significant attention. These unique digital assets have sparked a new wave of creativity and investment opportunities. However, navigating the process of transferring NFTs can be confusing for beginners.
Fortunately, this tutorial will walk you through the process of moving NFTs from Coinbase Wallet to MetaMask, two popular digital wallets. By following these step-by-step instructions, you will become a master at transferring your NFTs with ease.
Step 1: Set Up MetaMask
To get started, you’ll need to install the MetaMask browser extension and create an account. This wallet will give you control over your NFTs and allow you to interact with various decentralized applications (dApps).
Step 2: Install Coinbase Wallet
If you haven’t already, download and install the Coinbase Wallet app on your mobile device. This wallet will act as a bridge between your MetaMask wallet and the NFT marketplace.
Step 3: Connect MetaMask and Coinbase Wallet
Open the MetaMask extension and click on the account icon in the top right corner. From the drop-down menu, select “Connect to Mobile Wallet.” Follow the instructions to link your MetaMask wallet to your Coinbase Wallet.
Step 4: Find and Select Your NFT
Once your wallets are connected, navigate to the NFT marketplace of your choice. Search for the specific NFT that you want to transfer. Once you find it, click on it to open its details page.
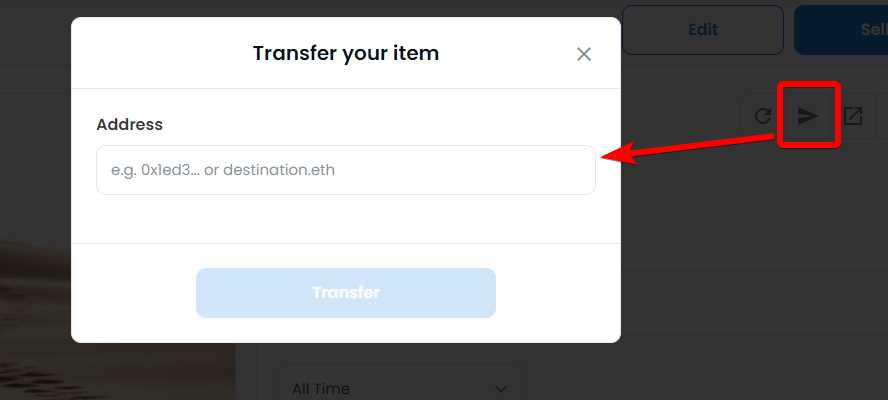
Step 5: Initiate the Transfer
On the NFT’s details page, look for the “Transfer” or “Send” button. Click on it to initiate the transfer process. You may be asked to confirm the transfer by entering a recipient address. Ensure that you enter your MetaMask wallet address as the recipient.
Step 6: Approve the Transfer
After confirming the recipient address, you may need to approve the transfer from both your Coinbase Wallet and MetaMask. Follow the on-screen prompts to approve the transfer.
Step 7: Complete the Transfer
Once the transfer is approved, your NFT will be on its way from Coinbase Wallet to MetaMask. Depending on the blockchain network’s congestion, the transfer may take a few minutes to complete. Be patient and wait for the transaction to be confirmed.
Step 8: Verify the Transfer
After the transfer is complete, open your MetaMask wallet and navigate to the “Assets” or “Collectibles” section. You should see your newly transferred NFT listed there. Congratulations on successfully mastering the NFT transfer process!
By following this ultimate tutorial, you have become well-equipped to confidently navigate NFT transfers from Coinbase Wallet to MetaMask. Remember to always double-check your wallet addresses and take necessary security precautions to protect your valuable NFTs. Happy transferring!
Moving NFTs from Coinbase Wallet to MetaMask
Transferring your NFTs from Coinbase Wallet to MetaMask is a straightforward process that allows you to have more control over your assets. Here, we will guide you through the step-by-step instructions:
Step 1: Install MetaMask
If you haven’t done so already, download and install the MetaMask extension for your preferred web browser. After installation, set up a new wallet or import your existing wallet using the seed phrase.
Step 2: Export NFT from Coinbase Wallet

Open Coinbase Wallet and navigate to the NFT you wish to transfer. Click on the “…” icon next to the NFT and select “Send to Another Wallet”. Choose MetaMask as the destination and confirm the transfer.
Step 3: Confirm the Transfer in MetaMask
Switch to your MetaMask wallet and navigate to the “Assets” tab. You should see the pending NFT transfer. Click on “Approve” to confirm the transfer. Keep in mind that you may need to pay a small gas fee for this transaction.
Step 4: Wait for the Confirmation
After confirming the transfer, you will need to wait for the blockchain to process the transaction. This can take a few minutes or longer depending on network congestion. Once the transaction is confirmed, the NFT will appear in your MetaMask wallet.
Note: It’s recommended to double-check the destination address and network when performing any NFT transfer. Any mistakes can result in irreversible loss of your assets.
By following these simple steps, you’ll be able to move your NFTs from Coinbase Wallet to MetaMask and have full control over your digital collectibles.
Disclaimer: The process outlined above is accurate at the time of writing but may be subject to changes as platforms update their interfaces. Always refer to the official documentation of the platforms for the most up-to-date instructions.
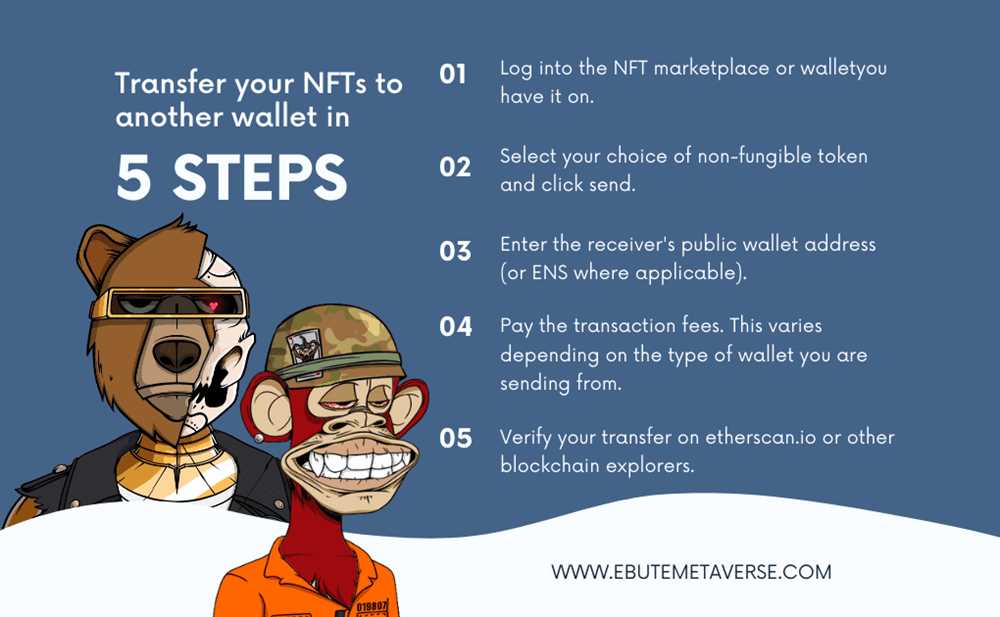
Step-by-Step Guide on Transferring NFTs
Transferring NFTs between wallets can be a breeze if you follow these simple steps:
- First, make sure you have both the Coinbase Wallet and MetaMask installed on your device. You can download them from the respective app stores.
- Open Coinbase Wallet and log in to your account. If you don’t have an account yet, create a new one and set up your wallet.
- In Coinbase Wallet, find the NFT that you want to transfer. You can navigate to the NFT section or search for the specific NFT using its name or ID.
- Once you’ve located the NFT, click on it to open its details page. Look for the option to transfer or send the NFT and click on it.
- Next, you will be prompted to enter the recipient’s wallet address. This address is usually in the form of a long string of alphanumeric characters. Make sure you double-check the address to avoid any errors.
- After verifying the recipient’s wallet address, you may have the option to include a message or note along with the NFT transfer. This step is optional but can be useful if you want to leave a personalized message for the recipient.
- Now, review all the details of the NFT transfer, including the recipient’s wallet address and optional message. Once you’re satisfied with the information provided, click on the confirm or send button to initiate the transfer.
- Depending on the blockchain network and congestion, the NFT transfer may take some time to complete. Be patient and wait for the confirmation message to appear.
- Once the transfer is successfully completed, you can check your MetaMask wallet to see the newly transferred NFT. Open MetaMask and log in to your account if necessary.
- In MetaMask, navigate to the NFT section or search for the specific NFT using its name or ID. You should see the transferred NFT listed in your MetaMask wallet.
That’s it! You have successfully transferred an NFT from your Coinbase Wallet to MetaMask. Now you can enjoy your NFT collection in your preferred wallet. Remember to always double-check wallet addresses and exercise caution when transferring valuable NFTs.
Benefits of Using Coinbase Wallet and MetaMask
When it comes to managing and transferring NFTs, Coinbase Wallet and MetaMask are two widely popular options among cryptocurrency enthusiasts. Both wallets offer a range of benefits that make it easier and more convenient to navigate the world of non-fungible tokens.
1. Security
Both Coinbase Wallet and MetaMask prioritize the security of your digital assets. Coinbase Wallet is a non-custodial wallet, which means you maintain full control of your private keys, reducing the risk of hacks and theft. MetaMask also uses secure encryption techniques and allows you to securely manage your NFTs without exposing your private keys.
2. User-Friendly Interface
Both wallets feature user-friendly interfaces that make it easy for both beginners and experienced users to manage and transfer their NFTs. Coinbase Wallet offers a clean and intuitive design, while MetaMask provides a customizable and user-friendly interface that allows for seamless NFT transactions.
3. Compatibility
Coinbase Wallet and MetaMask are compatible with a wide range of blockchains, including Ethereum and other popular networks. This compatibility allows you to access and transfer NFTs from various platforms, giving you the freedom to explore a wider range of digital assets.
4. Access to DApps
Both wallets provide access to decentralized applications (DApps), which opens up a world of possibilities for exploring and interacting with the NFT ecosystem. These DApps allow you to buy, sell, and trade NFTs directly within the wallet, simplifying the overall experience.
5. Community and Support

Both Coinbase Wallet and MetaMask have strong and active communities that provide support and guidance for users. Whether you have questions about transferring NFTs or need assistance with wallet functionality, you can find answers and support from the vibrant communities surrounding these wallets.
In conclusion, Coinbase Wallet and MetaMask offer numerous benefits that make them excellent choices for managing and transferring NFTs. From robust security measures to user-friendly interfaces and access to a thriving community, these wallets provide the tools you need to navigate the exciting world of digital collectibles.
Common Challenges and Troubleshooting Tips
When moving NFTs from Coinbase Wallet to MetaMask, you may encounter some challenges or issues along the way. Here are some common problems and troubleshooting tips to help you navigate through the process:
1. Incorrect Wallet Addresses
One common challenge is entering incorrect wallet addresses during the transfer process. Double-check the address you are using to ensure it corresponds to the correct wallet. Sometimes, users accidentally copy an old or wrong address, resulting in the NFTs being sent to the wrong destination. Always verify the receiving wallet address before initiating any transfer.
2. Gas Fees
Gas fees are another potential challenge when moving NFTs. Gas fees are required to process transactions on the Ethereum network, and the fees can fluctuate based on network congestion. To ensure that your NFT transfer is successful, consider checking the gas fees before initiating the transfer. It is also worth noting that higher gas fees can result in faster transaction confirmation.
3. Pending Transactions
If you notice a pending transaction for an extended period after initiating the transfer, it could be due to network congestion. Ethereum network congestion can cause delays in transaction processing. In such cases, it is advisable to be patient and wait for the transaction to clear. Avoid canceling the transaction unless necessary, as this can result in the loss of gas fees.
4. Unsupported NFTs
Not all NFTs are supported by all wallets or platforms. If you encounter an error while trying to import or view an NFT in MetaMask, it could be due to the specific format or standard used by that NFT. Ensure that the NFT you are trying to transfer is compatible with MetaMask or the receiving platform. If not, you may need to explore alternative methods or platforms for the transfer.
5. Wallet Syncing

In some cases, users may experience issues with wallet syncing or connectivity. If you encounter difficulties with syncing your Coinbase Wallet or MetaMask, try refreshing the page or restarting the application. You can also check for any updates to the wallet software and ensure that you have a stable internet connection. If the problem persists, consult the support documentation or reach out to the respective wallet’s customer support for assistance.
- Double-check wallet addresses to avoid sending to the wrong destination
- Be mindful of gas fees and check them before initiating the transfer
- Patience is key if you encounter pending transactions due to network congestion
- Verify compatibility of the NFTs with the receiving platform
- Troubleshoot wallet syncing issues by refreshing or restarting the application
By being aware of these common challenges and following the troubleshooting tips, you can navigate the process of moving NFTs from Coinbase Wallet to MetaMask more smoothly and minimize any potential issues.
Frequently Asked Questions:
Can I transfer multiple NFTs at once from Coinbase Wallet to MetaMask?
No, Coinbase Wallet currently does not support bulk or batch transfers of NFTs. You can only transfer one NFT at a time. If you have multiple NFTs that you want to transfer, you will need to repeat the transfer process for each individual NFT.
What happens if I send an NFT to the wrong MetaMask wallet address?
If you send an NFT to the wrong MetaMask wallet address, the NFT will be permanently lost. Blockchain transactions are irreversible, so it is crucial to double-check the recipient’s wallet address before confirming the transfer. Once the transaction is confirmed, there is no way to retrieve the NFT or reverse the transfer.

+ There are no comments
Add yours