


MetaMask is a popular cryptocurrency wallet and browser extension that allows users to manage their Ethereum-based assets and interact with decentralized applications (dApps) on the Ethereum network. While MetaMask was initially designed for Ethereum, it is also possible to send Binance Coin (BNB) to your MetaMask wallet.
By sending BNB to MetaMask, you can take advantage of its user-friendly interface and extensive features, such as swapping BNB for other tokens, participating in token sales, or interacting with various decentralized finance (DeFi) protocols. Learning the process of sending BNB to MetaMask can open up a world of opportunities in the ever-growing crypto space.
To send BNB to MetaMask, you’ll need to follow a few simple steps. First, make sure you have the MetaMask extension installed in your web browser and set up a wallet. Once your wallet is set up and you have some BNB in your Binance account, you can initiate the transfer.
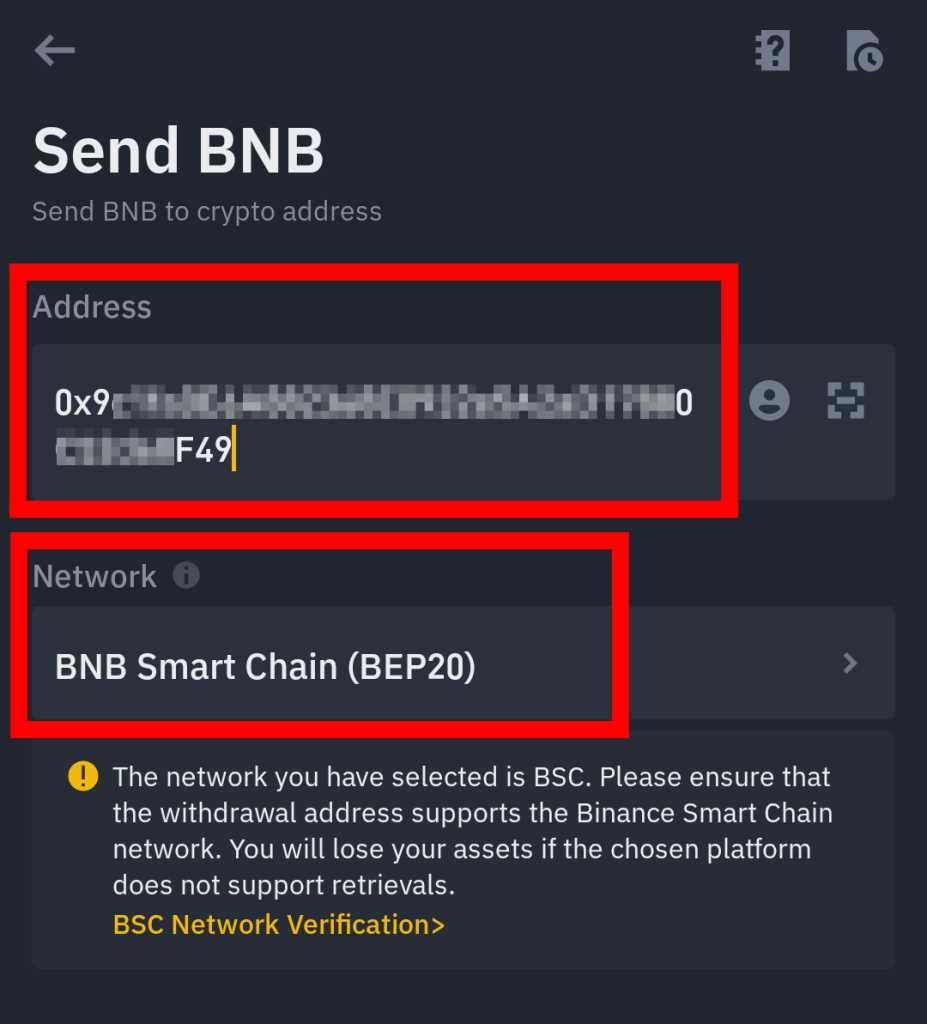
Open your Binance account and navigate to the “Wallet” tab. From there, find and click on the “Withdraw” button next to your BNB balance. Make sure you have selected the correct network (Binance Smart Chain) and enter your MetaMask wallet address in the “Recipient’s BSC Address” field. Confirm the transaction details and click “Submit” to initiate the withdrawal.
After submitting the withdrawal request, Binance will process the transfer and deduct the necessary fees. Once the transaction is confirmed on the Binance Smart Chain, you will see the BNB balance in your MetaMask wallet. You can then use your BNB within MetaMask to explore the world of decentralized applications, participate in token sales, or engage in DeFi protocols. Start sending BNB to your MetaMask wallet today and unleash the full potential of your cryptocurrency holdings!
Step 1: Connect Your MetaMask Wallet
If you want to send BNB to your MetaMask wallet, the first step is to connect your wallet to the appropriate network.
To do this, follow these simple steps:
1. Install or Open MetaMask
If you haven’t installed MetaMask yet, you can easily download it as a browser extension for Google Chrome or Firefox. Once installed, open the MetaMask extension.
2. Create or Import your Wallet
If you already have a MetaMask wallet, you can skip this step. Otherwise, click on the “Create a Wallet” button and follow the instructions to set up a new wallet. Make sure to securely save your secret backup phrase. If you already have a wallet, click on “Import Wallet” and follow the prompts to import your existing wallet using the secret backup phrase.
3. Connect to the Binance Smart Chain
Once your wallet is set up or imported, click on the account icon in the top right corner of the MetaMask extension. Then, click on “Settings” and select the “Networks” tab. Scroll down to find the “Add Network” button.
In the network settings, enter the following details:
Network Name: Binance Smart Chain
New RPC URL: https://bsc-dataseed1.binance.org/ (or any other Binance Smart Chain RPC URL)
Chain ID: 56
Symbol: BNB
Explorer URL: https://bscscan.com/ (or any other BSC explorer URL)
After entering these details, click on “Save” to add the Binance Smart Chain network to your MetaMask wallet.
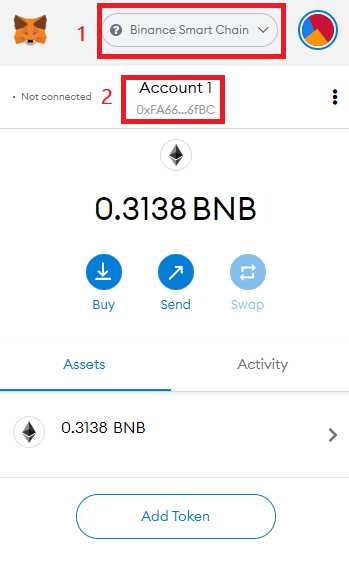
Congratulations! You have successfully connected your MetaMask wallet to the Binance Smart Chain network. Now you are ready to send BNB to your wallet.
Step 2: Add Binance Smart Chain Network
After installing the MetaMask extension in your browser and creating a new wallet, the next step is to add the Binance Smart Chain network to your MetaMask wallet. The Binance Smart Chain (BSC) network is required to send BNB (Binance Coin) from the Binance exchange to your MetaMask wallet.
To add the Binance Smart Chain network, follow these simple steps:
Step 2.1: Open MetaMask Settings
Click on the MetaMask extension icon in your browser to open the MetaMask wallet. At the top right corner of the wallet, you will see a round icon with three horizontal lines. Click on this icon to access the MetaMask menu.
Step 2.2: Select Networks
From the MetaMask menu, click on the “Settings” option. This will open the MetaMask settings page where you can manage various wallet settings.
In the settings page, click on the “Networks” tab. This tab allows you to add and manage different blockchain networks in your MetaMask wallet.
Step 2.3: Add Binance Smart Chain Network
Scroll down to the bottom of the Networks tab and click on the “Add Network” button. This will open the “New Network” form where you can enter the network details.
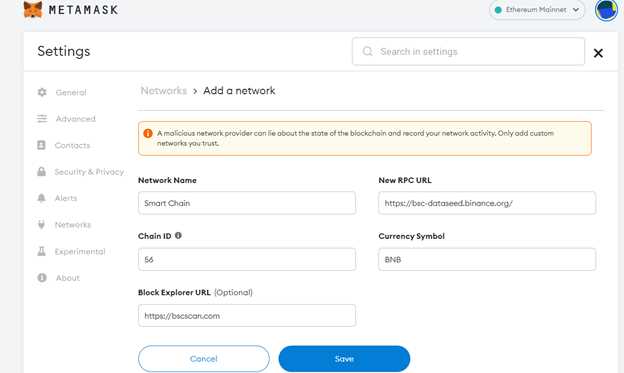
In the “New Network” form, enter the following details:
- Network Name: Binance Smart Chain
- New RPC URL: https://bsc-dataseed.binance.org/
- Chain ID: 56
- Symbol (optional): BNB
- Block Explorer URL (optional): https://bscscan.com/
Double-check that the entered details are correct and then click on the “Save” button to add the Binance Smart Chain network to your MetaMask wallet.
Now you have successfully added the Binance Smart Chain network to your MetaMask wallet. You can now proceed to the next step and send BNB to your wallet.
Step 3: Obtain BNB in Your Wallet
Before you can send BNB to your MetaMask wallet, you need to ensure that you have BNB tokens in your wallet. If you don’t have any BNB yet, you can follow these steps to obtain some:
1. Create an Account on a Cryptocurrency Exchange

The first step is to create an account on a cryptocurrency exchange that supports BNB trading. Some popular exchanges that offer BNB trading pairs include Binance, Binance US, and CoinEx. Choose an exchange and sign up for an account by providing the necessary information.
2. Deposit Funds into Your Exchange Account
Once you have created an account on the cryptocurrency exchange, you will need to deposit funds into your account. Most exchanges provide various deposit methods, such as bank transfers, credit/debit card deposits, and cryptocurrency deposits. Choose the method that suits you best and follow the exchange’s instructions to deposit funds into your account.
Note: Make sure to deposit an amount of funds that you are comfortable spending or using to purchase BNB. Cryptocurrency investments can be volatile, so it’s important to make informed decisions and only invest what you can afford to lose.
3. Buy BNB
After your funds have been deposited into your exchange account, you can proceed to buy BNB. Search for the BNB trading pair on the exchange’s platform and place a buy order. You can specify the amount of BNB you wish to buy or the amount of funds you want to spend. Review and confirm your order, and wait for the transaction to be processed.
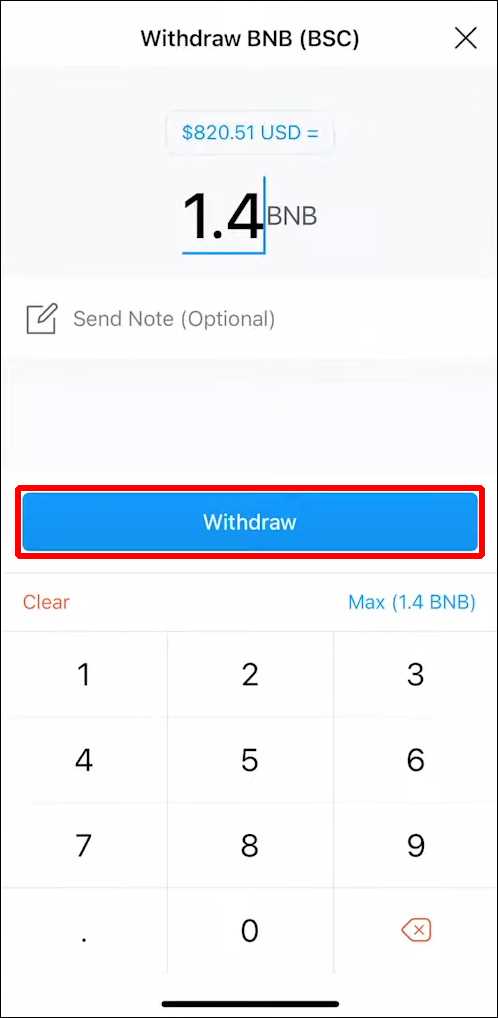
4. Withdraw BNB to Your MetaMask Wallet
Once your BNB purchase is complete, you need to withdraw the BNB tokens from the exchange to your MetaMask wallet. Navigate to the withdrawal section of the exchange’s platform and provide your MetaMask wallet address as the receiving address. Enter the amount of BNB you want to withdraw and confirm the withdrawal. The exchange will process the withdrawal and the BNB tokens will be transferred to your MetaMask wallet.
After completing these steps, you will have BNB tokens in your MetaMask wallet, ready to be sent or used for various purposes in the decentralized finance ecosystem.
| Step | Description |
|---|---|
| 1 | Create an account on a cryptocurrency exchange that supports BNB trading. |
| 2 | Deposit funds into your exchange account. |
| 3 | Buy BNB on the exchange using your deposited funds. |
| 4 | Withdraw BNB from the exchange to your MetaMask wallet. |
Step 4: Send BNB to MetaMask
After setting up your MetaMask wallet and connecting it to Binance Smart Chain, the next step is to send BNB (Binance Coin) to your MetaMask wallet. This will allow you to use BNB for transactions and interact with decentralized applications (dApps) on the Binance Smart Chain.
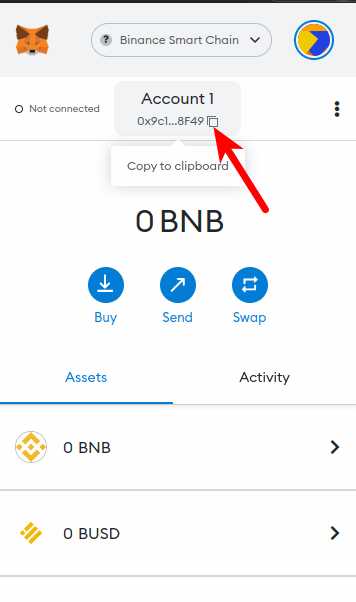
1. Obtain the BNB deposit address
 2. Send BNB from Binance
 Frequently Asked Questions:
How do I send BNB to MetaMask?
To send BNB to MetaMask, you need to follow a few steps. First, open your MetaMask wallet and copy your BNB address. Then, go to the exchange or wallet where you currently hold your BNB and initiate a withdrawal. Paste your MetaMask address in the recipient field and enter the amount of BNB you want to send. Confirm the withdrawal and wait for the transaction to be processed. Once the transaction is confirmed on the blockchain, the BNB will appear in your MetaMask wallet.
What is the process of sending BNB to MetaMask?
The process of sending BNB to MetaMask involves a few steps. First, you need to open your MetaMask wallet and copy your BNB address. Then, you should go to the exchange or wallet where you currently hold your BNB and look for the withdrawal option. Click on it and paste your MetaMask address in the recipient field. Next, enter the amount of BNB you want to send and review the withdrawal details. If everything looks correct, confirm the withdrawal and wait for the transaction to be processed. Once the transaction is confirmed on the blockchain, you will see the BNB in your MetaMask wallet.
+ There are no comments
Add yours