


Welcome to the step-by-step guide on how to add a polygon network to your Metamask mobile app! If you are looking to explore the world of decentralized finance and interact with the growing number of applications on the Polygon network, this guide will help you get started.
The Polygon network, also known as Matic, is a layer 2 Ethereum scaling solution that aims to bring fast, low-cost transactions to decentralized applications. By adding the Polygon network to your Metamask mobile app, you will be able to seamlessly transfer assets, participate in yield farming, and engage with a vibrant ecosystem of projects.
Step 1: Install Metamask Mobile
If you haven’t already, start by installing the Metamask mobile app on your smartphone. Metamask is a popular Ethereum wallet that allows you to securely store, manage, and interact with your cryptocurrencies. Simply search for “Metamask” in your app store and download the application.
Step 2: Create or Import a Wallet
Once you have installed Metamask, open the app and follow the instructions to either create a new wallet or import an existing one. Make sure to securely store your wallet’s seed phrase or private key, as this will be needed to recover your wallet in case of loss or theft.
Step 3: Access Network Settings
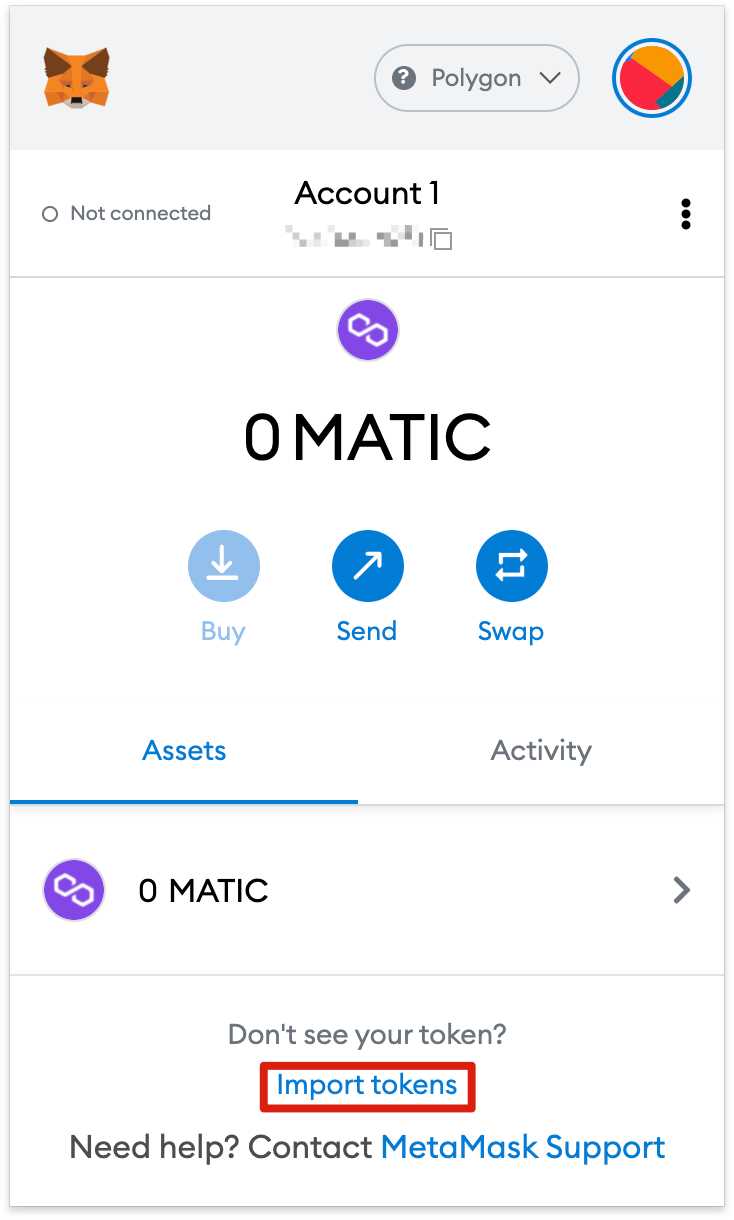
After setting up your wallet, you will be taken to the main dashboard of Metamask. To add the Polygon network, tap on the hamburger menu located in the top left corner of the screen. From the menu, select “Settings” and then “Networks”.
Step 4: Add the Polygon Network
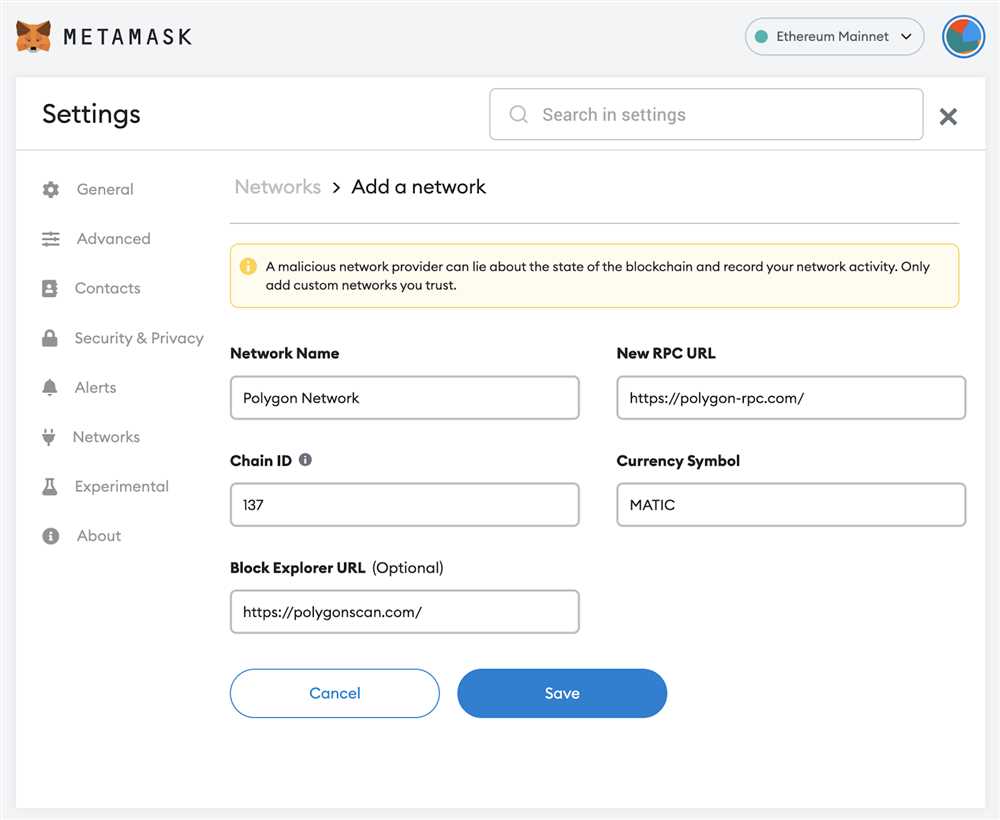
In the Networks settings, scroll down and tap on “Add Network”. Here, you will be prompted to enter the following details to add the Polygon network:
Network Name: Enter a name for the network, such as “Polygon” or “Matic”.
New RPC URL: Enter the RPC URL for the Polygon network. The RPC URL for the Polygon mainnet is “https://rpc-mainnet.maticvigil.com/”.
Chain ID: Enter the Chain ID for the Polygon network. The Chain ID for the Polygon mainnet is “137”.
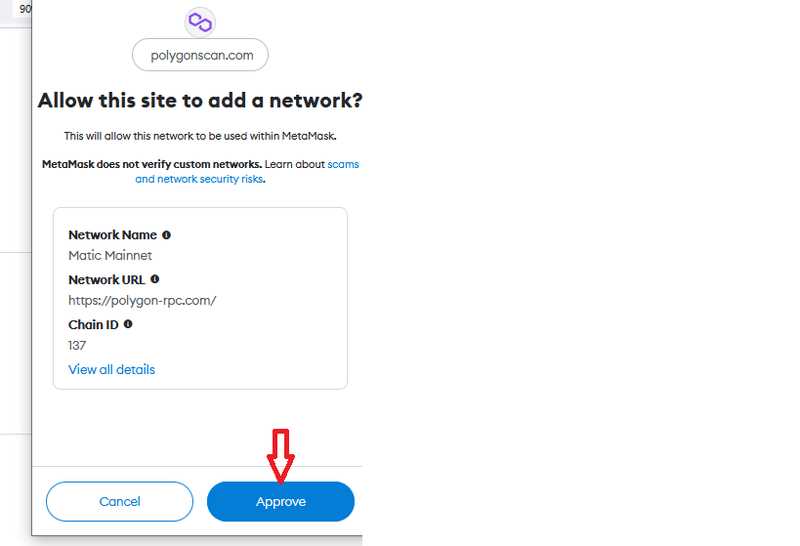
Once you have entered the details, tap on “Save” to add the Polygon network to your Metamask mobile app.
Step 5: Switch to the Polygon Network
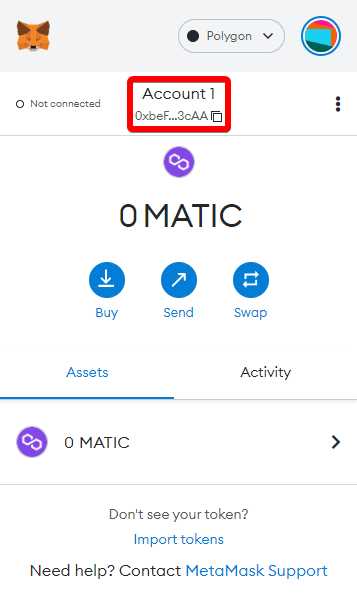
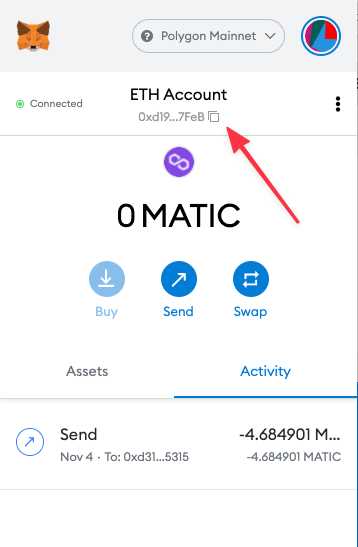
After adding the Polygon network, you can switch to it by tapping on the network selector located at the top of the Metamask app. From the dropdown list, select the Polygon network.
Congratulations! You have successfully added the Polygon network to your Metamask mobile app. Now, you can start exploring the exciting world of decentralized finance on the Polygon network.
Disclaimer: Please exercise caution and do your own research when interacting with decentralized applications and investing in cryptocurrency. The cryptocurrency market is highly volatile and can result in financial losses. This guide is for informational purposes only and should not be considered as financial advice.
Step-by-step Guide: Adding a Polygon Network to Metamask Mobile
Metamask is a popular wallet used for interacting with decentralized applications (DApps) on the Ethereum blockchain. However, it also has support for other networks, including the Polygon network. This step-by-step guide will walk you through the process of adding the Polygon network to your Metamask mobile wallet.
Step 1: Install Metamask Mobile
If you haven’t already, start by downloading and installing the Metamask mobile application from either the Apple App Store or the Google Play Store, depending on your device’s operating system.
Step 2: Create or Import a Wallet
Once you have installed Metamask mobile, open the application and either import an existing wallet using your recovery seed phrase or create a new wallet by following the prompts. Make sure to store your seed phrase in a secure location.
Step 3: Access the Settings
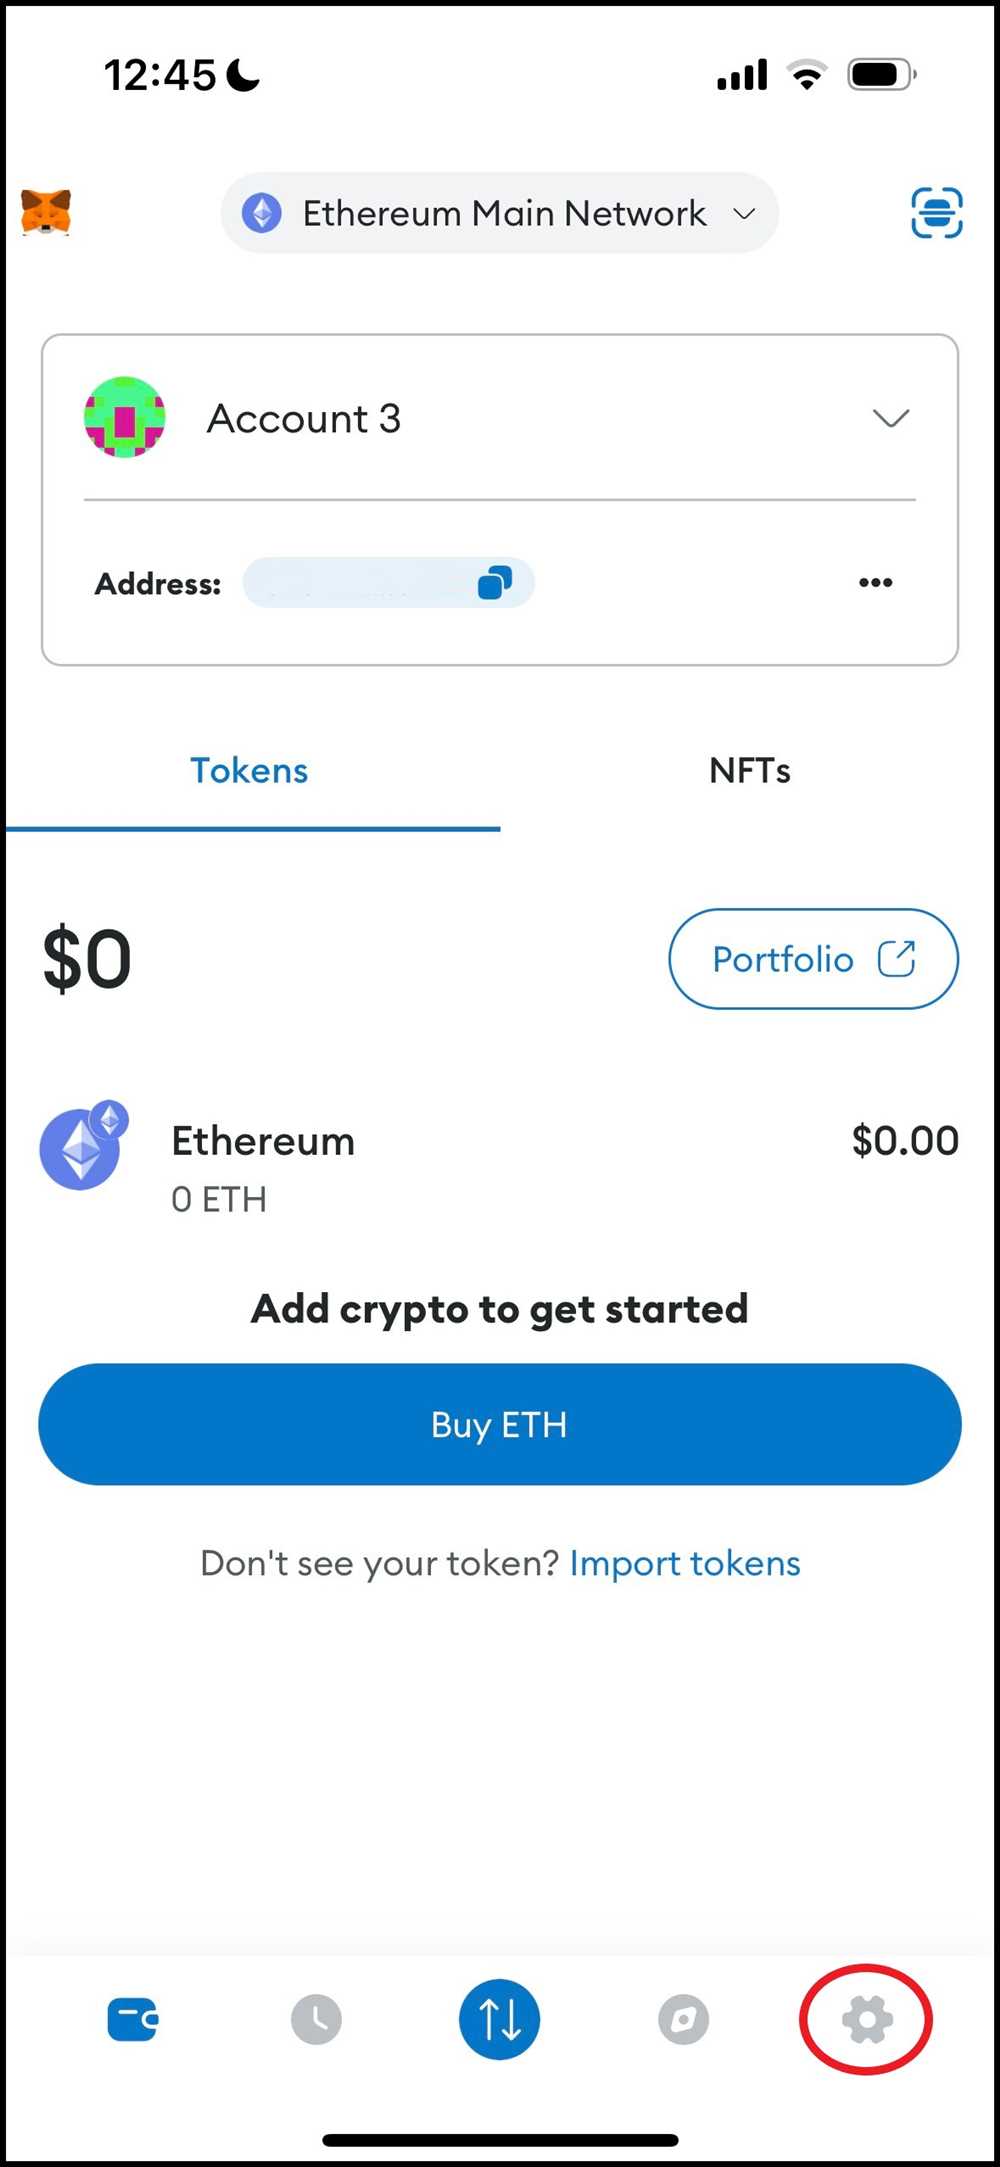
Once you have created or imported your wallet, navigate to the main screen of Metamask mobile. Click on the profile icon located in the top-left corner to access the settings menu.
Step 4: Select “Networks”
In the settings menu, you will see various options. Select the “Networks” option from the list.
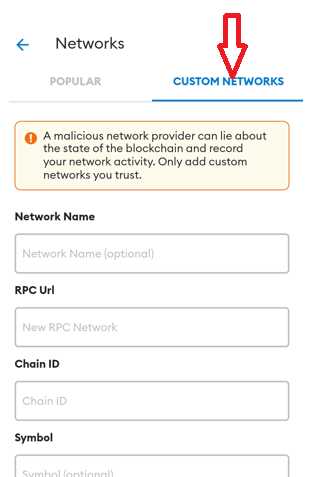
Step 5: Add a Custom Network
To add the Polygon network, scroll down to the “Custom Networks” section and click on the “Add Network” button.
Step 6: Enter Network Details
In the “Add Network” screen, enter the following details:
Network Name: Polygon
New RPC URL: https://rpc-mainnet.maticvigil.com/ (for the Polygon mainnet) or https://rpc-mumbai.matic.today/ (for the Polygon testnet)
Chain ID: 137 (for the Polygon mainnet) or 80001 (for the Polygon testnet)
Symbol: MATIC (for the Polygon mainnet) or Test (for the Polygon testnet)
Once you have entered these details, click on the “Save” button to save the network settings.
Step 7: Switch to the Polygon Network
After saving the network settings, you will be redirected to the “Networks” screen. Scroll down to the “Networks” section again and you will see the Polygon network listed. Click on the network to select it.
Step 8: Start Using the Polygon Network
Congratulations! You have successfully added the Polygon network to your Metamask mobile wallet. You can now use your wallet to interact with DApps and transact with assets on the Polygon network.
Remember to be cautious when transacting on any network and only interact with trusted DApps and projects.
Note: Make sure to always double-check the RPC URL and Chain ID before transacting to avoid any potential scams or errors.
Step 1: Download Metamask Mobile App
In order to add a polygon network to your Metamask mobile app, the first step is to download the Metamask mobile app from your device’s app store.
Here’s how you can download the Metamask mobile app:
1. Open the app store on your mobile device.
2. Search for “Metamask” in the search bar.
3. Look for the official Metamask app, which is developed by ConsenSys.
4. Tap on the app to open the details page.
5. Tap on the “Install” or “Get” button to start the download process.
6. Wait for the app to download and install on your device.
Once the Metamask mobile app is successfully downloaded and installed on your device, you’re ready to move on to the next step of adding a polygon network to your Metamask mobile app.
Step 2: Create or Import a Wallet

Before you can start using the Polygon network on your mobile MetaMask app, you’ll need to either create a new wallet or import an existing one. Follow the steps below to get started:
Create a New Wallet:
If you don’t have a wallet yet, you can create a new one by following these steps:
- Open the MetaMask mobile app on your device.
- Tap on the “Get Started” button.
- Read and accept the terms of use.
- Create a strong password for your wallet.
- Tap on “Create” to generate a new wallet.
- You will be provided with a recovery phrase. Write it down and save it in a secure place. This is important as it will be the only way to recover your wallet if you lose access to your device.
- Confirm your recovery phrase by selecting the words in the correct order.
- Your new wallet is now created and ready to use. You can now proceed to the next step.
Import an Existing Wallet:
If you already have a MetaMask wallet or a compatible wallet elsewhere, you can import it into your mobile MetaMask app. Follow these steps:
- Open the MetaMask mobile app on your device.
- Tap on the “Get Started” button.
- Read and accept the terms of use.
- Tap on “Import Wallet” instead of “Create a Wallet”.
- Enter your recovery phrase or private key when prompted. Make sure to double-check for any typos.
- Tap on “Import” to import your existing wallet.
- You have successfully imported your wallet and can now use it on the Polygon network. Proceed to the next step to connect to the network.
Once you have created or imported a wallet, you are ready to proceed to the next step and connect to the Polygon network in your MetaMask app.
Step 3: Add the Polygon Network
Now that you have installed and opened MetaMask on your mobile device, it’s time to add the Polygon network to your wallet. Follow the steps below:
Step 1: Open MetaMask and click on the three horizontal lines at the bottom right corner of the screen.
Step 2: In the menu that appears, select “Networks”.
Step 3: On the Networks page, click on the button that says “Add Network” at the top right corner of the screen.
Step 4: Now, you need to fill in the details for the Polygon network:
– Network name: Enter “Polygon” in this field.
– New RPC URL: Enter “https://rpc-mainnet.maticvigil.com” in this field.
– Chain ID: Enter “137” in this field.
– Symbol (optional): Leave this field blank.
– Block Explorer URL (optional): Leave this field blank.
Step 5: After filling in the details, click on the “Save” button at the top right corner of the screen.
Step 6: Congratulations! You have successfully added the Polygon network to your MetaMask wallet. You can now switch to the Polygon network and start using it to interact with dApps and decentralized finance platforms.
Please note that the above steps are for adding the Polygon network to the mainnet. If you want to add the Polygon network to the testnet, you will need to use different RPC URL and Chain ID.
Frequently Asked Questions:
What is Metamask mobile?
Metamask mobile is a mobile app that allows users to manage their cryptocurrencies and interact with decentralized applications (DApps) on their smartphones.
Why would I want to add a polygon network to Metamask mobile?
Adding a polygon network to Metamask mobile allows you to access and interact with decentralized applications built on the Polygon network, as well as to transfer and manage your polygon-based assets.
How do I add a polygon network to Metamask mobile?
To add a polygon network to Metamask mobile, you need to open the app, go to the settings menu, select “Networks”, and then tap on “Add Network”. From there, you will need to provide the relevant information for the polygon network, including the network name, RPC URL, chain ID, symbol and block explorer URL.
Where can I find the RPC URL and chain ID for the polygon network?
The RPC URL and chain ID for the Polygon network can be found on the Polygon documentation website. Alternatively, you can do a web search for “Polygon RPC URL” and “Polygon chain ID” to find the relevant information.
Can I add multiple polygon networks to Metamask mobile?
Yes, you can add multiple polygon networks to Metamask mobile. Each network will be listed separately, and you can switch between them by selecting the desired network from the networks menu in Metamask.
+ There are no comments
Add yours