


If you are a cryptocurrency enthusiast and use Metamask as your Ethereum wallet, you may find it beneficial to connect your Binance account to Metamask. By doing so, you will be able to easily manage your Ethereum and Binance assets in one place, simplifying the process of trading and transferring funds between the two platforms. In this step-by-step guide, we will walk you through the process of connecting your Binance account to Metamask.
Step 1: Install the Metamask extension
The first step in connecting your Binance account to Metamask is to ensure that you have the Metamask extension installed in your web browser. Metamask is a popular Ethereum wallet that allows you to hold and manage your Ethereum assets securely. You can download the Metamask extension for Google Chrome, Mozilla Firefox, or Brave by visiting the respective web browser’s extension store.
Step 2: Create or import an Ethereum wallet in Metamask
Once you have the Metamask extension installed, you will need to either create a new Ethereum wallet or import an existing one. If you are new to Metamask, you can create a new wallet by following the on-screen instructions. If you already have an Ethereum wallet and want to import it into Metamask, you can do so by selecting the option to import an existing wallet and following the prompts.
Step 3: Connect Binance to Metamask
After setting up your Metamask wallet, the next step is to connect it to your Binance account. To do this, open the Binance website and log in to your account. Once logged in, navigate to the user settings section and find the option to connect a wallet. Select Metamask as the wallet option and follow the instructions to authorize the connection.
Step 4: Confirm the connection
After authorizing the connection, you will need to confirm it in Metamask. You will receive a prompt in your Metamask extension asking you to allow the Binance connection. Review the details of the connection and click ‘Confirm’ to complete the process.
Once the connection is confirmed, you will be able to see your Binance account in your Metamask wallet. You can now easily manage your Ethereum and Binance assets, view your balances, and initiate transactions between the two platforms. Connecting your Binance account to Metamask streamlines your cryptocurrency management and enhances your trading experience.
Note: Connecting your Binance account to Metamask does not mean you are transferring your funds from Binance to Metamask. You are simply authorizing Metamask to access your Binance account’s information and interact with it.
Step 1: Create a Binance Account
To connect your Binance account to Metamask, you first need to have a Binance account. If you already have one, you can skip this step.
If you don’t have a Binance account yet, don’t worry! Creating one is a simple and straightforward process. Just follow these steps:
1. Visit the Binance website
Go to the Binance website by typing “binance.com” in the address bar of your web browser, or simply click here.
2. Click on “Register”
Once you’re on the Binance homepage, look for the “Register” button and click on it.
3. Fill in the registration form
A registration form will appear on your screen. Fill in the required information, including your email address and password. Make sure to choose a strong and unique password to protect your account.
4. Agree to the terms of service
Read through the terms of service and privacy policy, and if you agree with them, check the box to indicate your acceptance.
5. Complete the verification process
Binance may require you to complete a verification process to ensure the security of your account. This may involve providing additional personal information and documents.
6. Enable two-factor authentication (2FA)
As an additional security measure, Binance highly recommends enabling two-factor authentication (2FA) for your account. This adds an extra layer of protection by requiring a second form of verification, such as a code generated by a mobile app.
Once you have completed these steps, congratulations! You now have a Binance account that you can connect to Metamask.
Guide on how to sign up for a new Binance account
If you want to connect your Binance account to Metamask, the first step is to sign up for a new Binance account. Follow the steps below to create your account:
Step 1: Visit the Binance website
Open your preferred web browser and go to the official Binance website: https://www.binance.com
Step 2: Click on “Register”
Once you’re on the Binance homepage, click on the “Register” button located at the top-right corner of the page.
Step 3: Create your Binance account
Fill in the required information on the registration form, including your email address and password. Make sure to choose a strong password that contains a combination of letters, numbers, and special characters.
Step 4: Agree to the terms and conditions
Read and agree to the Binance terms of use by checking the box. You can also choose to receive email newsletters from Binance if you wish.
Step 5: Complete the CAPTCHA verification
To ensure that you’re a human and not a bot, complete the CAPTCHA verification by solving the puzzle or entering the characters shown in the image.
Step 6: Enable 2FA (Two-Factor Authentication)
For added security, consider enabling 2FA on your Binance account. This will require you to enter a unique code generated by a 2FA app or received via SMS every time you log in. Follow the instructions provided to set up 2FA.
Step 7: Verify your email address
After completing the registration process, you will receive an email from Binance with a verification link. Click on the link to verify your email address and activate your Binance account.
Once you have successfully signed up for a new Binance account, you can proceed with connecting it to Metamask by following the steps outlined in the guide.
| Benefits of using Binance |
|---|
| Wide range of cryptocurrencies supported |
| Robust security measures |
| User-friendly interface |
| High liquidity |
| Low trading fees |
Step 2: Install Metamask Extension
In order to connect your Binance account to Metamask, you will need to install the Metamask extension for your web browser. Follow these steps to get started:
- Open your preferred web browser and go to the Metamask website.
- Click on the “Get Chrome Extension” or “Get Firefox Extension” button, depending on which browser you are using.
- You will be redirected to the respective extension store for your browser. Click on the “Add to Chrome” or “Add to Firefox” button.
- A pop-up window will appear asking for confirmation. Click on “Add extension” to proceed with the installation.
- Once the extension is installed, you will see the Metamask logo in the top right corner of your browser.
- Click on the logo to open the Metamask extension.
- A welcome screen will appear. Click on the “Get Started” button to continue.
- You will be prompted to create a new wallet or import an existing one. Choose the option that suits you best and follow the instructions provided.
- Set up a secure password for your wallet and click on “Create” or “Import” to complete the process.
- Congratulations! You have successfully installed the Metamask extension and set up your wallet.
Now that Metamask is installed, you can proceed to the next step and connect your Binance account to Metamask.
Step-by-step instructions for adding Metamask to your browser
Metamask is a browser extension that allows you to interact with decentralized applications (dApps) on the Ethereum blockchain. Follow the steps below to add Metamask to your browser:
Step 1: Open your browser and go to the official Metamask website.
Step 2: Click on the ‘Get Chrome Extension’ button if you are using Google Chrome or the ‘Get Firefox Extension’ button if you are using Mozilla Firefox.
Step 3: A pop-up window will appear asking you to add Metamask to your browser. Click on the ‘Add to Chrome’ button if you are using Google Chrome or the ‘Add to Firefox’ button if you are using Mozilla Firefox.
Step 4: Another pop-up window will appear asking you to confirm the installation. Click on the ‘Add extension’ button.
Step 5: Once the installation is complete, you will see the Metamask icon added to the top right corner of your browser. Click on the icon to open Metamask.
Step 6: A welcome screen will appear. Click on the ‘Get Started’ button.
Step 7: You will be presented with the terms of service. Read them carefully and click on the checkbox to accept the terms. Then, click on the ‘Continue’ button.
Step 8: Set a password for your Metamask wallet. Make sure to choose a strong password and keep it safe. Enter the password in the designated field and click on the ‘Create’ button.
Step 9: Metamask will provide you with a unique 12-word seed phrase. Write down the seed phrase and keep it in a safe place. This phrase can be used to recover your wallet if you forget your password. Click on the ‘Next’ button.
Step 10: Confirm your seed phrase by selecting the words in the correct order. Once you have confirmed the seed phrase, click on the ‘Confirm’ button.
Step 11: Congratulations! You have successfully added Metamask to your browser. You can now use it to connect your Binance account and interact with various dApps on the Ethereum blockchain.
Note: It is important to secure your Metamask wallet by enabling additional security features such as two-factor authentication and hardware wallet integration.
Step 3: Connect Binance and Metamask
Once you have installed the Metamask extension and created an account, the next step is to connect your Binance account to Metamask. This will allow you to manage your Binance funds directly from your Metamask wallet.
Here’s how you can connect your Binance account to Metamask:
1. Open Metamask
Click on the Metamask extension icon in your browser’s toolbar to open the Metamask wallet.
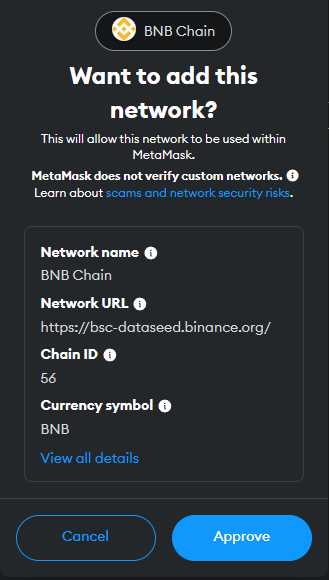
2. Switch to Binance Smart Chain Network

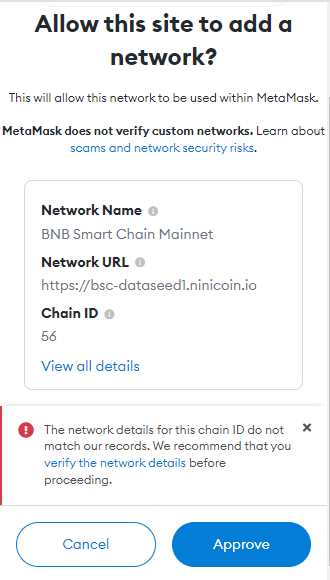
By default, Metamask is set to the Ethereum network. To connect Binance, you need to switch to the Binance Smart Chain network.
- Click on the network name at the top of the Metamask wallet.
- Select “Custom RPC” from the dropdown menu.
- Enter the following details:
- Network Name: Binance Smart Chain
- New RPC URL: https://bsc-dataseed1.binance.org/
- Chain ID: 56
- Symbol: BNB
- Block Explorer URL: https://bscscan.com/
- Click on “Save” to switch to the Binance Smart Chain network.
3. Add Binance Wallet to Metamask
Now that you’re on the Binance Smart Chain network, you can connect your Binance account to Metamask.
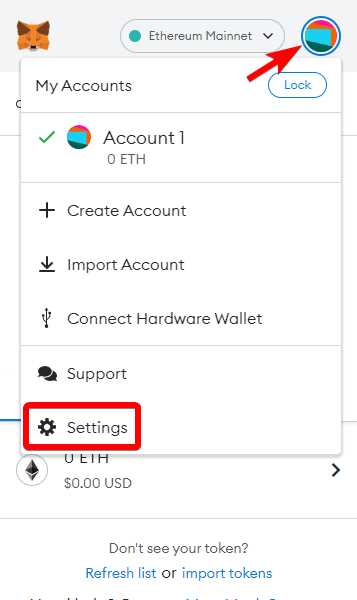
- Click on the Metamask extension icon in your browser’s toolbar to open the Metamask wallet.
- Click on the account icon at the top right corner of the wallet and select “Import Account”.
- Select “Binance Chain” as the network.
- Enter your Binance account’s seed phrase or private key.
- Click on “Import” to add your Binance wallet to Metamask.
Congratulations! You have successfully connected your Binance account to Metamask. Now you can manage your Binance funds directly from Metamask and enjoy the benefits of decentralized finance on the Binance Smart Chain network.
Step-by-step guide on linking your Binance account to Metamask
Linking your Binance account to Metamask allows you to easily manage your cryptocurrency holdings and seamlessly interact with decentralized applications (dApps). Follow these step-by-step instructions to connect your Binance account to Metamask:
- Open the Metamask extension in your web browser and make sure you are logged in.
- Click on the Metamask icon in your browser toolbar to open the Metamask interface.
- On the Metamask interface, click on the account icon located at the top right corner and select “Import Account”.
- In the “Import Account” window, select “From Binance Chain”.
- Copy your Binance Chain address from your Binance account. To do this, log in to your Binance account, navigate to the “Wallet” section, and find the address for the cryptocurrency you want to link to Metamask.
- Paste the Binance Chain address you copied in the previous step into the “Account Address” field on the Metamask interface.
- Click on the “Connect” button to link your Binance account to Metamask. Metamask will verify the address and import the account into your wallet.
- Once the connection is successful, you will see your Binance account listed as an imported account in the Metamask interface.
- You can now use Metamask to manage your Binance account, interact with dApps, and perform various cryptocurrency transactions.
By following these simple steps, you can easily link your Binance account to Metamask and enjoy the benefits of decentralized finance and blockchain technology.
Frequently Asked Questions:
What is Binance?
Binance is a cryptocurrency exchange platform that allows users to trade various cryptocurrencies.
What is Metamask?
Metamask is a cryptocurrency wallet and browser extension that allows users to interact with blockchain-based applications.
Why would I want to connect my Binance account to Metamask?
Connecting your Binance account to Metamask allows you to easily transfer funds between the two platforms and access decentralized applications (DApps) on the Ethereum network using your Binance funds.

+ There are no comments
Add yours