


Welcome to the world of decentralized finance! If you’re new to the crypto space and looking to explore the exciting world of Ethereum and its ecosystem, one of the first steps you’ll need to take is setting up your own Metamask wallet. Metamask is a popular browser extension that allows you to interact with Ethereum-based decentralized applications (DApps) and manage your digital assets securely and conveniently.
In this comprehensive beginner’s guide, we’ll walk you through the process of setting up your Metamask wallet step by step. Whether you’re a seasoned crypto enthusiast or just starting your journey into the world of blockchain, this guide will provide you with the knowledge you need to get up and running with Metamask.
Before we dive into the specifics, it’s essential to understand the importance of securing your Metamask wallet. Your wallet is like a digital bank account that holds your cryptocurrencies and tokens, so it’s crucial to take the necessary measures to keep it safe. We’ll cover best practices for securing your wallet and protecting your private keys, which are essential for accessing and managing your funds.
Setting up your Metamask wallet is a straightforward process, and by the end of this guide, you’ll be able to send and receive Ethereum, interact with DApps, and manage your digital assets like a pro. So, let’s get started and unlock the door to the exciting world of decentralized finance!
Getting Started with Metamask Wallet
Metamask is a popular cryptocurrency wallet that allows you to securely store, manage, and interact with various decentralized applications (dApps) on the Ethereum blockchain. In order to get started with Metamask Wallet, you will need to follow these steps:
- Install the Metamask extension: Visit the official Metamask website or search for “Metamask” in your browser’s extension store. Click on the “Add to Chrome” or “Add to Firefox” button to install the extension.
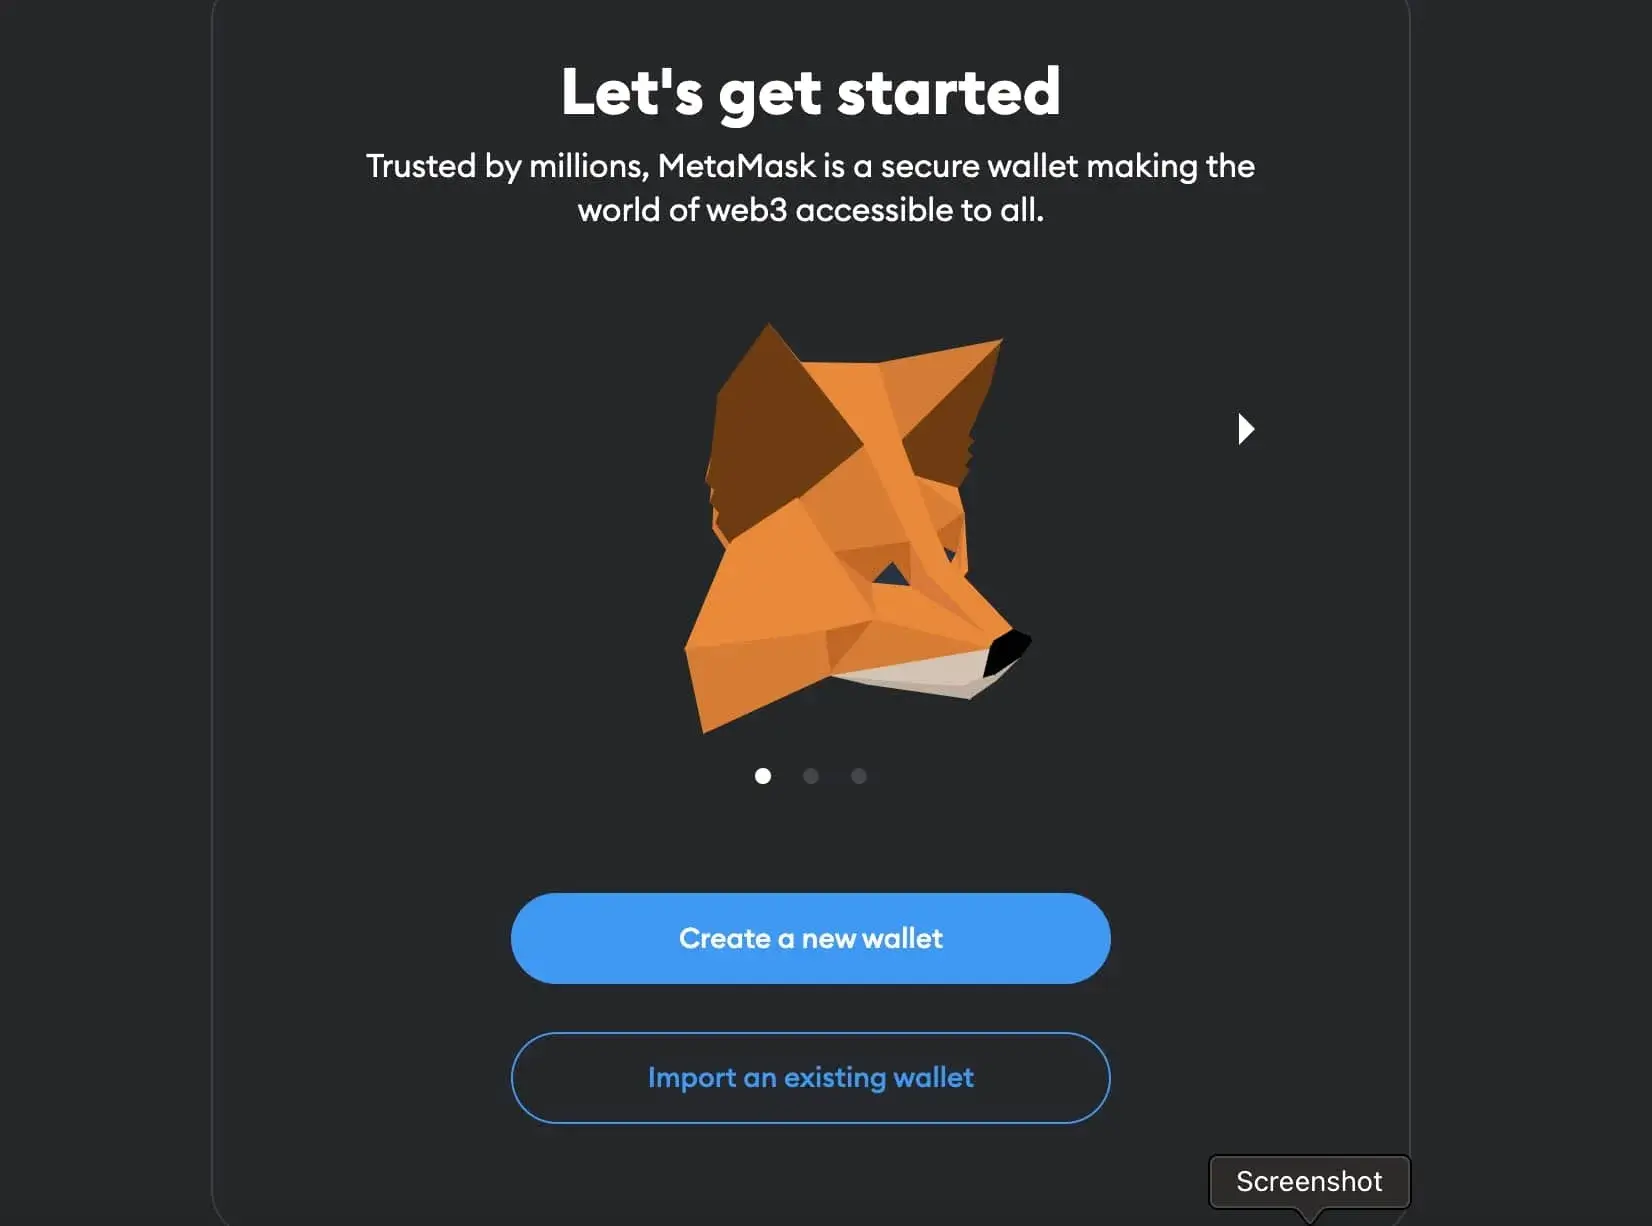
- Create a new wallet: After installing the extension, click on the Metamask icon in your browser toolbar. Follow the on-screen instructions to create a new wallet. Make sure to choose a strong password and backup your wallet’s seed phrase in a safe place.
- Import an existing wallet: If you already have a wallet, you can import it into Metamask. Click on the Metamask icon, then click on “Import Wallet” and follow the instructions to import your wallet using its seed phrase or private key.
- Add Ethereum or other supported networks: By default, Metamask is connected to the Ethereum mainnet. If you want to interact with other networks like testnets or custom networks, click on the network selection dropdown and choose the desired network.
- Top up your wallet: In order to use dApps or send transactions, you will need to have some cryptocurrency in your wallet. You can buy Ethereum or other supported cryptocurrencies from exchanges and transfer them to your Metamask wallet.
- Explore dApps and start interacting: Once your wallet is set up and funded, you can start exploring decentralized applications (dApps) on the Ethereum blockchain. Many popular dApps include decentralized exchanges, gaming platforms, and decentralized finance (DeFi) applications.
Remember to always exercise caution when using your Metamask wallet and only interact with trusted dApps and websites. Keep your wallet and seed phrase secure to prevent unauthorized access to your funds.
Setting Up Your Metamask Wallet
Setting up your Metamask wallet is a crucial step in accessing the world of decentralized finance (DeFi) and interacting with Ethereum-based applications. Follow these steps to get started:
- Visit the official Metamask website at https://metamask.io.
- Download and install the Metamask browser extension for your preferred browser.
- Click on the Metamask icon in your browser toolbar to open the wallet.
- Click on the “Get Started” button to begin the setup process.
- Create a new wallet by clicking on the “Create a Wallet” option.
- Set a strong password for your wallet, ensuring it is unique and difficult to guess.
- Review and understand the terms of use, then click on the “I Agree” button.
- Store and securely backup your 12-word seed phrase. This phrase is essential for recovering your wallet and should never be shared with anyone.
- Confirm your seed phrase by selecting the words in the correct order.
- Once your seed phrase is confirmed, your Metamask wallet is ready to use!
Remember to keep your Metamask wallet secure by enabling two-factor authentication (2FA) and keeping your device and browser up to date with the latest security patches. Additionally, always verify the authenticity of the websites and applications you interact with to avoid phishing attacks.
With your Metamask wallet set up, you can now start exploring the world of decentralized finance, participating in token sales, interacting with decentralized apps (dApps), and securely storing your digital assets.
Using Your Metamask Wallet
Once you have set up your MetaMask wallet, you can start using it to interact with decentralized applications (dApps) on the Ethereum network. Here are some key features and actions you can perform with your MetaMask wallet:
1. Importing and Exporting Wallet
If you already have an existing Ethereum wallet, you can easily import it into MetaMask by selecting the “Import Wallet” option. Similarly, you can export your MetaMask wallet to use it on other platforms by choosing the “Export Wallet” option.
2. Viewing Your Account Balance

To check your Ethereum account balance, simply open your MetaMask wallet and look for the account associated with your balance. The balance will be displayed in Ether (ETH) or the respective token you hold.
3. Sending and Receiving Ether
To send Ether to another Ethereum address, click on the “Send” button in MetaMask and enter the recipient’s address and amount. Confirm the transaction and wait for it to be processed. To receive Ether, click on the “Receive” button and share your wallet address with the sender.
4. Managing Tokens
MetaMask also allows you to manage and interact with various Ethereum tokens. You can add custom tokens by entering their contract address, symbol, and decimal places. This enables you to hold, send, and receive tokens directly from your MetaMask wallet.
5. Interacting with dApps
MetaMask is widely used to interact with decentralized applications (dApps) and smart contracts on the Ethereum network. When you visit a dApp, you will be prompted to connect your MetaMask wallet. This allows you to make transactions, complete actions, and access features within the dApp.
6. Adjusting Gas Fees

Gas fees are required to process transactions on the Ethereum network. MetaMask allows you to adjust the gas fee for each transaction depending on how quickly you want it to be processed. Higher gas fees generally result in faster transaction confirmations.
These are just some of the basic actions you can perform with your MetaMask wallet. As you explore and delve deeper into the world of Ethereum and decentralized finance, you will discover more advanced features and functionalities offered by MetaMask.
Frequently Asked Questions:
What is Metamask?
Metamask is a cryptocurrency wallet that allows users to securely store, manage, and interact with decentralized applications (dApps) on the Ethereum blockchain.
How do I set up a Metamask wallet?
To set up a Metamask wallet, you need to download the Metamask extension for your web browser and create a new wallet. Then, you will be given a secret backup phrase which you must write down and keep in a safe place. Finally, you can start using your wallet to manage your Ethereum assets and interact with dApps.
Can I use Metamask on my mobile device?
Yes, Metamask is available as a mobile app on both Android and iOS devices. You can download it from the respective app stores and set up your wallet in a similar way as on a web browser.
What are the benefits of using Metamask?
Using Metamask offers several benefits. Firstly, it provides a convenient and user-friendly interface for managing your Ethereum assets. Additionally, Metamask allows you to securely interact with various dApps, such as decentralized exchanges and decentralized finance (DeFi) protocols. Moreover, Metamask provides a high level of security for your wallet through features like encryption and the ability to set up hardware wallet integration.
+ There are no comments
Add yours