


Are you looking to transfer your cryptocurrency from Trust Wallet to MetaMask? Look no further, as we have prepared an easy step-by-step guide to help you with the process. Trust Wallet and MetaMask are two popular cryptocurrency wallets that offer different features and functionalities. If you are switching from Trust Wallet to MetaMask or simply want to have your funds in both wallets, this guide will assist you in smoothly transferring your assets.
Step 1: Install MetaMask
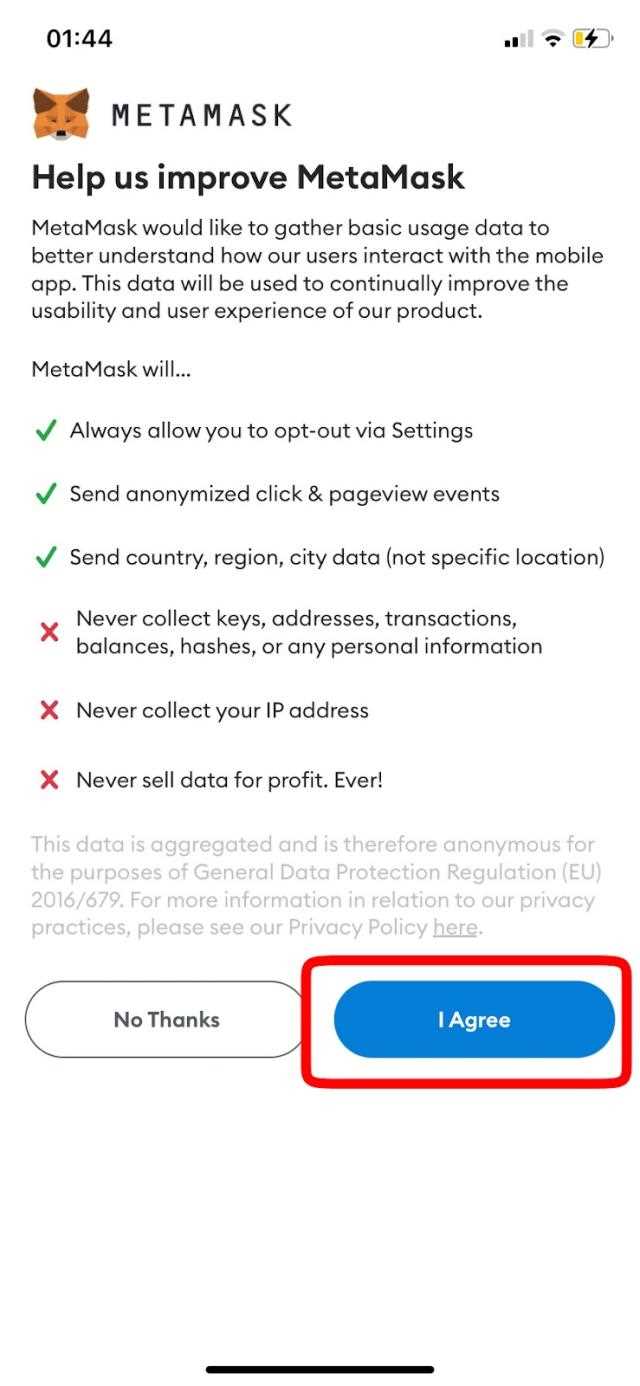
The first step is to install MetaMask on your device. MetaMask is available as a browser extension for Chrome, Firefox, and Brave browsers. Visit the MetaMask website or search for the MetaMask extension in your browser’s extension store. Once you find it, click on the “Add to Chrome” (or “Add to Firefox”/”Add to Brave”) button to install the extension.
Step 2: Create a MetaMask Wallet
After installing MetaMask, you need to create a new wallet. Click on the MetaMask extension icon in your browser’s toolbar and select “Create a Wallet.” Follow the prompts to set up a strong password and backup your wallet. Make sure to store your backup phrase in a safe and secure location, as it is crucial for accessing your wallet in case of device loss or failure.
Step 3: Import Trust Wallet to MetaMask
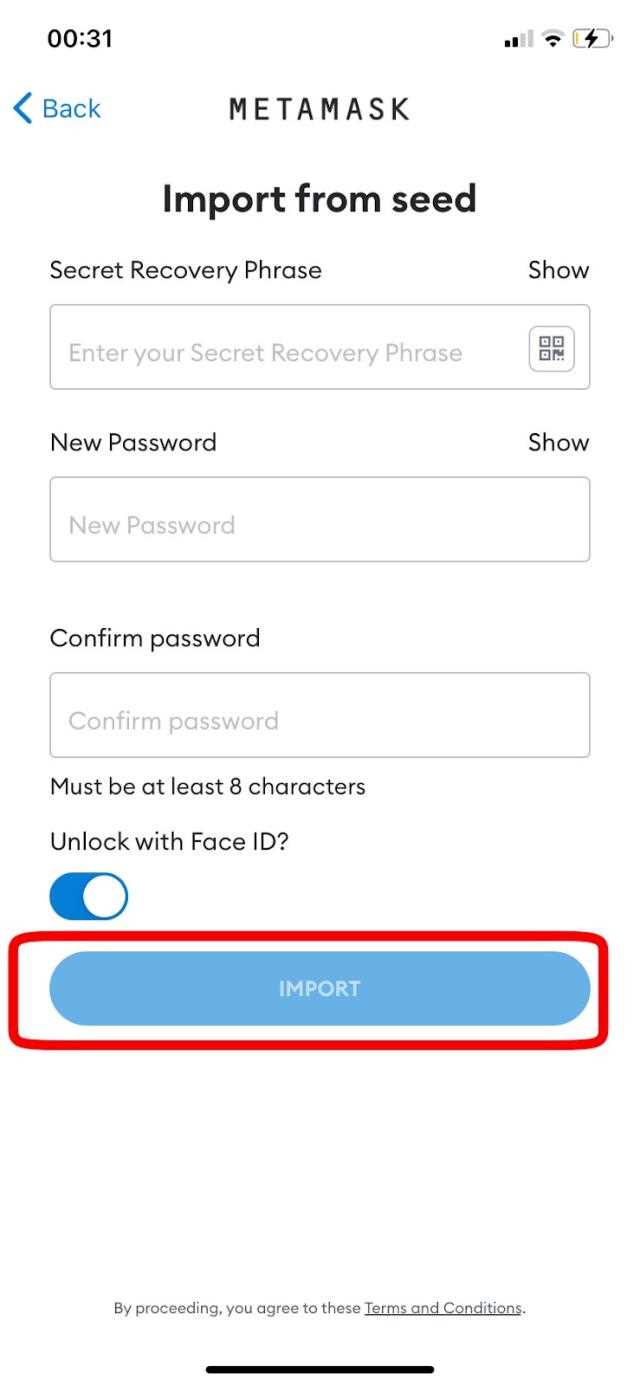
Now it’s time to import your Trust Wallet into MetaMask. In the MetaMask extension, click on the account avatar (the profile picture) and select “Import Account.” On the import screen, choose the “Seed Phrase” option and enter the backup phrase of your Trust Wallet. MetaMask will then generate a new address using your Trust Wallet’s seed phrase.
Step 4: Verify and Transfer Funds
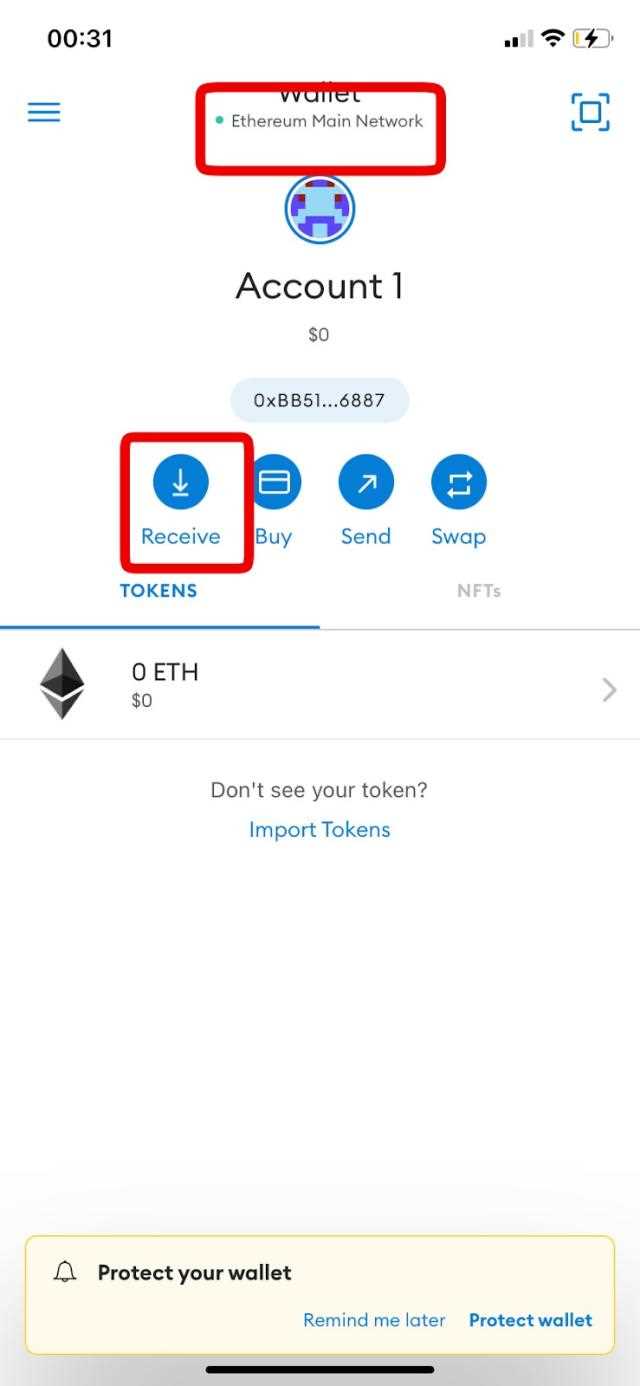
Before transferring funds from Trust Wallet to MetaMask, we recommend verifying the newly imported account. In MetaMask, click on the account avatar and select “Account Details.” Verify that the address displayed matches your Trust Wallet address. If it matches, you can proceed with transferring your funds.
Transfer the desired amount of cryptocurrency from your Trust Wallet to your imported MetaMask wallet address. Depending on the cryptocurrency and network congestion, the transfer may take some time to confirm. Once the transfer is confirmed, you will see your funds in your MetaMask wallet.
By following these simple steps, you can easily transfer your Trust Wallet to MetaMask and have your cryptocurrency assets available in both wallets. Remember to always double-check addresses and backup your wallets in order to ensure the security of your funds. Happy transferring!
How to Transfer Trust Wallet to MetaMask: Step-by-Step Guide
If you’re looking to transfer your Trust Wallet to MetaMask, you’re in the right place. Whether you’re switching to MetaMask for its advanced features or because you prefer its interface, the process is relatively simple. Follow the step-by-step guide below to learn how.
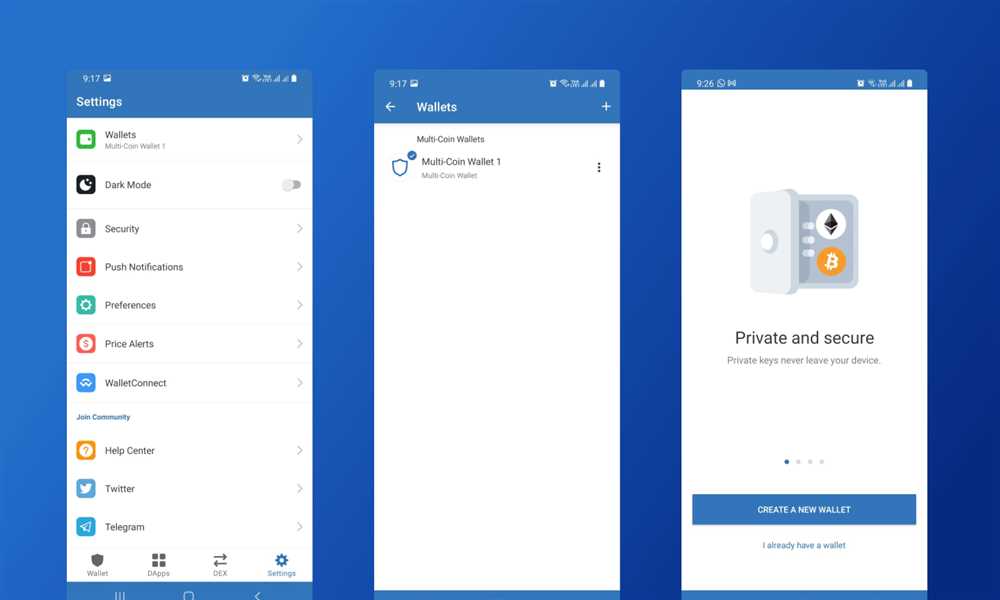
Step 1: Export Trust Wallet Private Key
To start the transfer process, you’ll need to export your Trust Wallet private key. Open the Trust Wallet app and go to the settings menu. From there, select “Wallets” and scroll down to find the wallet you want to transfer. Tap on it and click on “Export Private Key.” Trust Wallet will then prompt you to enter your password. Once you’ve entered it, you’ll see your private key. Copy it as you’ll need it for the next step.
Step 2: Import Trust Wallet into MetaMask
Now, open your MetaMask extension or app. If you don’t have MetaMask installed, make sure to download it and set up an account. Once you have MetaMask opened, click on the profile icon and select “Import Account.” MetaMask will then show a prompt asking for the private key. Paste the Trust Wallet private key that you copied in the previous step and click on “Import.” MetaMask will then import your Trust Wallet and it will be ready to use.
Step 3: Verify Your Wallet Transfer
After importing your Trust Wallet into MetaMask, it’s important to verify that the transfer was successful. To do this, check your MetaMask wallet address and compare it to your Trust Wallet address. Make sure they match to ensure that your funds have been transferred correctly.
Step 4: Complete the Transfer
With your Trust Wallet now transferred to MetaMask, you’re ready to start using MetaMask for your Ethereum transactions. Double-check that all your assets and tokens have been successfully migrated, and begin exploring the advanced features and functionalities that MetaMask offers.
| Trust Wallet | MetaMask |
|---|---|
| Export Private Key | Import Account |
| Verify Wallet Address | – |
| – | Complete Transfer |
Transferring your Trust Wallet to MetaMask is a straightforward process that allows you to take advantage of MetaMask’s powerful features. By following the step-by-step guide above, you can easily make the switch and start using MetaMask for all your Ethereum transactions.
Step 1: Download and Install MetaMask

To start the process of transferring your Trust Wallet to MetaMask, you will first need to have MetaMask installed on your device. Follow the steps below to download and install MetaMask:
- Open your preferred web browser and go to the MetaMask website.
- Click on the “Get Chrome Extension” button if you are using Google Chrome, or “Get Firefox Extension” if you are using Mozilla Firefox.
- A prompt will appear asking for your permission to add the extension to your browser. Click “Add to Chrome” if you are using Google Chrome or “Add to Firefox” if you are using Mozilla Firefox.
- After the installation is complete, you will see the MetaMask icon added to your browser’s toolbar.
- Click on the MetaMask icon to open the extension.
- On the initial setup screen, you will be asked to either import an existing wallet or create a new one. Choose the option that applies to you.
- If you chose to create a new wallet, you will be prompted to create a password. Make sure to choose a strong password that you can remember, as it is essential for securing your wallet.
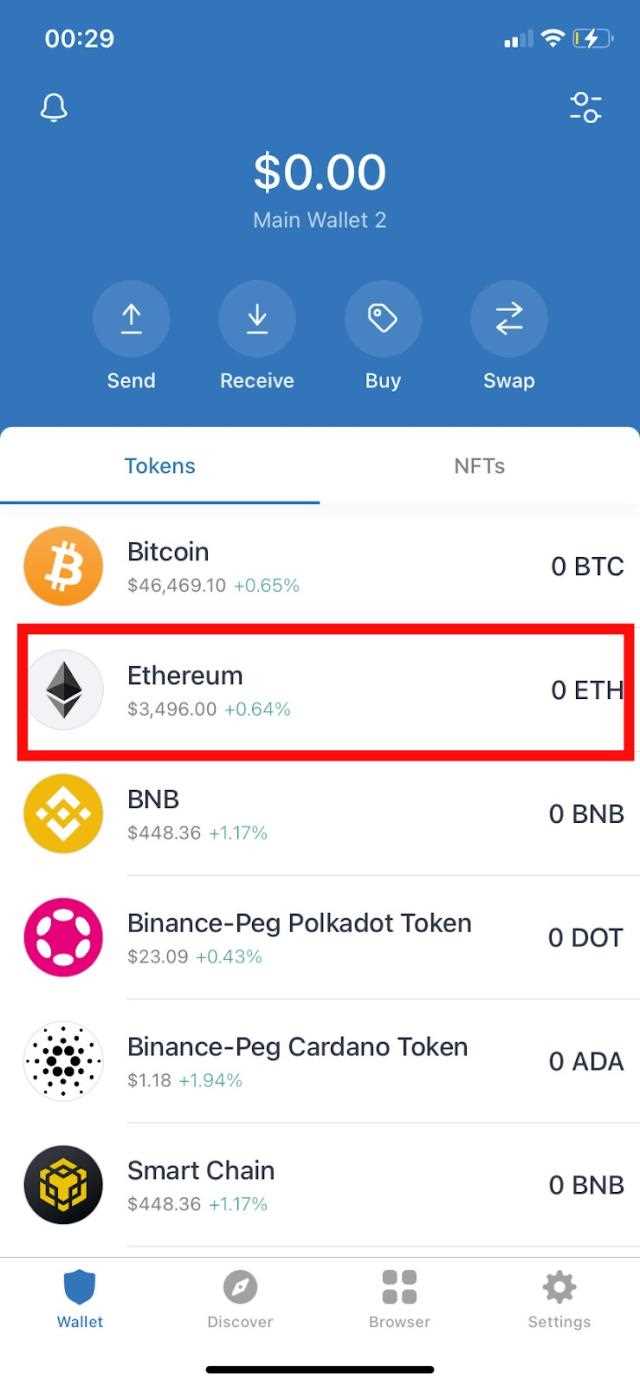
- Once you have created or imported your wallet, you will see your wallet address and balance displayed on the main MetaMask screen.
- Congratulations! You have successfully downloaded and installed MetaMask. You are now ready to proceed with transferring your Trust Wallet to MetaMask.
Step 2: Backup Your Trust Wallet
Backing up your Trust Wallet is an essential step to ensure the safety and security of your funds. By creating a backup, you can restore your wallet in case of device loss, damage, or any other unexpected event.
Here’s how to backup your Trust Wallet:
- Open the Trust Wallet app on your device.
- Tap on the “Settings” icon located at the bottom right corner of the screen.
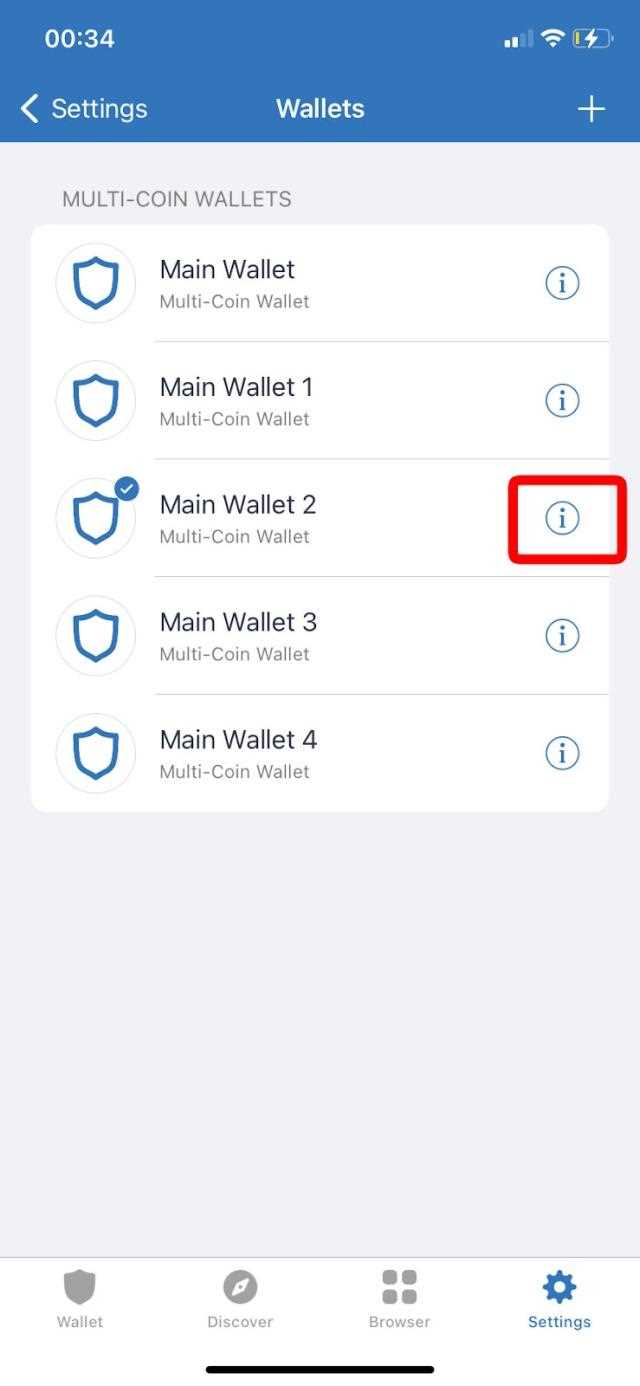
- In the Settings menu, select the “Wallets” option.
- Choose the wallet you want to backup from the list of available wallets.
- Once you’ve selected the wallet, tap on the “Backup” option.
- Read the backup instructions carefully and make sure you understand them.
- Write down the recovery phrase provided by Trust Wallet. This recovery phrase consists of a sequence of 12 or 24 words.
- Important: Do not store the recovery phrase on a digital device or share it with anyone. Keep it in a safe and secure place offline.
- Confirm the recovery phrase by entering the words in the correct order when prompted by Trust Wallet.
- Once you’ve confirmed the recovery phrase, your wallet will be successfully backed up.
It’s crucial to keep your backup phrase safe as it serves as the key to your funds. Losing the recovery phrase may result in permanent loss of access to your wallet and funds.
Remember to store the recovery phrase securely and ensure that it’s kept confidential. Consider storing multiple copies in separate physical locations to safeguard against accidental loss or damage.
By following these steps and creating a backup of your Trust Wallet, you can have peace of mind knowing that your funds are protected and can be easily restored if needed.
Step 3: Import Trust Wallet into MetaMask
Now that you have your Trust Wallet ready with all your assets and funds, it’s time to import it into MetaMask so you can have all your cryptocurrencies in one place. Follow these steps to import Trust Wallet into MetaMask:
Step 1: Install MetaMask
If you don’t have MetaMask installed already, you need to download and install it on your device. You can find the MetaMask extension for your browser on their official website or in your browser’s extension store. Make sure to choose the version that corresponds to the browser you are using.
Step 2: Open MetaMask
Once MetaMask is installed, you can open it by clicking on its extension icon in your browser’s toolbar. A new tab or pop-up will appear with the MetaMask interface.
Step 3: Create a New Account
If this is your first time using MetaMask, you will need to create a new account. Click on the “Create a Wallet” button and follow the instructions to set up a new account. Make sure to write down and keep your seed phrase in a safe place.
Step 4: Import Trust Wallet
To import your Trust Wallet into MetaMask, click on the account icon in the top right corner of the MetaMask interface. From the drop-down menu, choose “Import Account”.
A form will appear where you can enter your Trust Wallet’s seed phrase. Enter the phrase into the form and click “Import”. MetaMask will begin importing your Trust Wallet account and all its associated assets.
Step 5: Confirm Import

Once the import process is complete, you will see your Trust Wallet account and assets listed in the MetaMask interface. Take a moment to verify that all your funds and assets have been successfully imported.
Congratulations! You have successfully imported your Trust Wallet into MetaMask. Now you can manage and access all your cryptocurrencies using the MetaMask interface.
Frequently Asked Questions:
What is Trust Wallet?
Trust Wallet is a mobile cryptocurrency wallet that allows users to store, send, and receive various cryptocurrencies securely.
What is MetaMask?
MetaMask is a browser extension or mobile app that allows users to interact with decentralized applications (dApps) and store Ethereum and other ERC-20 tokens.
Why would I want to transfer my Trust Wallet to MetaMask?
There could be several reasons to transfer your Trust Wallet to MetaMask. One common reason is to have all your cryptocurrencies in one place for easier management and access. Another reason could be the desire to use specific dApps or services that are only compatible with MetaMask.
Are there any fees involved in transferring Trust Wallet to MetaMask?
The transfer itself does not involve any fees. However, you should be aware that when you send cryptocurrencies from one wallet to another, there may be network fees (gas fees) involved depending on the blockchain network you are using. These fees are required to process and validate transactions on the blockchain.
+ There are no comments
Add yours