


Welcome to our step-by-step guide on how to integrate Avalanche Network to Metamask! If you’re an Ethereum user looking to expand your horizons and explore the exciting possibilities offered by the Avalanche Network, look no further. In this guide, we will walk you through the process of adding the Avalanche Network to your Metamask wallet, allowing you to seamlessly switch between Ethereum and Avalanche with just a few clicks.
Why integrate Avalanche Network to Metamask?
The Avalanche Network is a rapidly growing decentralized platform that offers high scalability and low transaction fees, making it an attractive choice for developers and users alike. By integrating the Avalanche Network to your Metamask wallet, you gain access to a whole new world of decentralized applications (dApps) and can take advantage of the network’s speed and efficiency.
So, let’s get started!
Download and Install Metamask Extension
To start using the Avalanche network on Metamask, you first need to download and install the Metamask extension on your web browser. Follow the steps below to do this.
Step 1: Open your web browser and go to the Metamask website.
Step 2: Once on the website, click on the “Download” button.
Step 3: Select the appropriate version of Metamask for your browser (Chrome, Firefox, or Brave) and click on the download link.
Step 4: After the download is complete, locate the downloaded file on your computer and open it.
Step 5: Follow the installation instructions provided by the Metamask installer. This usually involves clicking “Next” and agreeing to the terms and conditions.
Step 6: Once the installation is complete, a new Metamask icon should appear in your browser’s toolbar.
Step 7: Click on the Metamask icon to open the extension.
Step 8: Set up a new Metamask wallet by following the on-screen instructions. This will involve creating a new password and writing down a secret phrase.
Step 9: Once your wallet is set up, you can now use Metamask to access the Avalanche network by adding the Avalanche network to the list of networks in Metamask.
Now that you have Metamask installed, you can proceed to the next step of integrating the Avalanche network to your Metamask wallet.
Create or Import a Wallet
Before you can start using the Avalanche Network with Metamask, you will need to create or import a wallet. Here are the steps to do so:
Create a New Wallet
If you don’t have a wallet yet, click on the “Create Wallet” button on the Metamask extension when it is opened. Follow the instructions and make sure to save your Seed Phrase in a safe place. This Seed Phrase is a series of words that can be used to restore your wallet if you lose access to it.
Import an Existing Wallet
If you already have a wallet and want to import it into Metamask, click on the “Import Wallet” option instead. You will need to provide your existing wallet’s Seed Phrase or private key. Follow the instructions provided by Metamask to complete the import process.
Note: Importing a wallet will not transfer any funds or transactions associated with that wallet. It simply allows you to use that wallet with the Avalanche Network through Metamask.
Once you have created or imported your wallet, you will be able to connect it to the Avalanche Network by following the next steps in this guide.
Connect Metamask to the Avalanche Network
To connect your Metamask wallet to the Avalanche network, follow these steps:
Step 1: Install the Metamask Extension
If you haven’t already, you need to install the Metamask extension on your web browser. Go to the official Metamask website and follow the instructions to add the extension to your browser.
Step 2: Create a New Wallet or Import an Existing Wallet
If you don’t have a Metamask wallet, click on the extension icon and choose “Create a Wallet”. Follow the prompts to set up a new wallet with a secure password and write down your recovery phrase. If you already have a Metamask wallet, click on the extension icon, choose “Import Wallet”, and follow the instructions to import your existing wallet using your recovery phrase.
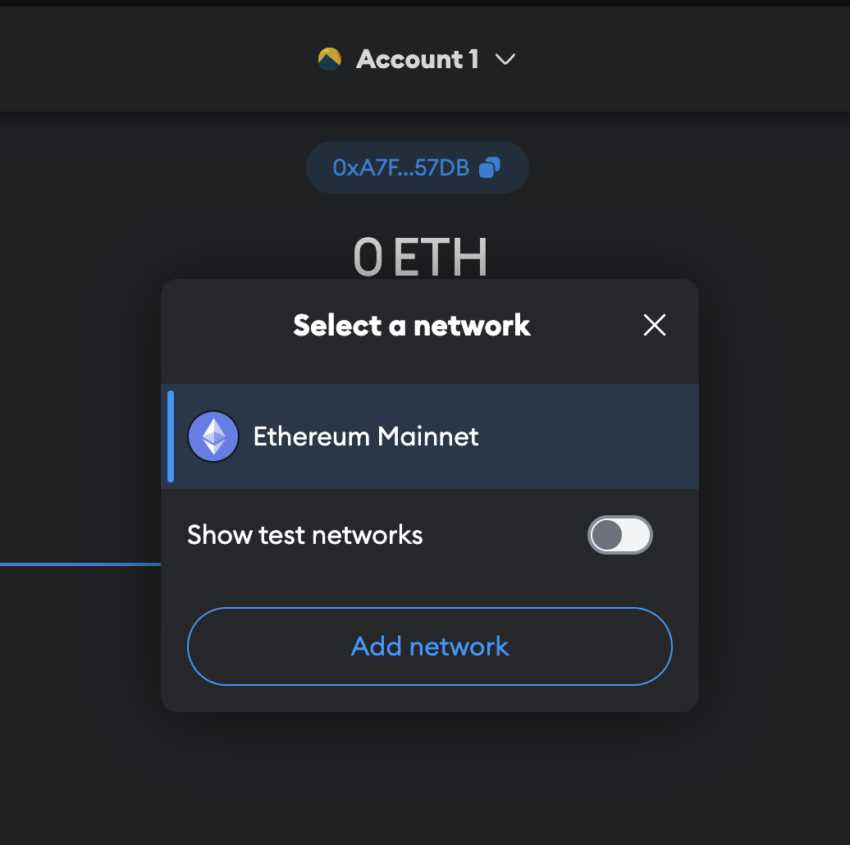
Step 3: Switch to the Avalanche Network
Once your wallet is set up or imported, click on the Metamask extension icon to open the wallet. You should see the Metamask interface. At the top of the interface, you’ll see the current network selected (such as “Main Ethereum Network”). Click on it and a dropdown menu will appear.
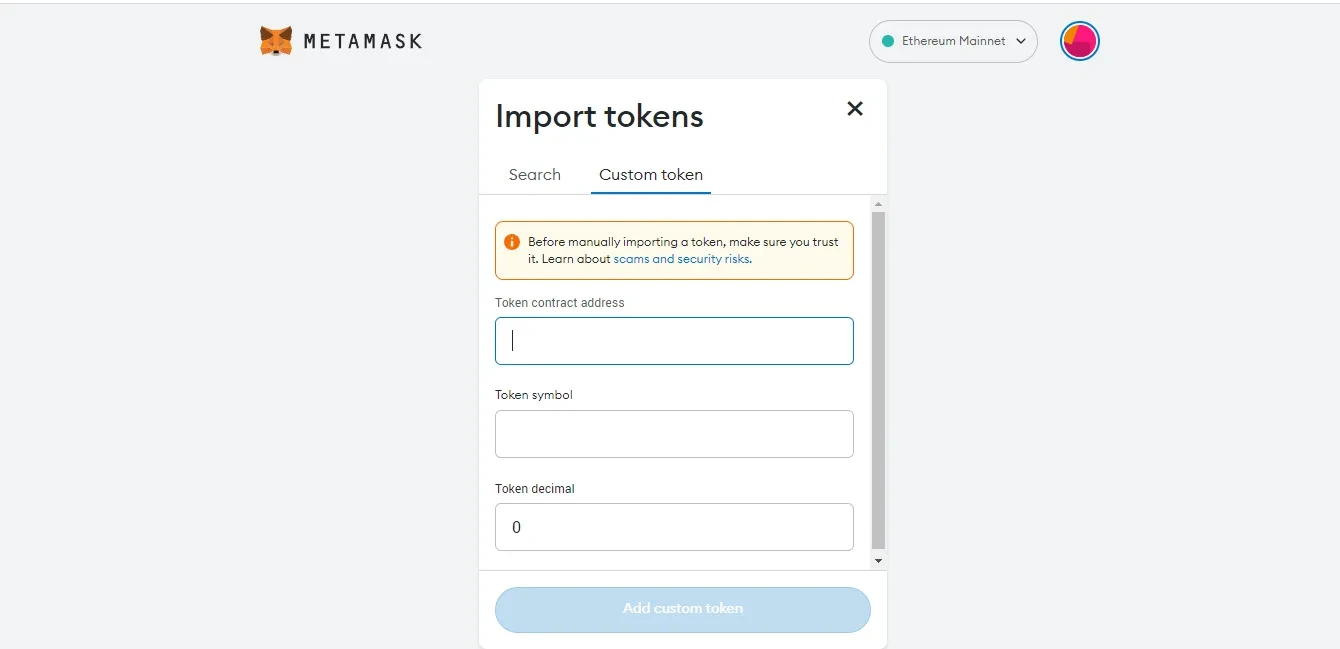
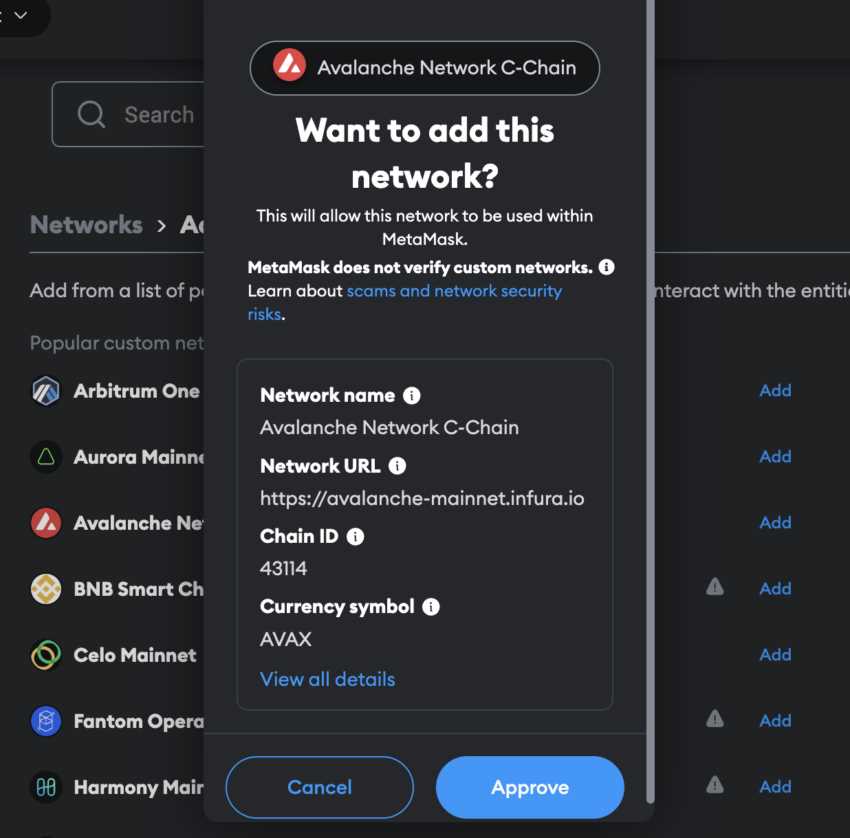
Step 4: Add the Avalanche Network
In the dropdown menu, click on “Custom RPC”. This will open a form where you can add a custom network. Fill in the following details:
Network Name: Avalanche
New RPC URL: https://api.avax.network/ext/bc/C/rpc
Chain ID: 43114
Symbol: AVAX
Block Explorer URL: https://cchain.explorer.avax.network/
Step 5: Save and Connect to the Avalanche Network
After filling in the details, click on “Save” to add the Avalanche network to your Metamask wallet. The new network will now appear in the dropdown menu. Click on it to switch to the Avalanche network.
Step 6: Confirm the Connection
If you have funds in your Metamask wallet, you can now see them on the Avalanche network. Double-check that the network name at the top of the Metamask interface shows “Avalanche”.
Congratulations! You have successfully connected your Metamask wallet to the Avalanche network.
Test and Use the Avalanche Network on Metamask
Once you have successfully integrated the Avalanche Network to Metamask, it is important to test and ensure that everything is functioning correctly. Here is a step-by-step guide on how to test and use the Avalanche Network on Metamask:
Step 1: Connect to the Avalanche Network
To connect to the Avalanche Network on Metamask, follow these steps:
- Click on the Metamask extension in your browser to open the wallet.
- On the Metamask wallet, click on the network dropdown (usually set to “Ethereum Mainnet” by default).
- Scroll down to the bottom and click on “Custom RPC”.
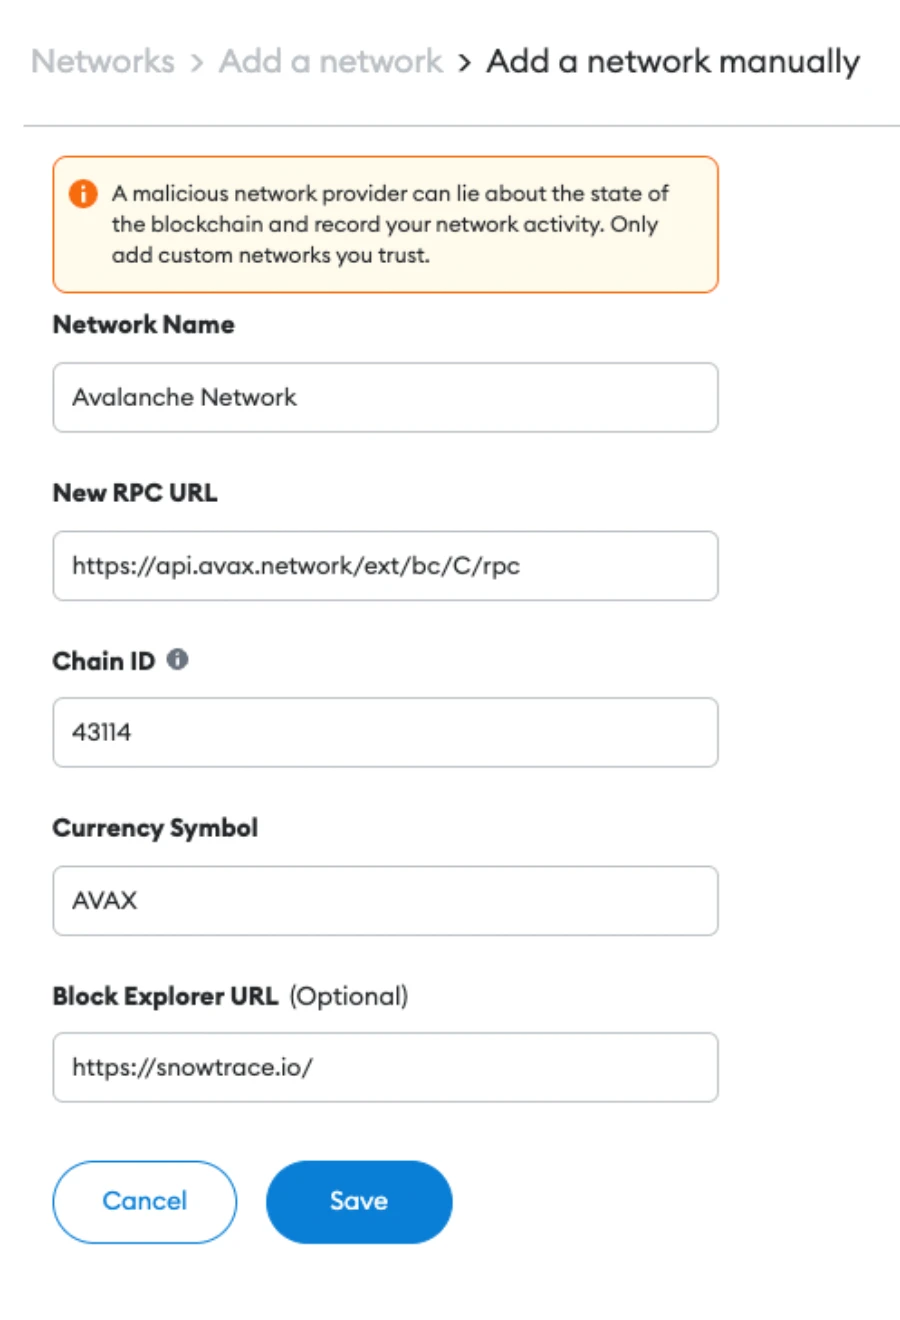
- In the “New Network” screen, enter the following details:
- Network Name: Avalanche
- New RPC URL: https://api.avax.network/ext/bc/C/rpc
- ChainID: 43114
- Symbol: AVAX
- Block Explorer URL: https://cchain.explorer.avax.network/
- Click the “Save” button to connect to the Avalanche Network.
Step 2: Import Test Accounts
To import test accounts on the Avalanche Network, follow these steps:
- Go to the Avalanche Faucet website (https://faucet.avax.network/) in your browser.
- Click on “Connect Wallet” and select Metamask as your wallet provider.
- Click on “Request 0.1 AVAX”.
- Confirm the transaction on Metamask.
- Wait for the transaction to be confirmed and the AVAX tokens to be sent to your account.
Step 3: Test Transactions on the Avalanche Network

Now that you have connected to the Avalanche Network and imported test accounts, you can test transactions on the network. Here are a few things you can do:
| Action | Steps |
|---|---|
| Send AVAX |
|
| Swap Tokens |
|
| Interact with Avalanche-based DApps |
|
By following these steps, you can test and use the Avalanche Network on Metamask seamlessly. Remember to always double-check the network you are connected to on Metamask before performing any transactions or interacting with DApps.
Frequently Asked Questions:
What is Avalanche Network?
Avalanche Network is a decentralized platform built to enable the creation of new and innovative blockchain applications. It consists of three main components: the Avalanche Consensus Protocol, the Avalanche Platform, and the Avalanche Network. Together, these components provide a scalable, secure, and reliable environment for developers to build their decentralized applications (dApps).
What is Metamask?
Metamask is a popular cryptocurrency wallet and browser extension that allows users to interact with decentralized applications (dApps) on the Ethereum blockchain. It provides users with a secure and easy-to-use interface for managing their Ethereum accounts, sending and receiving tokens, and interacting with dApps.
+ There are no comments
Add yours