


If you are a crypto enthusiast and want to expand your horizons beyond Ethereum, Flare Network is a great choice. Flare Network is a decentralized smart contract platform designed to provide opportunities for developers and users alike. By adding Flare Network to your Metamask wallet, you can access a whole new world of possibilities and participate in exciting projects.
Here is a step-by-step guide on how to add Flare Network to your Metamask wallet:
Step 1: Install and Set Up Metamask
If you haven’t already, install the Metamask extension for your browser and set up a new wallet. Make sure to securely store your wallet’s seed phrase, as this will be crucial for accessing your funds.
Step 2: Access Metamask Settings
Once you have set up your Metamask wallet, click on the extension icon in your browser to open it. Then, click on the profile image in the top right corner and select “Settings” from the dropdown menu.
Step 3: Add Custom Network
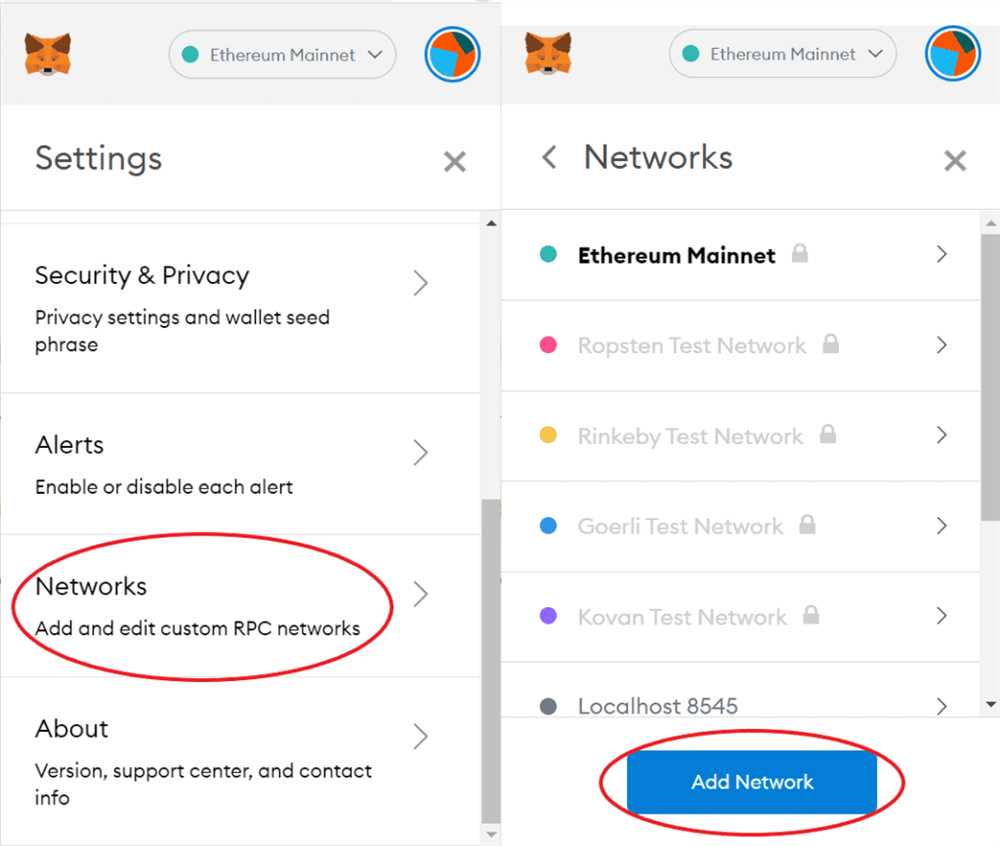
In the Settings menu, navigate to the “Networks” tab. Scroll down to the bottom and click on “Add Network” to add a custom network.
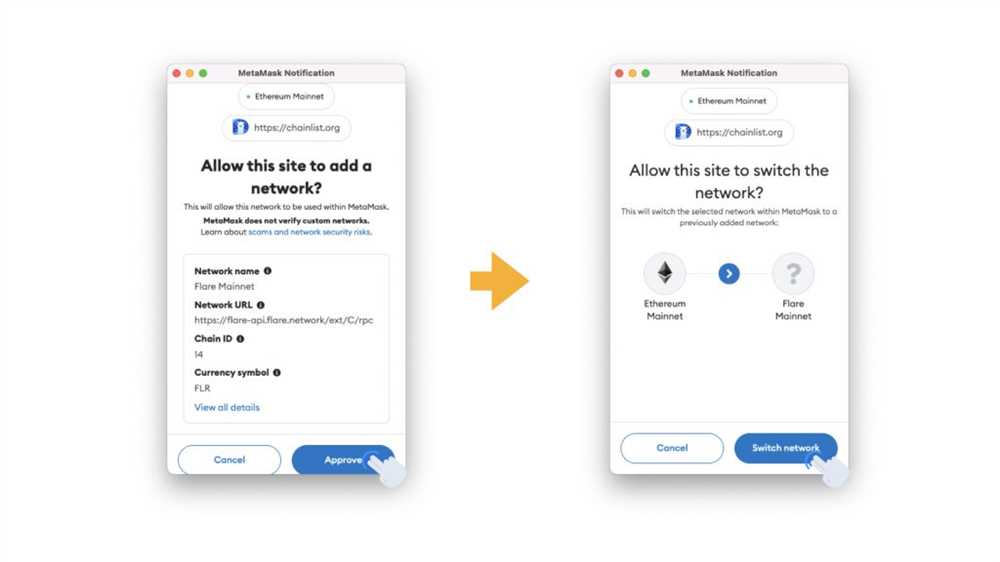
Step 4: Fill in Flare Network Details
Now, it’s time to fill in the details for the Flare Network. Enter the following information:
- Network Name: Flare Network
- New RPC URL: https://rpc.flare.xyz
- ChainID: 16
- Symbol: FLR
- Block Explorer URL: https://explorer.flare.network
Step 5: Save and Connect
After filling in the details, click on the “Save” button to save the Flare Network to your Metamask wallet. Once saved, you will see Flare Network as an option in the network dropdown menu.
Note: It’s important to double-check the information you entered to ensure accuracy.
Congratulations! You have successfully added Flare Network to your Metamask wallet. Now you can explore and interact with the exciting developments happening on the Flare Network. Remember to exercise caution when participating in any projects and keep your wallet’s security measures up to date.
This guide is meant for informational purposes only and should not be considered financial or investment advice. Always do your own research and consult with a professional before making any investment decisions.
Guide to Add Flare Network to Metamask
If you’re looking to add Flare Network to your Metamask wallet, you’re in the right place. Follow the step-by-step guide below to get started:
Step 1: Install the Metamask Extension
If you haven’t already, install the Metamask extension in your browser. You can find the extension by searching “Metamask” in your browser’s extension store.
Step 2: Create a New Wallet or Import an Existing One

Once Metamask is installed, open the extension and follow the prompts to create a new wallet or import an existing one. Make sure to secure your wallet with a strong password and keep your seed phrase in a safe place.
Step 3: Open Metamask Settings
In the Metamask extension, click on the account avatar in the top right corner and select “Settings” from the dropdown menu.
Step 4: Network Configuration
In the settings menu, select the “Networks” tab. Then, scroll down to the bottom of the page and click on the “Add Network” button.
Step 5: Fill in Flare Network Details
In the “Add Network” form, enter the following details for Flare Network:
| Network Name | Flare Network |
| New RPC URL | https://flare.flare.network |
| Chain ID | 16 |
| Symbol | FLR |
| Block Explorer URL | https://explorer.flare.network |
Make sure to double-check the details before clicking the “Save” button.
Step 6: Switch to Flare Network
Once you’ve saved the Flare Network details, go back to the Metamask extension and click on the account avatar again. This time, select “Network” from the dropdown menu and choose “Flare Network” from the list.
Step 7: You’re Done!

Congratulations! You have successfully added the Flare Network to your Metamask wallet. You can now use it to interact with FLR tokens and other Flare Network applications.
Remember to always exercise caution when dealing with cryptocurrencies and make sure to double-check addresses and transactions before proceeding.
Step 1: Install and Open Metamask
Metamask is a browser extension that allows you to interact with the blockchain. To get started, you’ll need to install the Metamask extension on your browser.
Installing Metamask
To install Metamask, follow these steps:
- Open your favorite web browser and go to the Metamask website.
- Click on the “Get Chrome Extension” button if you’re using Google Chrome, or “Get Firefox Extension” if you’re using Mozilla Firefox.
- Follow the instructions on the screen to add the extension to your browser.
- Once the installation is complete, you should see the Metamask icon in your browser’s toolbar.
Opening Metamask
Now that you have Metamask installed, you can open it by clicking on the Metamask icon in your browser’s toolbar.
If this is your first time opening Metamask, you’ll need to create a new account. Follow the on-screen instructions to set up a password and backup your seed phrase. Make sure to store your seed phrase in a safe place as it’s the only way to recover your account if you lose access to it.
Once you’ve created your account, you can log in to Metamask using your password or your seed phrase.
Congratulations! You have now installed and opened Metamask.
Step 2: Access Metamask Settings
In order to add Flare Network to your Metamask wallet, you first need to access the settings of your Metamask extension. Here are the steps:
- Open your web browser and click on the Metamask extension icon located in the upper right corner of the browser toolbar. The icon looks like a fox head.
- A small pop-up window will appear. Click on the “Settings” option at the bottom of the window.
- This will open the Metamask settings page. Here, you will find various options and features that you can customize.
- Scroll down until you find the “Networks” section. This is where you can add and manage networks in your wallet.
- Click on the “Add Network” button to add a new network.
Now that you have accessed the settings of your Metamask wallet, you are ready to proceed to the next step, which is adding the Flare Network to your wallet.
Step 3: Add Flare Network Custom RPC
After installing the MetaMask extension and creating your wallet, it’s time to add the Flare Network as a custom RPC (Remote Procedure Call) to MetaMask.
Follow the steps below to add Flare Network to MetaMask:
Step 1: Open MetaMask
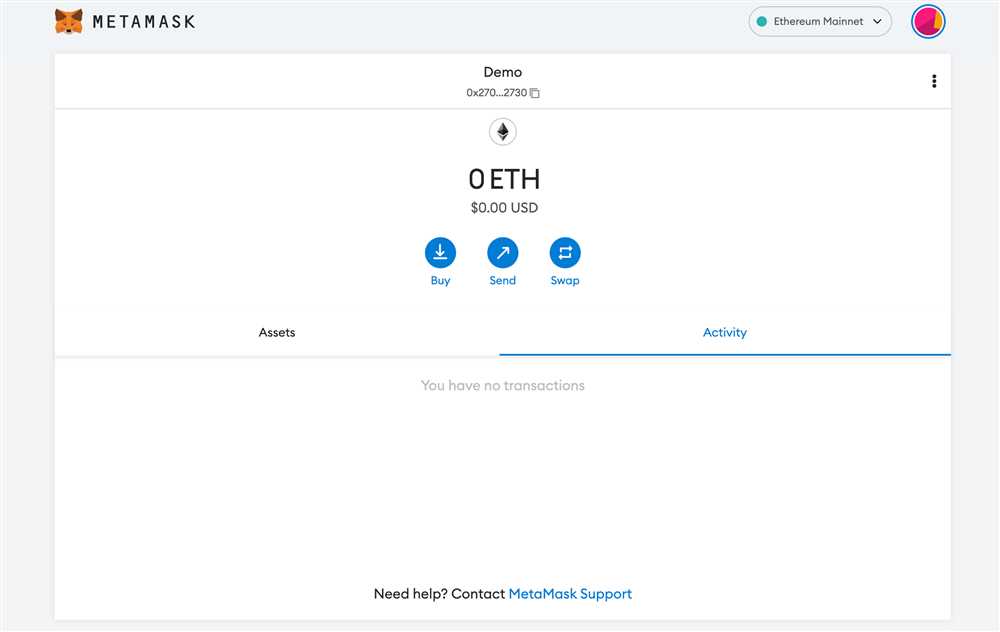
Open your MetaMask wallet by clicking on the extension icon in your browser toolbar. If you’re using a mobile device, open the MetaMask app.
Step 2: Switch to Custom RPC
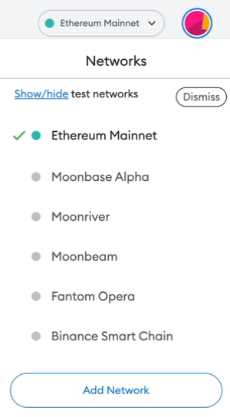
In the MetaMask wallet, click on the network selection dropdown. It is usually displayed as the Ethereum mainnet or whatever network you are currently connected to. In the dropdown, select “Custom RPC” to switch to the custom network configuration.
Step 3: Fill in Network Details
In the “Custom RPC” section, fill in the following details for the Flare Network:
| Network Name | Flare Network |
|---|---|
| New RPC URL | https://flare.finexus.io |
| ChainID | 16 (Flare Network Mainnet) |
| Symbol | FLR |
| Block Explorer URL | https://flarescan.com |
Once you have filled in the details, click on the “Save” button to add the Flare Network as a custom RPC in MetaMask.
Congratulations! You have successfully added the Flare Network to your MetaMask wallet.
Step 4: Connect Metamask with Flare Network
Now that you have installed the necessary browser extension and added the Flare Network to your Metamask wallet, it’s time to connect Metamask with the Flare Network. Here’s how you can do it:
Step 1: Open your Metamask wallet by clicking on the extension icon in your browser toolbar.
Step 2: In the Metamask wallet popup, click on the network dropdown menu, which is usually set to “Main Ethereum Network” by default.
Step 3: Scroll down and click on the “Custom RPC” option.
Step 4: In the “New RPC URL” field, enter the Flare Network’s RPC URL: https://rpc.flare.network.
Step 5: In the “Network Name” field, enter a name for the Flare Network, for example, “Flare Network” or “FLR Network”.
Step 6: In the “Currency Symbol” field, enter the symbol for the Flare Network’s native currency, which is “FLR”.
Step 7: In the “Chain ID” field, enter the Flare Network’s chain ID, which is 16.
Step 8: Optionally, you can also upload an icon for the Flare Network by clicking on the square icon next to the “Network Name” field and uploading an image file.
Step 9: Click on the “Save” button to add the Flare Network to your Metamask wallet.
That’s it! You have successfully connected your Metamask wallet with the Flare Network. Now you can start using your Metamask wallet to interact with Flare Network dApps and smart contracts.
Frequently Asked Questions:
What is Flare Network?
Flare Network is a blockchain network that aims to bring smart contract functionality to different blockchain platforms, starting with the integration of Ethereum. It allows the use of Ethereum-based assets on the Flare Network and enables interoperability between different blockchain networks.
Can I use Ethereum-based assets on Flare Network?
Yes, you can use Ethereum-based assets on Flare Network. Flare Network integrates with Ethereum’s Virtual Machine, allowing the use of Ethereum smart contracts and assets on the Flare Network. This provides more opportunities for developers and users to interact with Ethereum-based assets on the Flare Network.
What are the benefits of adding Flare Network to Metamask?
Adding Flare Network to Metamask allows you to access and interact with the Flare Network directly from your Metamask wallet. This opens up opportunities for using Ethereum-based assets on the Flare Network and taking advantage of the smart contract functionality provided by Flare Network. It also enables interoperability between different blockchain networks, providing more flexibility and options for decentralized applications and users.
+ There are no comments
Add yours