


Welcome to our step-by-step guide on using Cronos with Metamask! In this guide, we will walk you through the process of setting up and using Cronos, a Layer 2 solution, with Metamask, a popular Ethereum wallet extension.
Cronos is a sidechain of Ethereum that aims to provide faster and cheaper transactions, making it a viable solution for users who want to avoid high fees on the Ethereum mainnet. Metamask, on the other hand, is a browser extension that allows you to interact with Ethereum and its various networks.
To get started, make sure you have Metamask installed in your browser. If you don’t have it yet, you can download it from the official Metamask website or directly from your browser’s extension store. Once you have Metamask installed, follow these steps:
Step 1: Open Metamask and create a new wallet or import an existing one. Make sure you have some ETH in your wallet to use for transactions on Cronos. Don’t worry if you don’t have any ETH, as you can use the Ethereum Rinkeby test network to get some for free.
Step 2: Click on the network dropdown in Metamask and select “Custom RPC”. In the settings, enter the following RPC URL for Cronos: [insert Cronos RPC URL here]. Make sure you give it a name (e.g. Cronos Testnet) to easily identify it later.
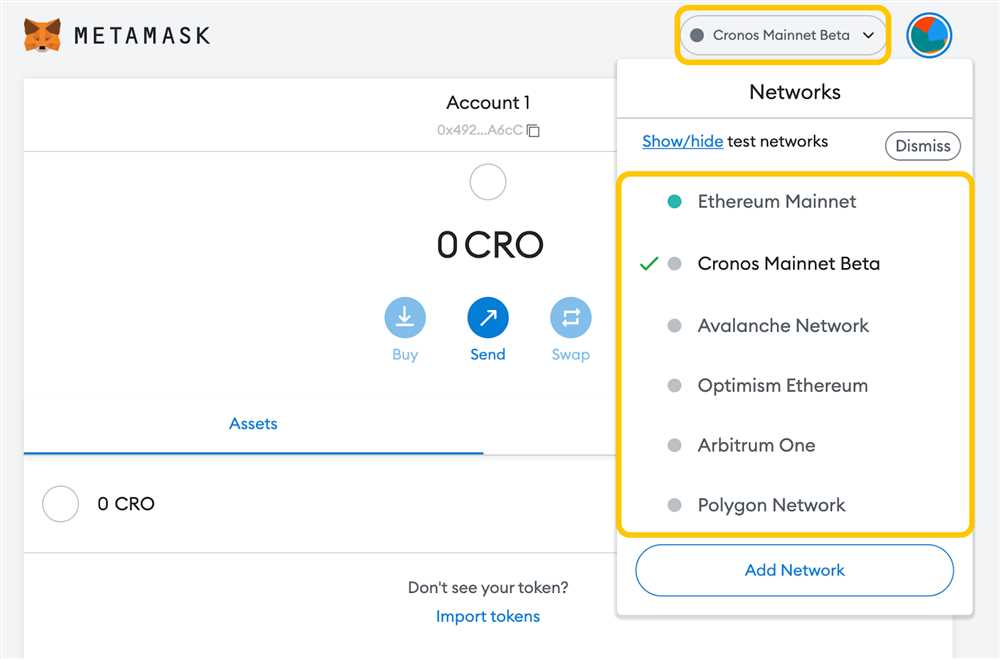
Step 3: Once you have added the Cronos network, you can switch to it by selecting it from the network dropdown. You will now be connected to Cronos and ready to use it for transactions.
Step 4: To interact with dApps on Cronos, make sure you are on the correct network in Metamask. Many dApps have a dropdown to select the network, so choose Cronos Testnet if available. You can now use Metamask as you would on the Ethereum mainnet, but with the benefits of Cronos’ faster and cheaper transactions.
Congratulations! You have successfully set up and connected Metamask to Cronos. You are now ready to explore the world of decentralized applications on Cronos and enjoy its fast and affordable transactions. Happy exploring!
Step-by-Step Guide: Setting up Metamask and Cronos
Metamask and Cronos are two important tools for working with the Cronos network. Follow the steps below to set them up and start using them:
Step 1: Install Metamask

Metamask is a browser extension that allows you to interact with the Cronos network. To install Metamask:
- Open your preferred web browser.
- Go to the Metamask website.
- Click on the “Get Chrome Extension” button.
- Follow the prompts to add the extension to your browser.
Step 2: Create a Metamask Wallet
Once Metamask is installed, follow these steps to create a new wallet:
- Click on the Metamask extension icon in your browser.
- Click on the “Create a Wallet” button.
- Follow the prompts to set a strong password and back up your wallet.
- Once you have completed the setup, you will see your new wallet address.
Step 3: Connect Metamask to Cronos
After creating a wallet, you need to connect Metamask to the Cronos network:
- Open Metamask by clicking on the extension icon in your browser.
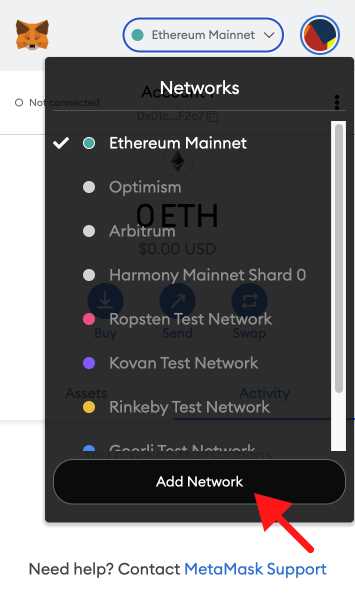
- Click on the network dropdown (typically set to “Ethereum Mainnet”).
- Scroll down and click on “Custom RPC”.
- In the “RPC URL” field, enter the Cronos network RPC URL: https://cronos.heimdall.gaia.staging.vitwit.com.
- Click on the “Save” button.
Step 4: Add Cronos Token to Metamask
To add the Cronos token to Metamask:
- Open Metamask and make sure you are connected to the Cronos network.
- Click on the “Add Token” button.
- Click on the “Custom Token” tab.
- Enter the Cronos token contract address: [Cronos Token Contract Address].
- Click on the “Next” button and then “Add Tokens”.
Congratulations! You have successfully set up Metamask and connected it to the Cronos network. You are now ready to start using Cronos for your blockchain development tasks.
Note: Make sure to secure your Metamask wallet by keeping your password and recovery phrase safe. Be cautious when interacting with smart contracts and transferring funds.
Disclaimer: The information provided in this guide is for educational purposes only and should not be considered financial or investment advice. Always do your own research and exercise caution when handling cryptocurrencies.
Installing Metamask
In order to use Cronos with Metamask, you will first need to install the Metamask browser extension. Metamask is a digital wallet that allows you to interact with dApps on the Ethereum network, including Cronos.
Step 1: Download the Extension
Start by opening your preferred browser and navigating to the Metamask website. You can find it by doing a simple web search for “Metamask”. Once you are on the website, look for the “Download” button or link and click it.
Step 2: Add the Extension to Your Browser
After downloading the Metamask extension, it’s time to add it to your browser. The process may vary slightly depending on which browser you are using, but generally, you can find the extension in your browser’s settings or extensions menu. Look for something like “Extensions” or “Add-ons” and click on it.
Once you are in the extensions menu, you should see an option to “Add” or “Install” an extension. Click on that option and navigate to the location where you saved the downloaded Metamask extension. Select the file and the installation process should begin.
Step 3: Create a Metamask Account
Once the extension is added to your browser, you should see the Metamask icon in the top right corner of your browser window. Click on it to open Metamask.
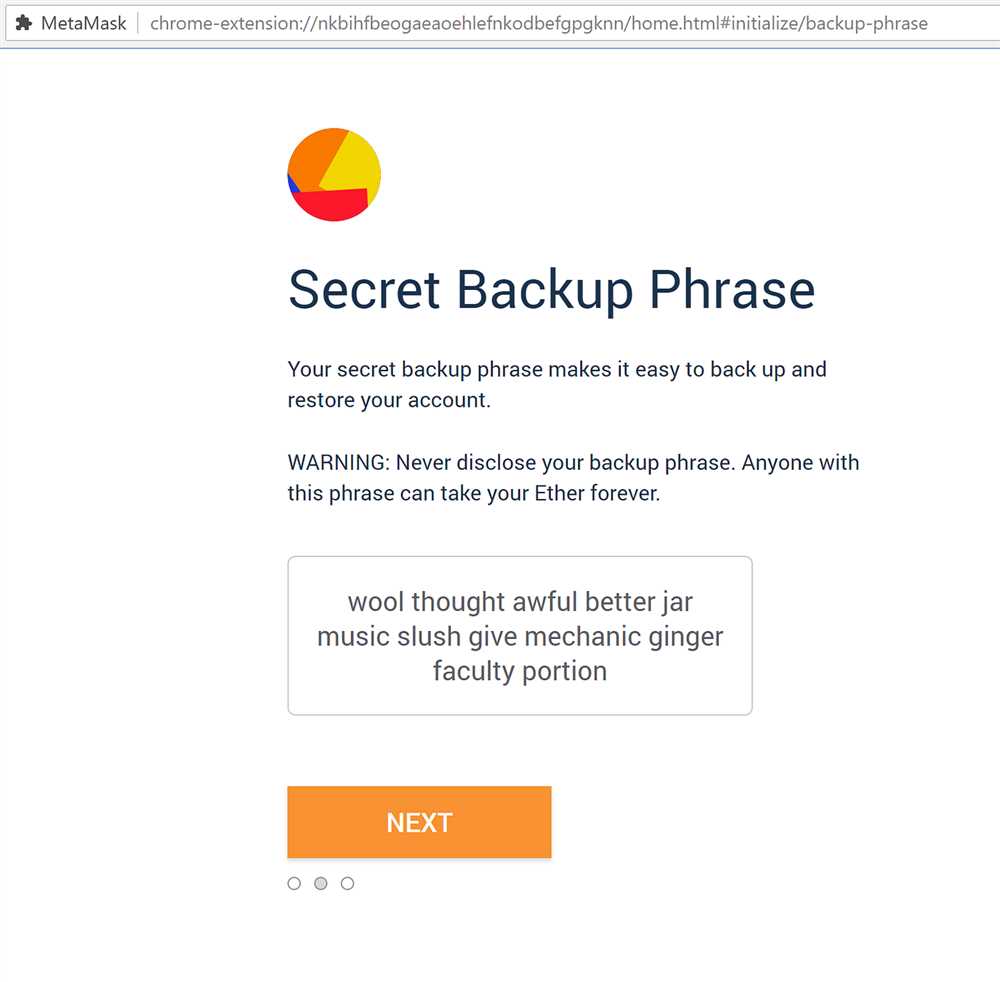
The first time you open Metamask, you will be prompted to create a new account. Follow the provided instructions to set up your account, including creating a strong password and securely storing your secret backup phrase. This backup phrase is important as it can be used to restore your account in case you lose access to your device.
Once you have set up your account, you will be directed to the Metamask dashboard. From here, you can manage your Ethereum accounts, view your transaction history, and interact with dApps like Cronos.
Connecting Metamask to Cronos
In order to interact with the Cronos network using your Metamask wallet, you need to connect Metamask to Cronos. Follow the steps below to connect your Metamask wallet to Cronos:
- Open Metamask: Ensure that you have the Metamask extension installed in your browser and open the extension to access your wallet.
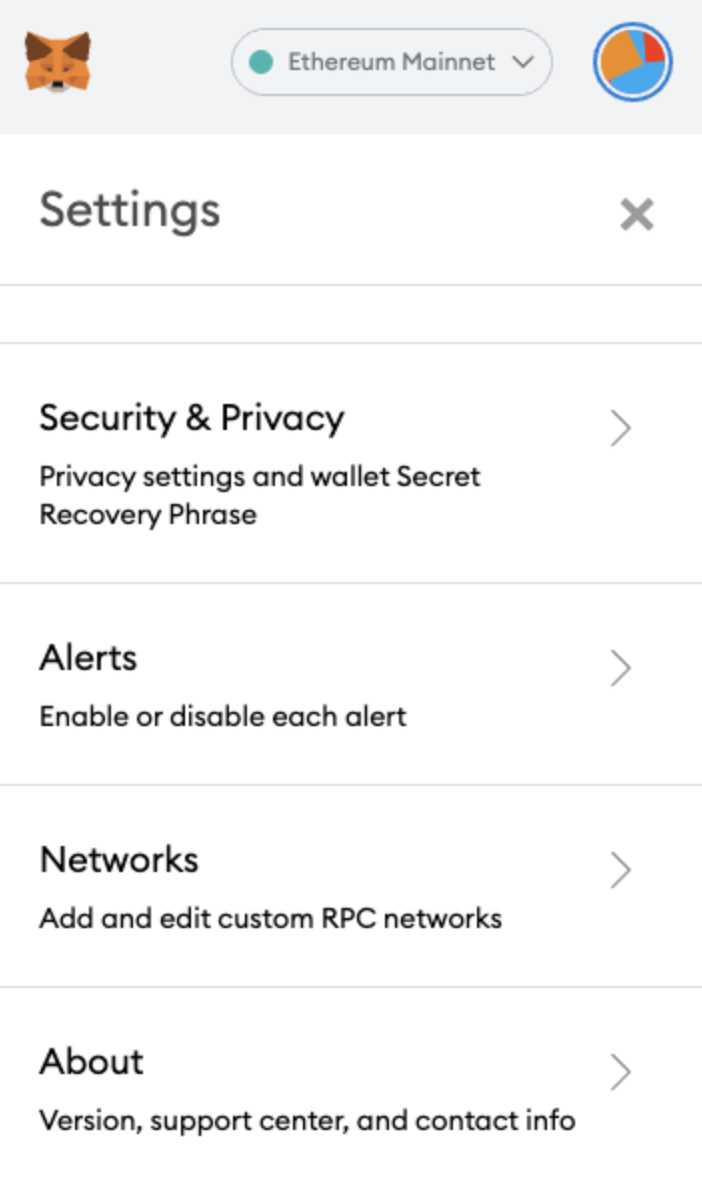
- Switch Network: On the Metamask interface, click on the network dropdown menu and select “Custom RPC” to add a custom network.
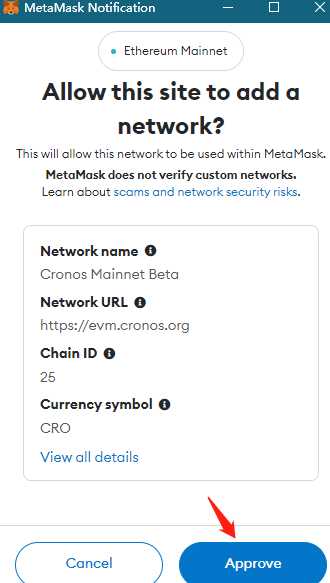
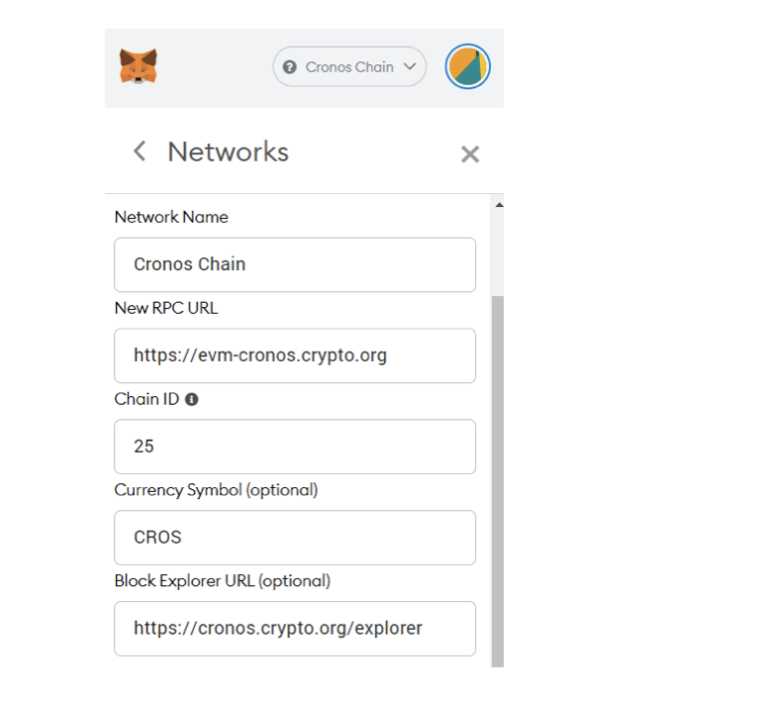
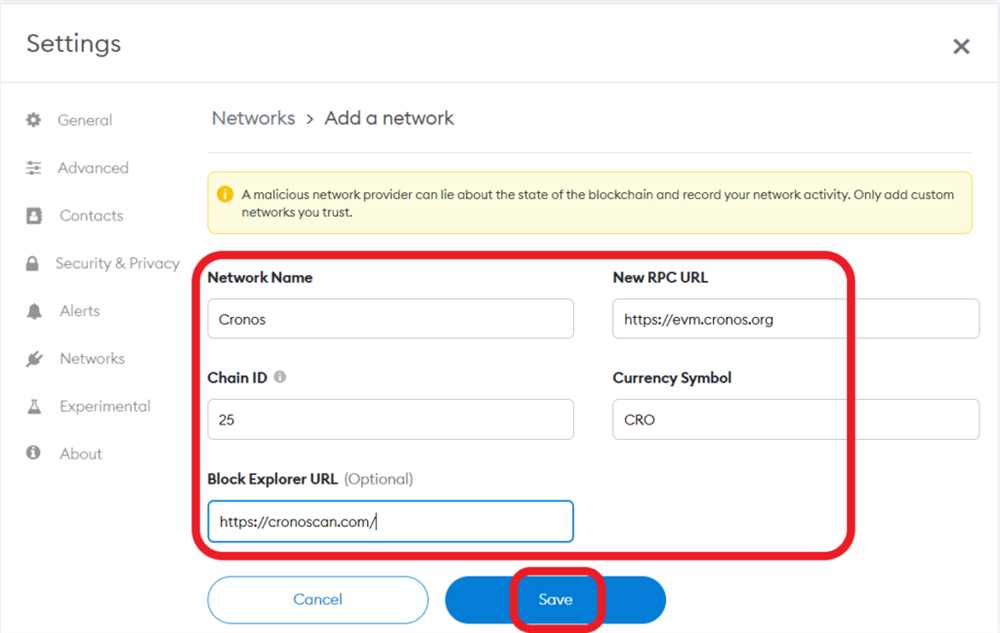
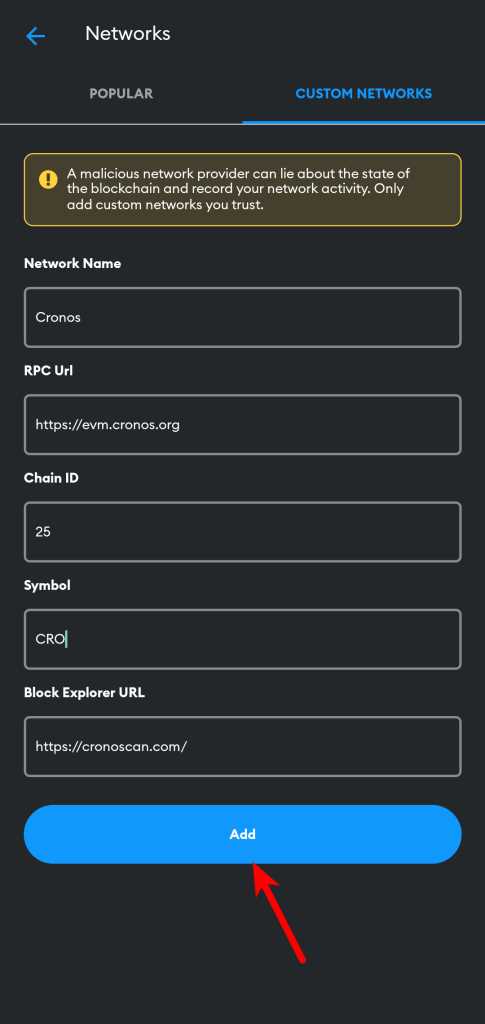
- Add Network Details: Fill in the following details to add the Cronos network:
- Network Name: Cronos
- New RPC URL: Enter the RPC URL for the Cronos network here
- Chain ID: Enter the Chain ID for the Cronos network here
- Currency Symbol: Enter the currency symbol for the Cronos network here
- Block Explorer URL: Enter the block explorer URL for the Cronos network here (optional)
- Save Network: Click on the “Save” button to add the Cronos network to your Metamask wallet.
- Switch to Cronos Network: Once the network is added, switch to the Cronos network by selecting it from the network dropdown menu.
- Import Account: If you already have a Cronos account, click on the Metamask extension and import your existing Cronos account by providing the account details.
- Create New Account: If you don’t have a Cronos account, click on the Metamask extension and create a new Cronos account by following the provided instructions.
Once you have connected your Metamask wallet to Cronos, you will be able to interact with the Cronos network and use your wallet to perform transactions and interact with smart contracts on Cronos.
Transferring Tokens on Cronos using Metamask
Once you have set up your Cronos network with Metamask, you can easily transfer tokens on the network. Here’s a step-by-step guide on how to do it:
- Open your Metamask wallet and make sure you are connected to the Cronos network.
- Click on the “Send” button to initiate a token transfer.
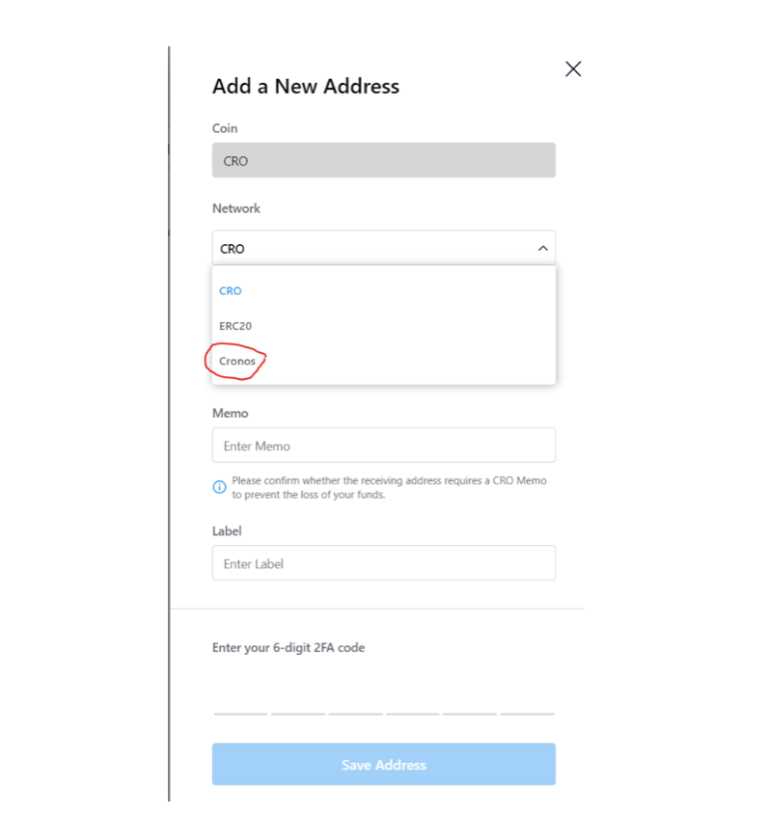
- Enter the recipient’s address in the “To” field. Make sure to double-check the address to avoid any mistakes.
- In the “Amount” field, enter the number of tokens you want to transfer.
- Select the token you want to transfer from the dropdown menu. If the token is not listed, you may need to add it as a custom token.
- Review the transaction details, including the gas fees. Make sure you have enough funds to cover the fees.
- Click on the “Next” button to proceed with the transfer.
- Confirm the transaction in Metamask by clicking on the “Confirm” button. You may need to enter your password or approve the transaction on your connected device.
- Wait for the transaction to be processed on the Cronos network. The recipient should receive the tokens shortly.
Please note that token transfers on Cronos may require gas fees, which are paid in native Cronos tokens. Make sure you have enough Cronos tokens in your wallet to cover the fees. Additionally, the transaction time may vary depending on network congestion.
| Step | Description |
|---|---|
| 1 | Open Metamask and connect to Cronos network. |
| 2 | Click on “Send” button. |
| 3 | Enter recipient’s address. |
| 4 | Enter number of tokens to transfer. |
| 5 | Select token from dropdown. |
| 6 | Review transaction details. |
| 7 | Click on “Next” button. |
| 8 | Confirm transaction in Metamask. |
| 9 | Wait for transaction to be processed. |
By following these steps, you’ll be able to transfer tokens on the Cronos network using Metamask easily. Always double-check the recipient’s address and confirm the transaction details before proceeding. Happy token transfers!
Frequently Asked Questions:
What is Cronos?
Cronos is a layer 2 scaling solution for Ethereum that is built by Crypto.com. It aims to provide faster and cheaper transactions for users by leveraging its own proof-of-authority (PoA) blockchain and bridging assets from Ethereum to Cronos.
+ There are no comments
Add yours