


Welcome to our step-by-step guide on integrating Cronos Network with Metamask! If you’re looking to harness the full potential of Cronos Network and use it with Metamask, you’ve come to the right place. With this guide, we’ll walk you through the entire process, making it easy for you to get started and begin exploring all that Cronos has to offer.
Why integrate Cronos Network with Metamask?
Cronos Network is a revolutionary blockchain platform that offers fast and scalable transactions, making it ideal for decentralized applications (dApps) and smart contracts. By integrating Cronos Network with Metamask, a popular Ethereum wallet and browser extension, you can easily access and interact with Cronos Network’s features, enabling a seamless experience for managing your assets and participating in the Cronos ecosystem.
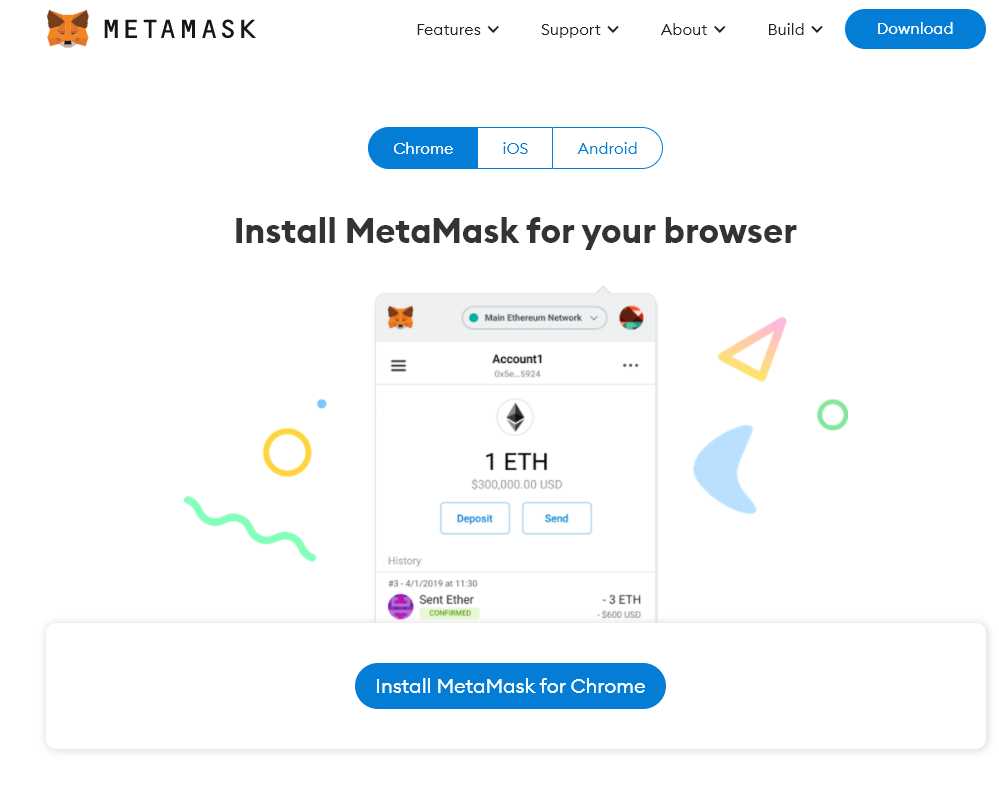
Step 1: Install Metamask
If you haven’t already, the first step is to install Metamask. Visit the official Metamask website (https://metamask.io/) and follow the instructions to download and install the Metamask extension for your web browser of choice. Once installed, create a new account or import an existing one if you already have a Metamask wallet.
Step 2: Configure Metamask for Cronos Network
With Metamask installed, you’ll need to configure it to work with Cronos Network. Open Metamask and click on the network dropdown, then select “Custom RPC” from the options. In the “New RPC URL” field, enter the Cronos Network RPC URL: https://cronos-testnet.crypto.org:8545. Fill in a name for the network, such as “Cronos Testnet”, and click “Save”.
Step 3: Connect Metamask to Cronos Network
Now that Metamask is configured for Cronos Network, you’ll need to connect it to the network. In Metamask, click on the network dropdown and select the Cronos Network you just added. Metamask will now be connected to Cronos, and you’ll be able to view your Cronos account balance, send and receive CRON tokens, interact with dApps on Cronos, and more.
Step 4: Explore Cronos Network
With Metamask successfully integrated with Cronos Network, it’s time to start exploring all that Cronos has to offer. Discover different dApps built on Cronos, participate in token swaps and liquidity pools, and experience the fast and low-cost transactions that Cronos provides. The possibilities are endless, and with Metamask as your gateway, you’ll have a seamless and user-friendly experience on the Cronos Network.
That concludes our step-by-step guide on integrating Cronos Network with Metamask. By following these simple steps, you’ll be well on your way to harnessing the power of Cronos and enjoying all the benefits it brings. Happy exploring! Disclaimer: Make sure to exercise caution and do your own research before engaging with any dApps or transactions on Cronos Network.
Getting Started with Cronos Network
Welcome to this step-by-step guide on how to get started with Cronos Network! Cronos Network is a powerful blockchain network that aims to provide fast and efficient transactions for the Ethereum ecosystem. By integrating with Metamask, you can easily access Cronos Network and take advantage of its features.
To get started, you need to have Metamask installed on your browser. If you don’t have it, you can download and install it from the official Metamask website. Once you have Metamask installed, follow the instructions below to integrate it with Cronos Network:
1. Open Metamask and click on the account icon in the top right corner of the screen.
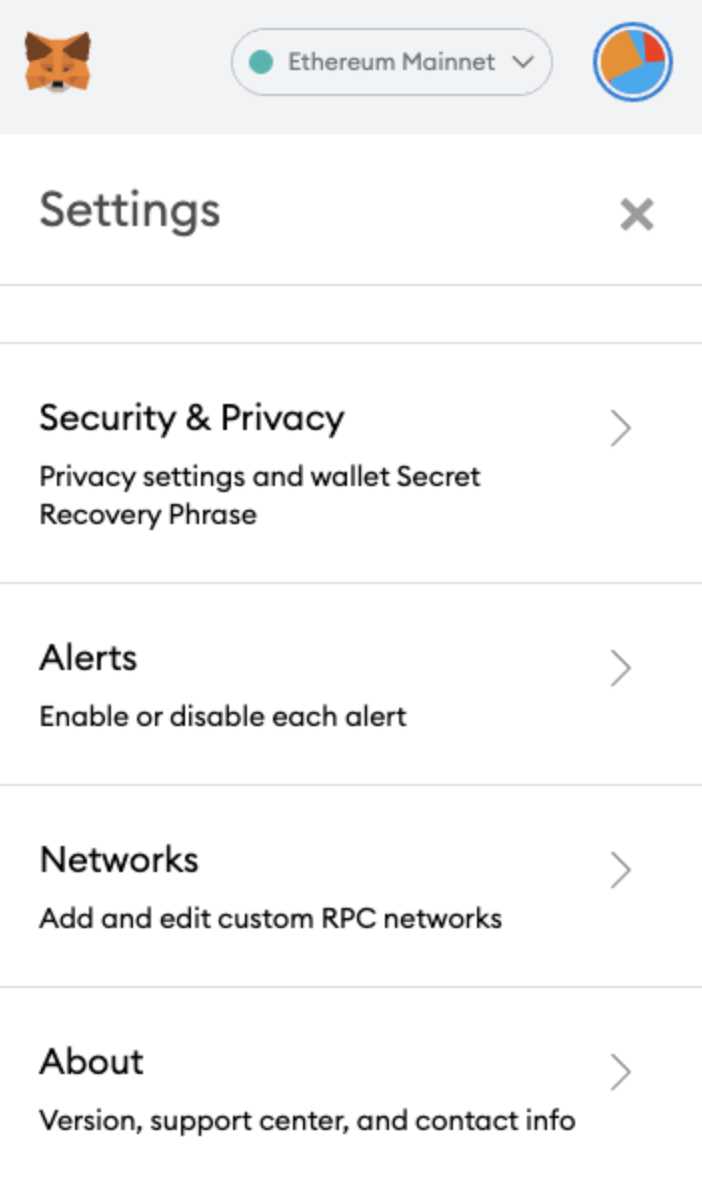
2. Click on “Settings” and then select the “Networks” tab.
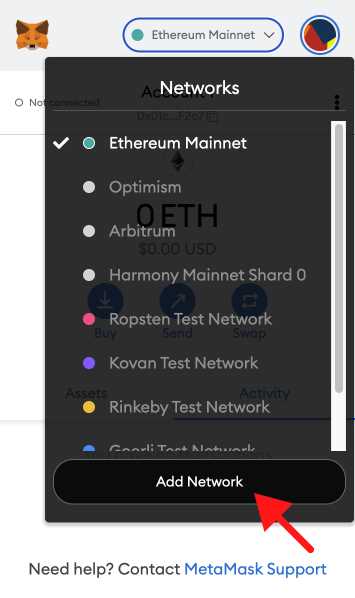
3. Scroll down and click on “Add Network”.
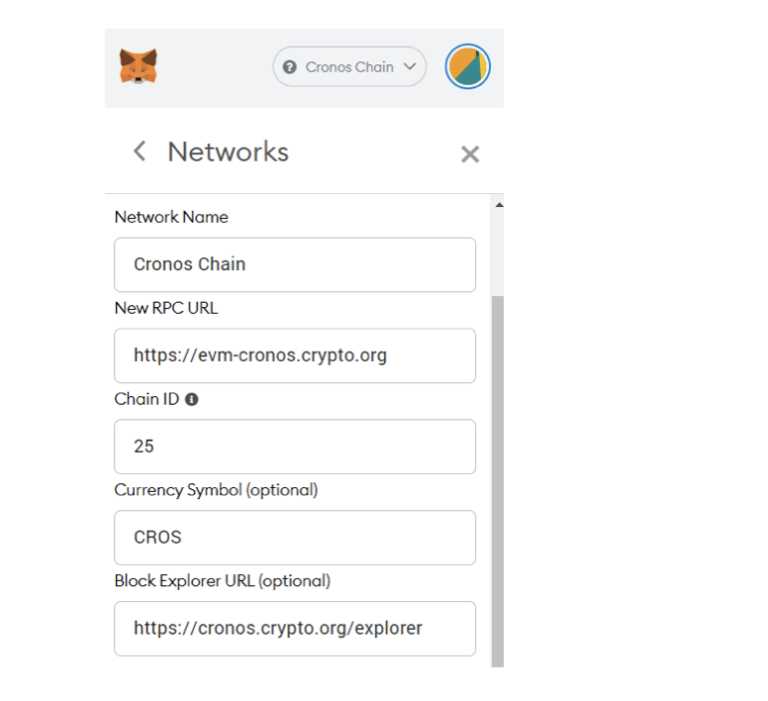
4. In the “Network Name” field, enter “Cronos Network”.
5. In the “New RPC URL” field, enter the RPC URL for Cronos Network. The RPC URL is typically provided by the Cronos Network documentation.
6. In the “Chain ID” field, enter the chain ID for Cronos Network. The chain ID is also specified by the Cronos Network documentation.
7. Click on “Save” to add Cronos Network to Metamask.
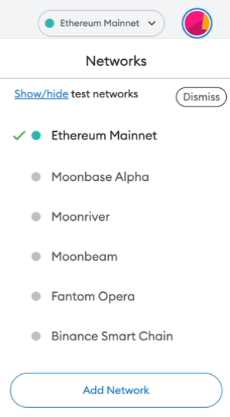
Once you have added Cronos Network to Metamask, you can switch between different networks by clicking on the network icon in the top right corner of the screen and selecting the desired network. Now you are ready to use Cronos Network with Metamask!
Remember to always double-check the RPC URL and chain ID provided by the Cronos Network documentation to ensure that you are connecting to the correct network. With Cronos Network integrated with Metamask, you can explore and leverage the capabilities of this powerful blockchain network.
Setting Up Metamask for Cronos Network Integration
In order to integrate Cronos Network with Metamask, you will first need to configure Metamask to recognize the Cronos Network. Follow the step-by-step guide below to set up Metamask for Cronos Network integration:
Step 1: Install Metamask
If you haven’t already, download and install Metamask from the official website. Metamask is a browser extension that allows you to interact with Ethereum-based applications.
Step 2: Create a Metamask Account
Once Metamask is installed, launch the extension and create a new account. This account will be used to interact with the Cronos Network.
Step 3: Configure the Network
- Click on the Metamask extension icon in your browser toolbar to open the Metamask window.
- Click on the account profile icon in the top right corner and select “Settings” from the dropdown menu.
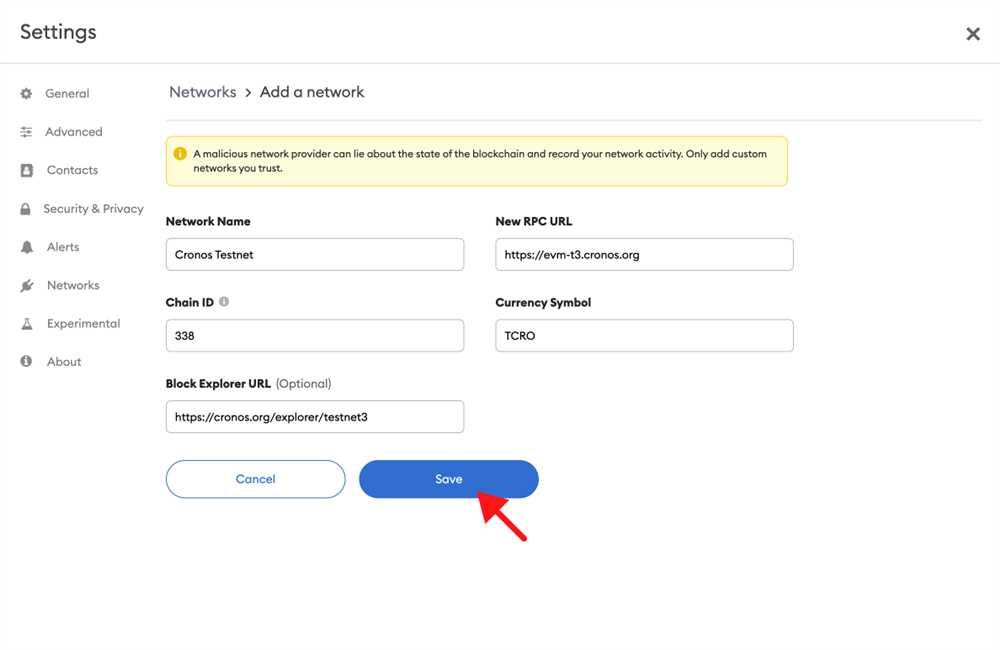
- In the “Settings” tab, scroll down to the “Networks” section and click on “Add Network”.
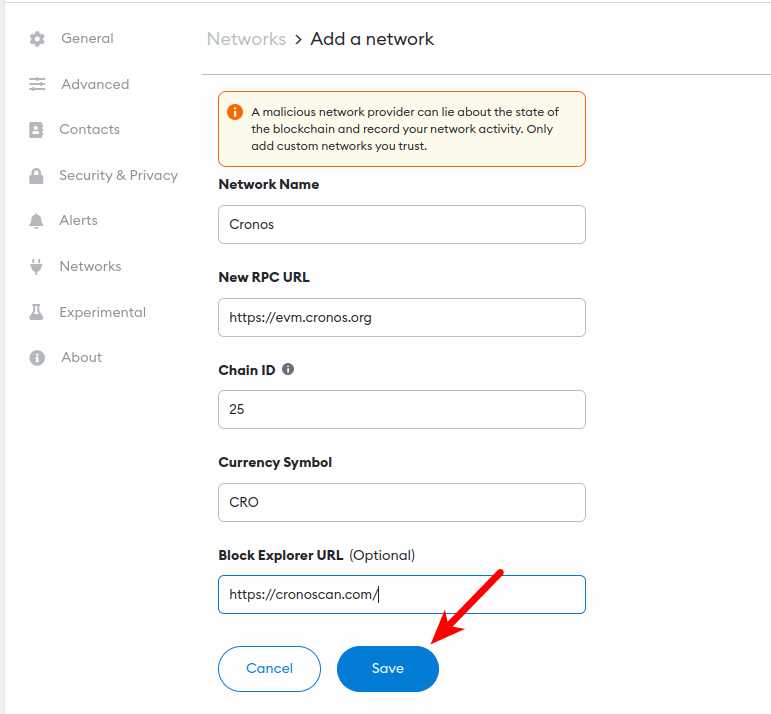
- Fill in the following details for the Cronos Network:
- Network Name: Cronos Network
- New RPC URL: Enter the RPC URL provided by Cronos Network
- Chain ID: Enter the Chain ID provided by Cronos Network
- Currency Symbol: Enter the currency symbol for the Cronos Network
- Click on “Save” to add the Cronos Network to Metamask.
Step 4: Switch to the Cronos Network

- Click on the account profile icon in the top right corner of the Metamask window.
- Select the newly created Cronos Network from the dropdown menu.
Once you have completed these steps, Metamask will be set up for Cronos Network integration. You can now use Metamask to interact with decentralized applications on the Cronos Network.
Integrating Cronos Network with Metamask
If you are interested in using Cronos Network, a layer 2 solution built on the Cosmos ecosystem, with Metamask, follow these step-by-step instructions to integrate Cronos Network with your Metamask wallet.
Step 1: Install the Metamask Extension
If you haven’t already, install the Metamask extension on your preferred web browser. You can find the extension in the browser’s extension store or by visiting the official Metamask website.
Step 2: Create a Metamask Account
After installing the Metamask extension, open it and create a new account by following the on-screen instructions. Make sure to securely backup your wallet seed phrase. This will be important for later steps.
Step 3: Switch to the Cronos Network
Open Metamask and click on the network selection dropdown menu. Scroll down to the “Custom RPC” option and click on it. In the RPC URL field, enter “https://cronos.cosmos.network” and give the network a name, such as “Cronos Mainnet”. Press the “Save” button to switch to the Cronos Network.
Step 4: Add Cronos Tokens
To interact with Cronos Network’s tokens, you need to add them to your Metamask wallet. Open Metamask and click on the “Add Token” button. In the “Token Contract Address” field, enter the address of the token you want to add. You can find the token addresses on the official Cronos Network website or through other reliable sources. Once you’ve entered the token address, Metamask will automatically fill in the remaining fields. Click on the “Next” button and then on the “Add Tokens” button to add the token to your wallet.
Step 5: Interact with Cronos DApps

Now that you have successfully integrated Cronos Network with Metamask, you can start interacting with Cronos DApps. Simply visit a DApp built on Cronos Network and connect your Metamask wallet. You’ll be able to perform transactions and access the features offered by the DApp with the security and convenience of your Metamask wallet.
By following these simple steps, you can easily integrate Cronos Network with Metamask and enjoy the benefits of the Cronos ecosystem. Happy exploring!
Testing and Troubleshooting the Integration
After successfully integrating Cronos Network with Metamask, it’s important to thoroughly test the integration to ensure everything is functioning as expected. Here are some steps to follow for testing and troubleshooting:
1. Connect Metamask to Cronos Network:
Make sure that you have correctly connected Metamask to the Cronos Network. You can do this by checking the network settings in Metamask and ensuring that it is set to connect to the Cronos Network.
2. Test basic functions:
Start by testing basic functions, such as sending transactions and interacting with contracts on the Cronos Network. This will help verify that the integration is working properly and that you can successfully interact with Cronos Network using Metamask.
3. Test advanced features:
If your integration includes advanced features, such as staking or delegating tokens on Cronos Network, be sure to thoroughly test these features. Pay close attention to any specific requirements or restrictions for these features, and ensure they are correctly implemented in your integration.
4. Check for errors or issues:
If you encounter any errors or issues during testing, carefully review any error messages or logs to identify the cause of the problem. Check for any potential misconfigurations or oversights in the integration. You may also need to consult the documentation or seek support from the Cronos Network or Metamask communities to troubleshoot and resolve any issues.
5. Perform comprehensive testing:
In addition to testing specific functions and features, it’s important to perform comprehensive testing of your integration. This includes testing various scenarios, edge cases, and combinations of features to ensure your integration is robust and reliable.
6. Seek feedback:
Once you have completed testing and resolved any issues, consider seeking feedback from users or other developers to ensure your integration meets their needs and expectations. This can help identify any additional improvements or refinements that may be necessary.
Conclusion
Testing and troubleshooting the integration between Cronos Network and Metamask is crucial to ensure a smooth and seamless user experience. By following these steps and diligently addressing any issues that arise, you can ensure that your integration is reliable and effective.
Frequently Asked Questions:
What is Cronos Network?
Cronos Network is a Layer 2 scaling solution developed by Crypto.com. It is built on top of the Ethereum network and aims to provide faster and cheaper transactions.

+ There are no comments
Add yours